Friday 28 June 2019

Paruppu Keerai | Sirukeerai Paruppu Kadayal | Sirukeerai Paruppu Masiyal | Quick Spinach Dal Recipe


This preparation used to be the only spinach dish that I liked when I was a child. And still this remains my favourite. I basically never liked spinach and that's the reason I loved this recipe. It masks the taste of the spinach to a good extent with the tur dal in it. And it's a one pot recipe, so it saves a lot of time on a busy day morning provided you can cleaned spinach ready :) If you are in Tamil Nadu, then there is no dearth to the varieties of spinach that you can get. And this recipe tastes great with Sirukeerai, pasalai keerai (Malabar spinach), paruppu keerai and palak as well. 

If you would like to peek into my other spinach recipes, then here they are - Cheera Parippu CurryCheera Thalippu, Cheera Thoran, Vallarai keerai PoriyalChembila MezhukkupurattiChembin Thandu Parippu Curry & Palak Paneer


Serves: 3-4 persons


I Took: 

Preparation Time: 10 mins

Cooking Time:  mins


I Used:


Keerai/Spinach - 1 ½ cup - chopped
Tur Dal - ½ cup
Tomato - 2 medium sized ones
Green Chilly - 3-4 long ones
Garlic - 4-5 pods
Tamarind (optional) - A blueberry sized
Turmeric Powder - ¼ tsp
Asafoetida - ¼ tsp
Salt - As Needed


To Temper:

Oil - 1-2 tbsp
Onion Vadagam (refer notes) - 1 tbsp
Mustard - 1 tsp
Red Chilly - 1-2 nos - broken

The Way:


1. Rinse the tur dal 3-4 times with water. Then add around 2 cups of water and soak it for 20-30 minutes

2. Meanwhile, rinse the spinach leaves (refer notes) in water 2-3 times so as to remove the dirt and mud from it. You can use the leaves and the tender stem. This recipe is best suited for Sirukeerai, pasalai keerai (Malabar spinach), paruppu keerai and palak 

3. Then chop the spinach leaves and keep aside

4. Roughly chop the tomatoes as well. Peel the skin of the garlic and slit the green chillies and keep


5. Now take the soaked tur dal along with the soaked water in a pressure cooker. Add turmeric powder, asafoetida, chopped tomatoes, garlic, green chilly and tamarind to it. Addition of tamarind is optional. If the tomatoes are tangy enough then you can skip tamarind

6. Pressure cook the dal for 2 whistles on high and then 3-4 whistles on simmer

7. Then switch off the flame and allow the pressure to release naturally

8. Once the pressure is released, open the cooker. Check how much water (or stock) is there. If you have more than a quarter cup of water then take them out onto a glass or container and keep aside. This is done because it is difficult to mash the gravy to a smooth consistency is more liquid is present

9. Then mash the dal-spinach using a masher so that the gravy becomes smooth. Now you can add the stock that you have kept aside, depending on the consistency of the gravy that you need


10. In a tadka pan, heat oil. Splutter the onion vadagam. If you do not have the vadagam, you can make a tadka using mustard seeds & red chilly. You can add sliced shallots too in the tadka if you like

11. Now add this tadka to the dal and mash it again and mix it well


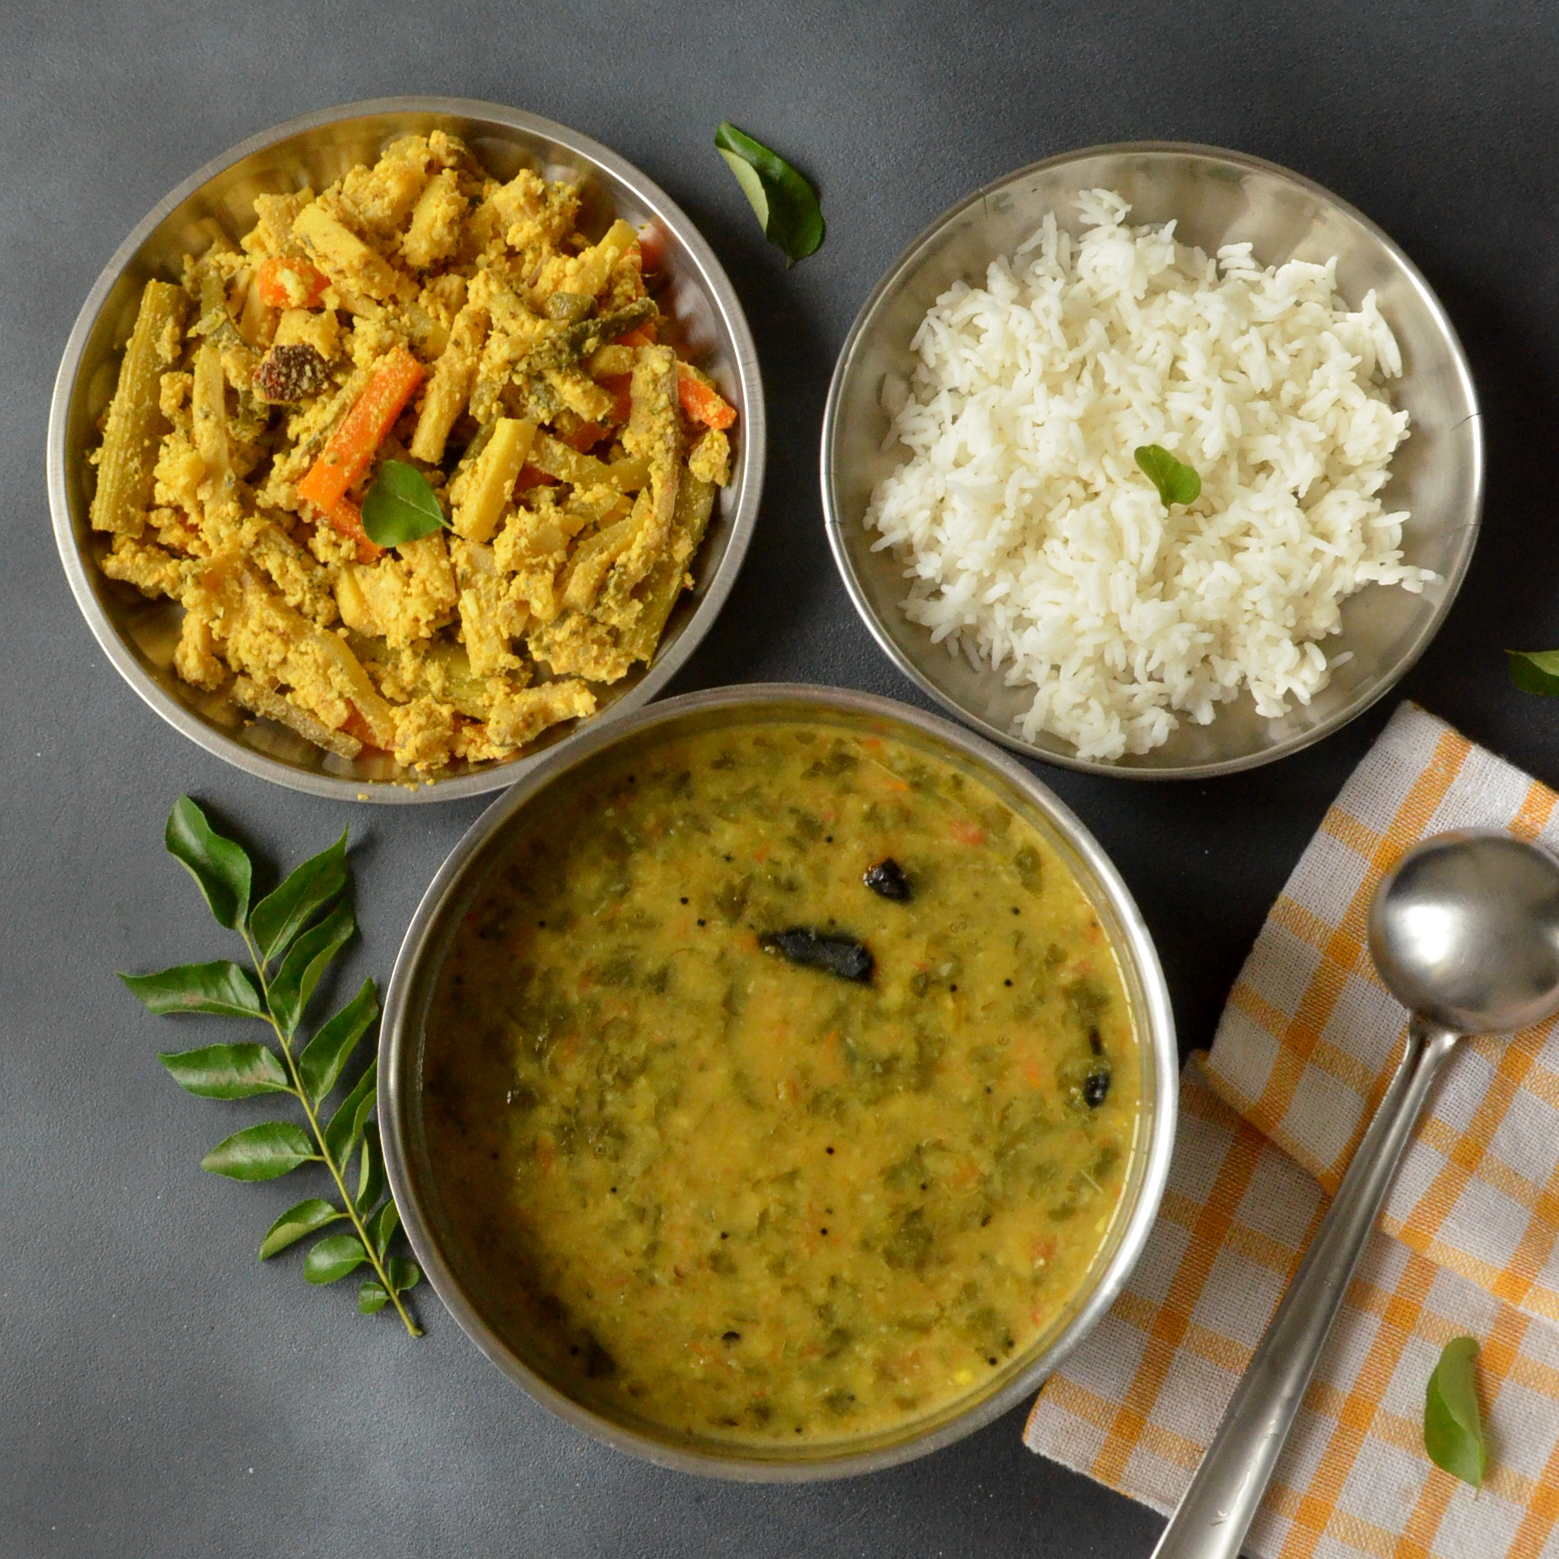
Serve with rice and a stir fry of choice. I usually like to pair it with yam fry, plantain fry or beetroot thoran

Notes:

  • This gravy will taste yummiest when made with siru keerai, pasalai keerai (Malabar spinach), paruppu keerai and also palak
  • After buying the spinach, clean them properly. Remove any leaves that have turned yellow or starting to turn yellow. Also discard the leaves that are infested with pests or have small holes or white coloured formation in them. Also use only the tender stalks
  • I use onion vadagam for tempering. If not available you can make a tadka of mustard, red chilly and shallots
Cheers,
Chitz

Friday 21 June 2019

Vallarai Keerai Poriyal | Brahmi Leaves Thoran | Pennywort Stir Fry


Now that we have shifted our base back to Chennai, I am able to buy and cook some native veggies and greens :) Vallarai Keerai is one such green that I have not seen even once in Pune. So last week when I saw some in the local market, I immediately grabbed a bunch. When I bought them I thought that they are used to make dosas but when I checked with my mom it turned out that the greens used for making dosa is 'Mudakkathan Keerai' and not this. And she told me the recipe to make this poriyal. She said that this Vallarai Keerai (Brahmi) is bitter and hence to make it into an appeasing poriyal you need to add some supporting ingredients like tomato, dal and coconut. 

This is how it looks :)

Generally when we make keerai (greens) poriyal we do not add any of them . Just plain saute of onions and chillies and then the spinach. And as she said, when I tasted the poriyal before adding dal and coconut it was very bitter. But once it was done, it tasted yum and there was only a very faint bitterness to it that even my little one relished it :) And also this leaves are very good for our brain, so if you get hold of some Vallarai Keerai, do buy and make them, now that you have a fool proof recipe :) Also let me know how it turned out..

My other keerai recipes are - Cheera Parippu CurryCheera ThalippuCheera Thoran, Sirukeerai Paruppu MasiyalChembila MezhukkupurattiChembin Thandu Parippu Curry & Palak Paneer


Serves: 4-5 persons


I Took: 

Preparation Time: 15 mins

Cooking Time: 25 mins


I Used:


Vallara Keerai (Brahmi)-2 cups
Sesame oil-1 tbsp
Mustard-¼ tsp
Green Chilly-3 nos (slit)
Asafoetida-¼ tsp
Onion (chopped)-½ cup
Tomato (chopped)-½ cup
Tur Dal (or Mung Dal)-2 tbsp
Grated Coconut-2 tbsp


The Way:


1. Take the tur dal (or moong dal) in a bowl. Rinse well in water. Then soak the dal in ¼  cup of water for 15-20 minutes

2. Once soaked, add a little salt (not much coz we will be adding in the poriyal as well) and cook them till done. First keep the flame in high till the water boils and then simmer and cook covered till done. The dal should not turn mushy. They should be cooked and retain their shape. It should take around 8-10 minutes for them to get cooked

3. Meanwhile clean and keep the greens (keerai). Remove old or wilted or yellow coloured leaves. The stem is edible too. If the stem is clean and tender use it as well

4. Rinse the greens (keerai) in water 2-3 times to remove the dirt and mud particles. Then drain the water and chop them finely and keep aside

5. Chop the onions and tomatoes and keep aside

6. In a pan, heat sesame oil. Use sesame oil for this stir fry. It is highly recommended. If you do not have it replace with sunflower or coconut oil

7. Splutter mustard


8. Add the chopped onions and slit green chillies and saute

9. The onions should turn translucent and slightly start to turn colour

10. Then add asafoetida and turmeric powder. give a quick saute

11. Add the chopped tomatoes and give a nice saute. Maybe you can close and cook for 2 minutes till the tomatoes slowly start to turn mushy


12. Add the chopped greens and give a nice stir. Cover and cook for 5-6 minute till the leaves wilt and get cooked. Check in between to see that they do not get stuck at the bottom and saute to avoid that


13. Once the greens are cooked, add the cooked tur dal (or moong dal) and give a gentle stir and leave it for a minute

14. Then add the grated coconut and give a quick and gentle stir

15. Switch off flame and serve with rice and a gravy of choice


Cheers,
Chitz

Mango Chia Seed Pudding | Chia Mango Pudding | Mango Chia Pudding Recipe


This is one dish that regularly makes it's appearance during summer. I love chia pudding and that too only with mangoes :D Last year when I made this and was trying to take pictures for the blog while Dhruv was sleeping. Just when I had the whole setup ready and clicked 2-3 pics, he woke up and came. And was not ready to part with the pudding. He was smirking and grinning that he sabotaged my set up and was happily having the pudding. Yes, my little one too loves this :) So this year I made it while he was away at school and clicked leisurely ;) And evening we both enjoyed having this.. It is best served chilled ! Usually it's quite sunny in Chennai. But day before yesterday when I clicked this it was quite gloomy. And yesterday it rained for about 10 minutes. This is the first rain of the year and it feels good too as there is a little relief from the scorching heat :)

Check out the other Mango recipes here if interested.. 


Makes: 1 cup


I Took: 

Preparation Time: 5 mins


I Used:


Mango - 2 sides of 1 big banganapalli
Chia - 3 tbsp
Milk (boiled & cooled) - 1 ½ cup
Honey (any sweetener) - 1 tbsp
Vanilla Essence - 1 tsp


The Way:


1. Take the chia seeds in a bowl. Add milk to it. Use milk that is boiled and cooled

2. Now add sweetener of choice. I added honey


3. Then add vanilla essence if using and mix well

4. Cover the bowl and leave it refrigerated for minimum 2 hours. Leave it overnight if possible


5. Next for assembling the pudding, peel a ripe mango and rinse it with water. Then cut into small bite sized cubes

6. In a serving glass, now layer the pudding with alternate layers of mango slices and the bloomed chia 

7. Garnish with pomegranate or cherry or nuts or raisins of your choice


Serve chilled !

Notes:


  • You can customize the pudding the way you want. You can layer it with mango puree instead of mango pieces
  • You can add a layer of rice flakes or granola to make it more healthy & wholesome
  • If the mangoes are sweet enough you wouldn't need any sweetener
  • You can also add in seeds like hemp, melon etc and nuts like almonds & dry fruits of choice
  • You can go for another fruits like strawberries or chikoo as well but personally I favour mangoes :)
Cheers,
Chitz

Friday 14 June 2019

Raw Mango Pachadi | Pacha Maanga Pachadi | Mangai Pachadi | Mamadikaya Pachadi


This is a dish with a lot of emotions attached to it.  This was one of my grandfather's favourite dish. This is my mom's favourite. And now it's mine too.. Earlier I was not a great fan of this. But after a point, I started relishing this relish. And what happened was I never used to get it right. So I have made this a couple of times and clicked a couple of times over a couple of years but somehow I was not satisfied. 

This year when my mom was home, I made her do this and after that I made it again a couple of times and it was tasting perfect each time. Just like that childhood days taste I have in my senses :) And this time I jotted down the measurements too and so it made it's way to the blog now. Sometimes (Many a times) the simplest of the dishes are the ones that take time to master than the complex ones. At least for me ;) This dish can be had like you have the pickle, as a side dish/relish for rice. Or if you are like me, can have it as such too :D

Makes: 1 cup


I Took: 

Preparation Time: 5 mins

Cooking Time: 20 mins


I Used:


Raw Mango - 1 medium sized (A heaped ½ cup)
Red Chilly Powder - 1 tsp
Turmeric Powder - ¼ tsp
Salt
Water
-
-
As Needed
¼ cup
Jaggery - 2-3 tbsp
Oil - 2 tsp
Mustard  - ½ tsp
Red Chilly   - 1-2 nos
Curry Leaves - 2 sprigs


The Way:


1. Trim the edges and peel the skin of the mango. Wash it well. The area near the stalk may have milk in it. So wash well else you will get a bitter taste

2. Chop the mango to small pieces (around ¼ inch pieces)

3. Take the chopped mangoes along with the red chilly powder, turmeric powder and salt in a kadai/pan. Add water and mix well


4. Keep the kadai on flame. When it comes to a boil, simmer the flame and  close the kadai with a lid and allow the mango pieces to get cooked. It will take around 5-7 minutes

5. Check once in a while to see that the water is not dried and the mango pieces doesn't get stuck at the bottom of the kadai

6. Once cooked you can see that much of the water has evaporated and you have a thick mix. Now add the jaggery granules to it. I use organic jaggery granules. So added as such

7. If you are using normal jaggery, scrape the jaggery and take them in a separate vessel. Add little water to it and heat it over flame. Once they dissolve switch off the flame and allow to cool. Then strain them using a strainer to remove any impurities in the jaggery and then add it to the pachadi


8. Once you add jaggery, it will release some water. Keep mixing over low flame for 2-3 minutes. The mix will come together. Switch off the flame then

9. In another tadka pan, heat oil. Splutter mustard


10.Add broken red chilly and curry leaves

11. Add this tadka to the pachadi. Mix well and serve


Notes:

  • Quantity of the red Chilly powder and jaggery mentioned here are that which I used for a moderately sour mango. Adjust them according to the mango that you use 
  • Use raw mangoes for making this pachadi. My mom says that the best ones for making this pachadi are the ones that are starting to turn ripe. The ones which are firm like raw mango but have a mild yellow colour to it
  • Adding tadka is optional. If you do not like, you can skip it

Cheers,
Chitz

Wednesday 12 June 2019

Mango Milkshake Recipe | How to make fresh Mango Milkshake at home?


Come summer, mango milkshakes have to be made.. Right? Yes, for us it is like "What is summer without a Mango Milkshake?' I would love to make some popsicles too but this year we are cutting low on sugar and some carbs too, so I guess the popsicles have to wait for another year maybe :( This milkshake can be tailored in many ways to suit our cravings and needs. You can make it rich by adding a pinch of saffron. You can make it healthy by skipping the sweetener. You can make it vegan by adding almond or coconut milk instead of the normal dairy milk. Or maybe add 2 scoops of ice cream instead of one ;) Choose as you may want to, but if the mangoes are reasonably sweet, then any variant of the shake is great and makes you feel  refreshed :) I generally make the shake with Alphonso (for it's bright colour :D) or Banganapally mangoes but you can choose any pulpy and reasonably sweet variety of mango for the shake..


Makes: 2 glasses


I Took: 

Preparation Time: 10 mins


I Used:


Alphonso Mango - 2 medium sized ones
Milk  - 1-1½ cup (boiled, cooled & refrigerated)
Sugar/Jaggery/Sweetner (optional) - 1-2 tbsp (As needed)
Ice cream (optional) - 1 scoop
Saffron/Kesar (optional)
Cardamom powder (optional)
-
-
A pinch
¼ tsp
Nuts (optional) - 2-3 tbsp


The Way:


1. Scrape the skin of the mango and trim the stalk off. Rinse it well in water. While trimming the stalk some milk can ooze out of the mango and it gives a weird taste if not rinsed properly

2. Cut the mango into small chunks and take them in a blender

3. Add milk to it and blend well


4. Now open the blender and taste the milkshake. If needed add sugar, kesar and ice cream and then give a final blend

5. Pour into tall glasses and serve cold. You can garnish with chopped nuts if needed


Notes:

  • I use Alphonso (or Banganapalli) mangoes for it's colour and taste. It gives a deep yellow colour and the shake feels like store bought :) You can use any ripe, pulpy, sweet and fibreless mangoes of your choice for making the shake
  • For a thick milkshake use less milk for blending. Also keeping the mango/mango pieces in fridge also helps
  • If using ice cream, use vanilla or mango flavour so that the taste is not compromised much
  • Use ice cubes while blending for chilled shake. It can make the shake a little runny. Instead use chilled milk and mango for making shake and serve the shake with ice cubes added in the glass
  • You can blend in the nuts or use for garnishing. Sometimes I like to blend in the nuts when I skip adding extra sweetner. Then it feels like having an extra crunch and I do not feel that I have skipped the sweetner (At times it is for satisfying the mind too ;))
Cheers,
Chitz


Sunday 9 June 2019

Raw Banana Fry | Vazhakkai Fry | Vazhakya Tawa Fry | Vazhakkai varuval | Easy Vazhakka Roast


This is yet another shallow fry recipe that features quite often in my menu. As the husband man (and now at times the little man too) has a relatively low tolerance (it's the mind that speaks not the tummy ;)) towards veggies, I resort to more of frying the veggies and make them look like close cousins to non-vegetarian dishes ;) For me to feel less guilty, I mostly use 2 or at the max 3 tbsp oil and shallow fry them. It tastes yum and makes the boys eat (not love, no way I can make them I guess) the veggies as well. So this is a simple and crispy fry that pairs well with rice an curd or Sambar or Rasam or even with a Puli Kuzhambu :) Do try and let me know how you wooed your loved ones :)


Serves: 2-3 persons


I Took: 

Preparation Time: 20 mins

Cooking Time: 30 mins


I Used:


Raw Banana - 2 medium sized ones (1.5 cups after cutting)
Chilly powder - 1 tsp
Coriander powder - 1 tsp
Turmeric powder - ¼ tsp
Garam Masala
Rice Flour (optional)
Oil
Mustard
Curry leaves
-
-
-
-
-
½ tsp
1-2 tbsp
2-3 tbsp
¼ tsp
2 sprigs
Salt - As Needed


The Way:


1. Gently scrape the skin of the plantains with a knife or a scraper. Do not remove the whole skin. Lightly scrape, maybe just the black spots alone you can scrape away. Rinse them in water. Trim the edges and cut them into thin round slices


2. Take the cut plantain slices in a steel bowl. Add the red chilly powder, coriander powder, turmeric powder, garam masala and salt to it and mix well. Allow it to rest for 10-15 minutes

3. Heat oil for shallow frying in a frying pan


4. Once the oil is hot, splutter the mustard seeds and curry leaves. This is optional

5. Then reduce the flame to minimum. Arrange the plantain pieces in the frying pan and shallow fry them 

6. Once one side slightly turns colour, flip over and roast the other side as well. 

7. Once done, remove them onto a plate and fry the remaining plantain pieces also like this in batches and serve with rice and gravy


Notes:

  • If you may like, add a ¼ tsp of ginger garlic paste also while marinating the plantain pieces
  • If you like your plantain fry more crispier, add 1-2 tbsp of rice flour to the marination

Cheers,
Chitz

Friday 7 June 2019

Green Mochai Puli Kuzhambu | Mochai Chenakizhangu Puli Kuzhambu | Field Beans Gravy with Elephant Yam


This post is in my drafts for over an year now :D Now don't go 'Ohh my' so fast.. I have some more drafts that dates back to 3 years as well ;) Sometimes I feel the pic is not good, sometimes I feel the recipe is not up to the mark, maybe the measurements need a lil more fine tuning ;) So whatever the reason maybe, I am working on it and at the earliest planning to clean my drafts. Either rectify the issues or discard the draft and start fresh. Let's see how great it goes :)

So today's recipe is one with fresh field beans. I was very skeptical about cooking with this bean as it was the first time I was seeing the fresh variety though I have had the dried bean so many times during my childhood days :) But my mom convinced me (over phone) that they too taste great if made into a puli kuzhambu (tangy gravy with tamarind) with elephant yam.. And I didn't think twice. I had the yam too handy.. So went ahead and made this lip smacking gravy. It is easy to prepare and uses the pantry staples. Do try if you get hold of some fresh field beans and let me know how you liked it :)  

Serves: 2-3 persons


I Took: 

Preparation Time: 20 mins

Cooking Time: 30 mins


I Used:


Green Mochai/Green Field Beans - ⅓ cup
Chenai/Yam (diced) - ½ cup
Onion (sliced) - 1 medium sized
Tomato (quartered) - 1 medium sized
Red Chilly powder - 3 tsp
Coriander powder - 3 tsp
Turmeric powder - ¼ tsp
Asafoetida - ½ tsp
Tamarind - A small lemon sized
Grated Coconut - ¼ cup
Salt - As Needed

To Temper:
Oil - 1 tbsp
Mustard seeds - ¼ tsp
Curry leaves - 2 sprigs


The Way:


1. Soak tamarind in ½ cup warm water for 20-30 minutes. Then extract the pulp and keep aside

2. Remove the mochai (field beans) from the pods just like you de-shell the green peas

3. Grind the coconut in a mixer jar along with little water to a smooth paste and set aside

4. Clean and cut the yam into 2 inch cubes. Also slice the onions and chop the tomato into 8 pieces


5. Now take the field beans, cut yam, sliced onions and cut tomatoes in a kadai or clay pot that you are going to use to make the gravy

6. Add red chilly powder, coriander powder (or sambar powder - refer notes), turmeric powder, asafoetida and salt. Add 1 cup of water as well

7. Mix together and switch on the flame. Allow it to boil and then lower the flame and cook it covered for 5 minutes


8. Now open the lid and add the tamarind juice. Allow it to get cooked in low or medium flame. This will take around 10-12 minutes

9. When the beans and yam are cooked, add the ground coconut to the gravy and mix well

10. Allow it to blend in the gravy and cook for another 3-4 minutes. Once the gravy has reached the desired consistency and the flavours have mixed in well, switch off the flame


11. In a tadka pan, heat oil. Splutter mustard

12. Add the curry leaves and switch off the flame. Add this tempering to the gravy and mix well


Serve with steamed rice and a stir fry of your choice.


Notes:

  • Instead of red chilly powder and coriander powder you can add 2-3 tbsp of sambar powder. It will be more flavourful. Or you can add 2 tbsp of sambar powder, 2 tsp of red chilly powder and 2 tsp of coriander powder as well
  • While grinding coconut, you can add a tsp of fennel seeds or poppy seeds as well. If then take care to boil the gravy well so that you do not get the raw smell of the fennel seeds 
  • If yam is not available you can try with raw banana/plantain as well or maybe skip yam altogether. But yam does impart a earthy flavour to the tangy gravy. Do not skip if you can get hold of some
Cheers,
Chitz