Who doesn't love idiyappam? Well I know some folks who are not a great fan but setting them aside, many of you would love eating idiyappam right? For those who are not very aware of what it is, is a string hopper made from rice flour. Rice flour is made into a dough using hot water and then the dough is pressed into string hoppers and steamed. It is a very healthy and light on the tummy dish that can be had as a breakfast, dinner or snack.
It pairs beautifully with many side dishes like Stew, Potato stew, Veg Kurma, Kadala Curry, Egg Curry, Chicken Curry, Chicken Stew, Mutton Stew.. And it can be had with simple sweetened (with sugar or jaggery) coconut milk or just sweetened milk. Kids love that combo. It can even be used as a base and made into other snacks like Masala Idiyappam, Sweet Sevai, Lemon Sevai or Tomato Sevai. While some find it a tedious process to make idiyappams, what I personally have experienced is, if there is some roasted rice flour handy, it can make a yummy and tasty breakfast within 15-20 minutes :) And there are some tips and tricks that I have learnt over the years for a fluffy and soft idiyappam which I am sharing below with you guys :)
What kind of rice flour should be used?
I always use plain rice flour for making idiyappams. Either roasted or plain. If it is not roasted, I roast it for a few minutes and then add water (boiling hot). If using roasted flour, then I do not roast it again but add hot water that has been heated to a rolling boil. I generally do not use store bought idiyappam flour but my mil uses it and it gives good results too. Some people use puttu flour to make idiyappam. If you have access to good quality rice flour or puttu or idiyappam flour, use that. Do not use old rice flour as it compromises the taste of the idiyappam
How much water to use?
I generally need around 1.3 cups of hot water for 1 cup of rice flour. It again depends on the quality of the rice flour. It takes around 1.25 to 1.5 cups of hot water for 1 cup of rice flour. Use hot water as it makes the dough smooth and soft. This is the key to soft idiyappams. Finally use your hands and knead to a smooth lump free dough. Also some use a mix of water and coconut milk (thick one) in an approximate ratio of 1:(0.3) to make softer idiyappams. I have not tried yet though :) coz making a smooth and soft dough always helps me in making soft idiyappams. Feel free to try adding coconut milk if you need.
What makes the idiyappam hard?
1. Lesser water in the dough can make your idiyappam hard
So after using a spatula to mix the hot water onto the rice flour, use your hands and knead the dough to a smooth and soft texture. Any lumps should be removed. Feel the dough and you will know the difference. It should be as smooth as a baby bum :D
2. If you over roast the flour, it can make the idiyappam hard or brittle
Roast the flour on medium flame till it is hot and it starts to turn yellow at the bottom of the pan. The flour should turn from it's smooth consistency to a free flow consistency while you roast.
3. Keeping the dough open can make it dry and hence the idiyappam too
If you make a big batch of dough, keep the remaining dough (while you wait for the first batch to get steamed on the idly cooker) covered with a wet cloth and place it in a covered vessel. If you keep it open it will loose it's moisture and turn hard. Also use the entire batch immediately. I would not recommend to refrigerate the dough or use it later.
4. Do not steam for more than 5-6 minutes
The rice flour would already have cooked almost half when you add hot water, so do not steam for a long time.It turns the idiyappam hard
So I believe I have covered and answered most of your queries. So let's see in detail how to make some soft and fluffy idiyappams with step by step pics. If you still have more questions feel free to drop a comment below or write to me :)
Preparation Time: 15 minutes
Cooking Time: 6 minutes
| Rice
Flour/Idiyappam Flour |
- |
1 cup |
| Salt |
- |
As Needed |
| Hot Water |
- |
1.25 - 1.5 cups |
| Oil |
- |
1-2 tbsp |
The Way:
1. Take 1 cup rice flour in a kadai/pan. Add salt and mix. Heat the kadai on a low flame. If the rice flour that you have at hand is roasted, then ignore till step 4
2. Roast the rice flour for about 4-5 minutes on this low flame, stirring as frequently as possible to ensure that it doesn't get burnt at the bottom
3. Take care not to brown the flour. It should just start to turn yellow at the bottom of the kadai and the flour should become very hot to touch
4. Do not over roast as the flour as the idiyappam will become brittle. If the rice flour that you have at hand is roasted, then ignore the above steps
5. While roasting the flour, boil 1.5 - 2 cups water in a saucepan. When it starts boiling switch off the flame
6. Once the rice flour is roasted, add the hot water little by little and mix well using a ladle or spoon. You will need somewhere between 1.25 to 1.5 cups of water for 1 cup of rice flour
7. Keep mixing using the spoon. When the heat becomes bearable, use your hands and knead gently to a smooth and soft dough. The dough should still be hot when you knead

8. If the dough looks dry, then add few drops of water and knead. If it is sticky then add few tablespoons of rice flour and knead
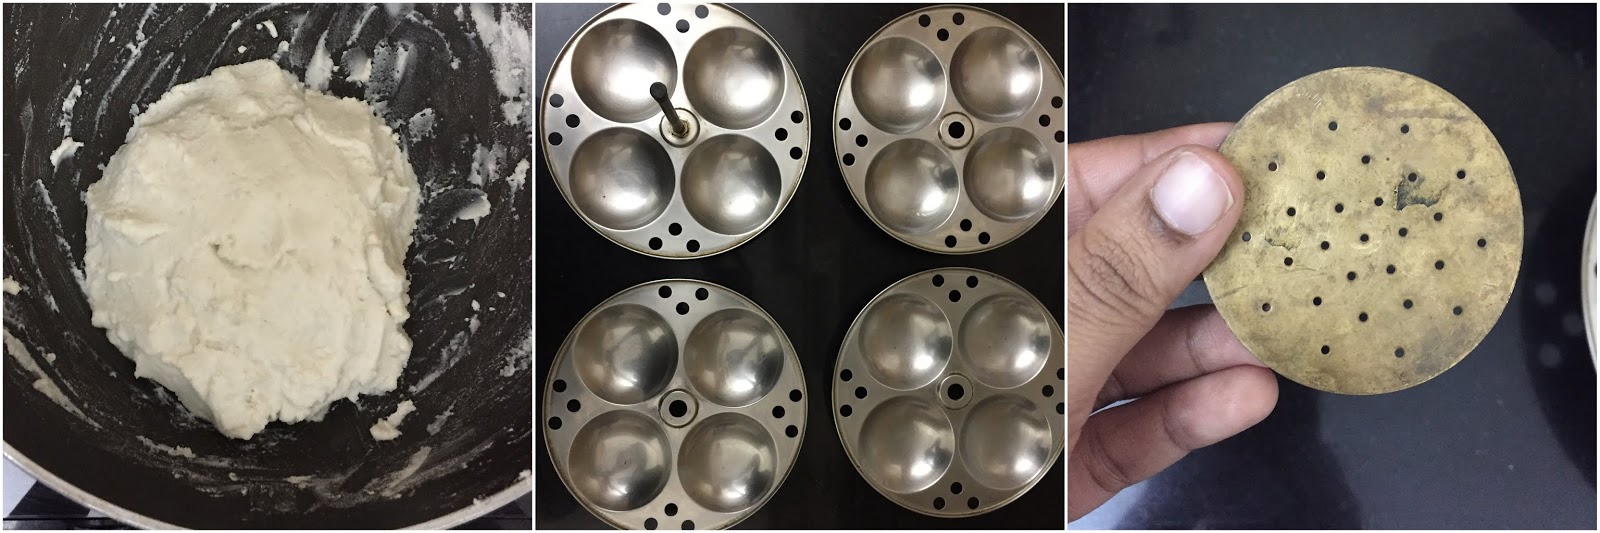
9. Once the dough is ready, take the idly moulds/plates and grease each mould with little oil and keep aside. If you prefer add little (1 tsp or more as per your liking) grated coconut into each moulds. In the step by step pics I have not added grated coconut but in the final pics idiyappam I have done that
10. You need an idiyappam maker to make this. It is a cylindrical shaped apparatus with a twister handle at the top end and perforated disc at the bottom end. The perforated disc comes in various shapes and sizes. If you choose a disc with smaller holes the idiyappam will be more thin

11. Now grease the idiyappam maker with little oil (inside the cylinder and on the perforated disc) if preferred. Divide the prepared dough into 2-3 portions and make a log with one portion and place it in the idiyappam maker. Cover the pan that contains the rest of the dough while you press the idiyappam using the first portion, else the dough will turn dry
12. Gently press (or turn the handle, depends on the type of the idiyappam maker that you have) the idiyappam maker and allow the dough to fall into concentric round circles onto the idly mould
13. I make 3-4 rounds of the dough in one mould. Make sure that the dough does not rise too high in one mould and touch the bottom of the idly plate that is placed on top. So eyeball the amount of dough to be pressed onto a mould based on that
14. In a similar manner press the dough onto the remaining idly moulds as well. Here in the below pic, in the final plate I have pressed the remaining flour all over the idly plate (as I didn't have enough dough to make another batch and wanted to do in one go) Hence it looks different
15. The dough has to be hot while pressing. So immediately after roasting and adding water and making the dough, press it onto the idly plates. Do not allow to rest the dough
16. In a pressure cooker or pan (in which you usually make idly), take 2 cups of water. Place the prepped idly stand into the cooker and switch on the flame
17. Allow the idiyappam to steam for 5-6 minutes in high flame. Do not use the weight if steaming in cooker. Then switch off and allow the steam to be released (takes 1-2 minutes)
18. Then remove the idly stand from the cooker, remove the idiyappams onto the plate or a casserole if serving later
Serve warm with sweetened Coconut Milk or sweetened Milk or Stew or Potato stew or or Veg Kurma or Kadala Curry or Egg Curry or Chicken Curry or Chicken Stew or Mutton Stew (The list is endless ;)) !
Cheers,
Chitz