Tuesday 17 December 2013

Persimmon Chia Yogurt Verrines - From my Guest

Now, is that a co-incidence or the heights of my lethargy, I'm not sure. But the next post after my guest post is a guest post for me from a very special blogger friend of mine ;) :D Guess who is doing the first guest post for me?? Yeah, she is the creative food photographer, food stylist & the wonderful Meena from elephants and the coconut trees. I am a great fan of her lovely pics. She tells the story of the dish through her appealing & mouth watering pics, which make me crave for them right away. Her Unakka Chemmen Podi is a award winning recipe which has brought me great accolades at my home :) 

So Meena is one of my great blogger buddy who constantly encourages me with my posts & recipes :) When I asked her to do a guest post for me, she immediately accepted & presented with 3 wonderful recipes & pics to choose from. I actually wanted tell her to do all 3 for me :D but then my sis intervened & selected this dish :) To tell the truth, I am a great fan of persimmon a.k.a sharon fruit & it was with great delight that I seconded my sis's decision :) 

So now, over to Meena dear !!


Thank you so much Chitz for inviting me to your space.It is such an honor to do this guest post for you. I will never forget that you were one among the first to join my blog and encourage me all along.

Hello lovely readers,

I am Meena, who blogs at elephants and the coconut trees.I am from Kerala,India currently living in California, United States with my husband and tween. I am a complete foodie and enjoy all kinds of cuisines. 

I started cooking after marriage and it was never easy for me. Those days there was no Google to help either. I must say I have done so many experiments and the poor man of mine just gulped it down.Then came the daughter.. a very sweet girl but she could reject food like a Master Chef judge :) That being said times have improved. Non vegetarian,super spicy food and baked goodies just vanish in no time:) I started blogging to acquaint daughty with Kerala food and to keep track of everything else that happened in my kitchen.


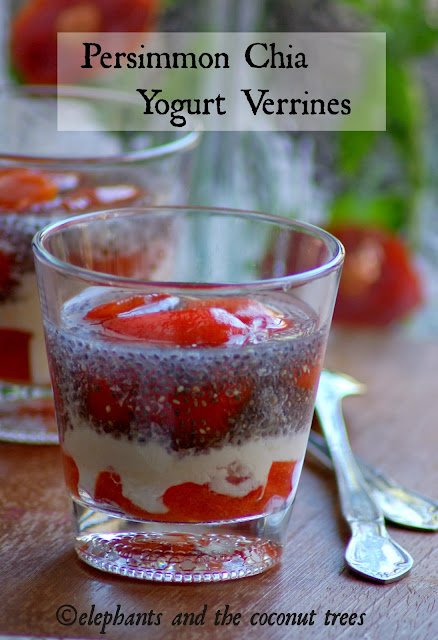
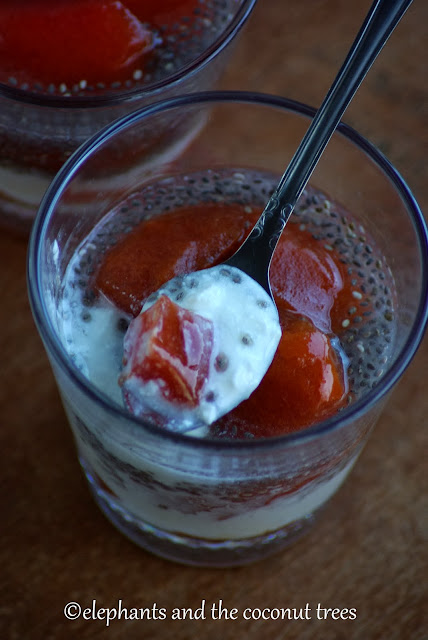
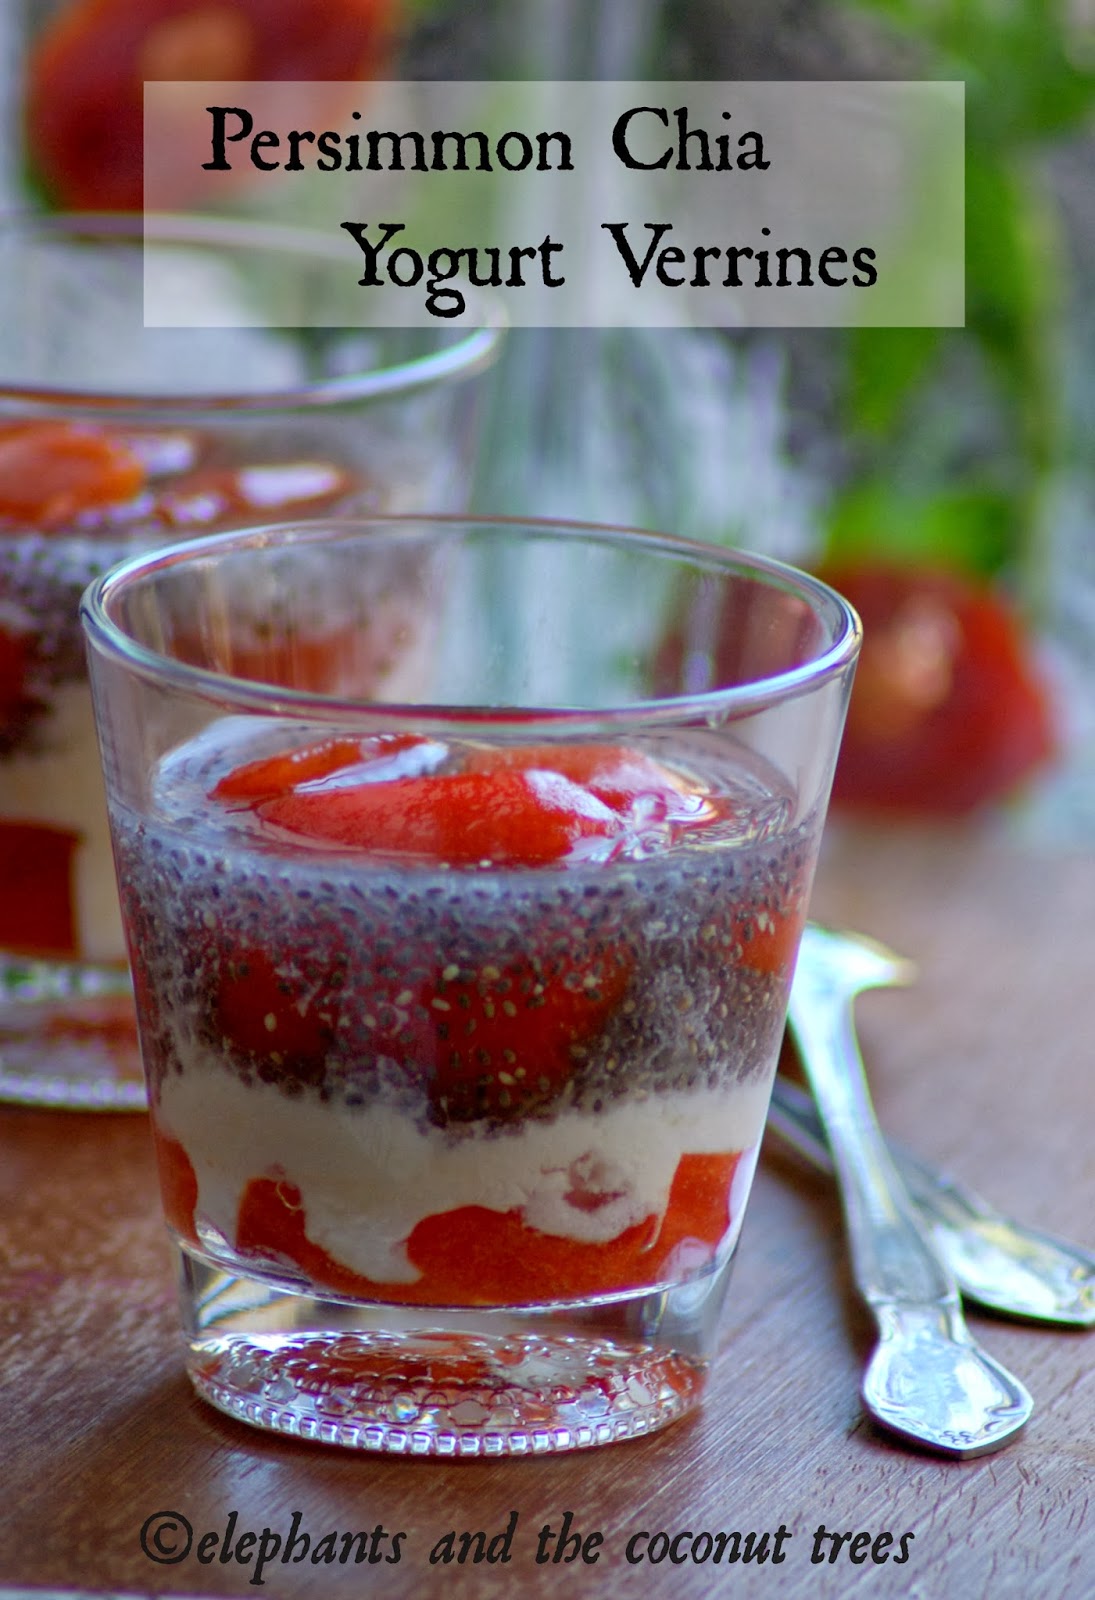
Persimmon is a fruit looks like tomato but gives a faint taste and smell of mango.Unripe ones can be really astringent and bitter.So pick ones that give in to a press. Persimmon freeze very well and ones thawed it is really pulpy and tastes really sweet that I do not use any extra sweetener when I eat, not even honey. 

The quality of the verrines lie on the yogurt you use.I used whipping cream and made yogurt at home.It really gives a creamy texture and certainly enhances the taste. Persimmon Chia Yogurt Verrine is an ideal fall dessert to make in large batch.It can also be had as a breakfast on the go if you were to fill it in jar with tight lid .


Ingredients :

Fuyu Persimmon - 2 ( 1 per person)
Homemade yogurt from heavy whipping cream - 4 -5 tbsp( Really thick not sour)
Chia seed - 1 1/2 tbsp
Honey - 2 tsp

Method :

  • Wash ,wipe and freeze ripe persimmon for 24 hours.
  • Soak chia seeds in 1/2 glass water and let it stand for 1 hour to expand or overnight in fridge.
  • When u are ready to assemble in the glass simply take out the frozen persimmon put it in warm water for a few minutes then cut off leave part and peel  the skin gently with potato peeler (u might have to hold the fruit with a paper towel or cloth as the fruit would be still cold).Cut into bite size pieces

To assemble 

  • Arrange few pieces of fruit at the bottom of the glass then slowly put 2 tbsp of yogurt per glass then hold a spoon upside down on top of  the yogurt  and gently pour 2-3 tsp of chia seeds onto the back of the spoon.So the layers would not mix up .On top add add the remaining cut fruits.Serve chilled or at room temperature.
  • Before serving drizzle some honey.


Thank you so much Chitz for giving me an opportunity to be your guest.Wish you all the best and hope you join Deepak soon.

And that was the very sweet lady from the land of 'coconuts & elephants' :) treating me & my dear readers will a fall dessert. Thank you so much Meena for doing this guest post for me.. I do miss Persimmons & you made me reminiscence of my indulgence of it :)

Cheers,
Chitz

Saturday 23 November 2013

Kerala Mixture - My first Guest Post :)


The first time experiences will always remain memorable & close to our heart, isn't it? I experienced that excitement when Rafee, the sweet tooth & sweet heart asked me to do a guest post for her wonderful space. I really like this segment at her space & used to look forward to the posts, which used to feature every Saturday before, but now due to her slightly busy schedule became biweekly. I got acquainted to a lot of fellow bloggers through this lovely event of hers :) So most of the times, the first times do makes us a little nervous, right? It was the same with me too. What to cook, how to present? Will Rafee's wide range of reader fans like it, especially after she left the choice of the dish to me :D After much debate (inside my head) and cooking two to three dishes I finally settled for the 'Kerala mixture'. 

Rafee is an amazing person whom I befriended through the blogging world. I have to say person rather than blogger, coz blogging is just one aspect of her life that she handles amazingly in addition to the other roles of a daughter, wife, mother, home maker & a professional ! In spite of her busy schedule she does blog very frequently & never fails to express her two words of opinion & encouragement to what her fellows have cooked & presented ! And the highlight is she replies to every comment at her space. Now that's the heights of dedication & interaction for me. The intro for most of her posts would be her experiences or small quotes which would really make you understand that she is a warm human being who strives to be a better person with each passing day ! It's a pleasure to know you & be a fellow blogger, Rafee :) I am really glad that I could do this guest post for you & thank you for giving me this oppurtunity :)

Do hop on to her space for the detailed recipe & pics :)


Cheers,
Chitz

Wednesday 16 October 2013

Halloween Special - Vegan Pumpkin Bread - Baking Partner Challenge #15


Come the month of October, it's festival time !! Dussera & Diwali here in India & the infamous Halloween in US. For me Halloween means kids in scary outfits & pumpkins carved in funny shapes ;) Actually I get reminded of the Harry Potter Halloween dinner scene :D Since pumpkin is such an inevitable part of Halloween, we Baking Partners decided to bake some Pumpkin bread for the occasion. So when Swathi announced the recipes & asked us to choose from among the three variants of pumpkin bread, my eyes & heart fell for the Vegan version. 

It is such a breeze recipe, just like a normal cake where in you combine all wet ingredients & dry ingredients separately & eventually mix them both & bake ! I was so much in love with the end result ! It was so soft & tender & tasty. I even took some to my send-off party (by the ladies gang ;)) back in Norway & all the ladies loved them. When they ask you for the recipe, you know that they too loved it to the core. So what you waiting for my pals, try this out soon & you too are gonna enjoy baking & eating them like us :)


Recipe Source: Here

I Took: 40 + 50 minutes

Serves: 1 loaf


I Used:

All purpose Flour - 1 cup
Whole Wheat Flour - ¾ cup
Dark Brown Sugar - 1 cup (I used normal sugar)
Baking Soda - 1 tsp
Baking Powder - ½ tsp
Salt - ½ tsp
Nutmeg - ½ tsp
Cinnamon - ½ tsp
Allspice - ½ tsp
Cloves - ¼ tsp
Pumpkin Purée - 1 cup (Refer first 2 steps)
Oil - ½ cup
Maple Syrup - 3 tbsp ( I omitted this)
Water - 3 tbsp 
Walnuts or pepitas - ½ cup - chopped (I used almonds)

The Way:


  1. Peel the skin off the pumpkin & rinse them well. Cut them into big chunks and pressure cook or microwave with ½ cup water for 15 minutes
  2. Allow them to cool. Then blender it to make a fine puree. If you want to remove the extra moisture, strain the puree using a cheese cloth. Set aside
  3. For this recipe, you can also blend the spices along with the boiled pumpkin !
  4. Preheat oven to 175 °C. Grease and flour a loaf pan
  5. In a large bowl mix together the all purpose flour, whole wheat flour, sugar, baking soda, baking powder, salt and spices (Nutmeg, cinnamon, cloves & allspice)
  6. In a small bowl whisk together pumpkin, oil, maple syrup, and water
  7. Add wet mixture to dry, combine until just moistened. The batter will be very thick, it is not a problem!
  8. Fold in nuts and pour the batter into the prepared pan
  9. Bake for about 45-50 minutes or until top is browned and a toothpick inserted in the center comes out clean. It took 50 minutes for me
  10. Allow it to cool for 20 minutes. Use a butter knife to gently loosen bread from sides of pan & then invert onto a cooling rack
Cheers,
Chitz

Monday 14 October 2013

Roasted Nectarine Smoothie


Hellova dear friends ! A big hi to all those who missed me & have been wondering where the heck I am :D I had been on a short break coz of my relocation to India. So now that's done & am slowly settling to the clock & climate of Chennai, I thought I would take a peep into my humble space & post something from my drafts. It's been quite a while since I met & heard from you guys & yes, I AM missing you people. Getting back to a full time work after the year long break is fun & challenging, but it would not be a complete truth if I told that I do not miss the all time blogger life ;)

So want to know what my comeback recipe is. It is a simple smoothie with a twist, which by guarantee would be loved by a fruit phobic or a picky fruit eater too ! Want a name? None other than Deeps ! Yes, he is a very picky fruit eater & u can say at times me too ;) We are not great fans of fruits that are bitter or sour. So I find ways to mask that sense of taste very often.. And this one (which I found while gawking on foodgawker) was an instant hit with Deeps. He was like 'This is good' which actually translates to 'Wow, this is great !!' The roasting of the fruit before turning it into a smoothie actually did wonders. So, if you are on the watch out to use a nectarine or a peach (as the original recipe called for) in ways other than the raw form, then this is the recipe. Try it out & do let me know how you felt about it ! 


Recipe Source: Scarletta Bakes

I Took: 50-60 minutes

Serves: 4 tall glasses


I Used:

Nectarines - 4 large, pitted & quarted
Canola Oil - ¼ cup
Sugar - ¼ cup
Greek Yogurt  - 2 cup
Vanilla Ice cream - 6 cup (I used 3 cups)

The Way:

  1. Preheat oven to 175 degree C 
  2. Toss the nectarine quarters with oil & sugar until well coated
  3. Arrange the quarters on a parchment lined baking tray with the cut sides facing up. Roast them until the fruit is shriveled & darkened which would take about 30-40 minutes
  4. Allow them to cool once roasted. Add Greek yogurt & Vanilla ice cream & blend it to a smooth uniform consistency. Blend in batches of half if your blender cannot accommodate the whole quantity
  5. Serve in chilled tall glasses :)
Cheers,
Chitz

Wednesday 18 September 2013

Crouu-doughnuts | Kronuts - Baking Partner Challenge #14


 You know what is the latest sensation in the pastry or bakery world?? It's none other than the 'Cronut™' which is one of the most viral desserts of all time ! Developed by chef Dominique Ansel for Dominique Ansel Bakery in New York City & launched in May 2013, this dessert has fans all over the world & the imitation versions are being tried all over US & Australia. So what is this dessert actually? You can say in simple words that it is a hybrid of a croissant & donut, but let's listen to what the inventor says about the delicacy (from the Dominique Ansel Bakery website)


Taking 2 months and more than 10 recipes, Chef Dominique Ansel’s creation is not to be mistaken as simply croissant dough that has been fried. Made with a laminated dough which has been likened to a croissant (but uses a proprietary recipe), the Cronut™ is first proofed and then fried in grapeseed oil at a specific temperature. Once cooked, each Cronut™ is flavored in three ways: 1. rolled in sugar; 2. filled with cream; and 3. topped with glaze. Cronuts™ are made fresh daily, and completely done in house. The entire process takes up to 3 days.


So when Swathi decided to challenge us with making Kronuts this month, I was very excited. Since I could not get to eat this delicacy from any bakeries here, I wanted to make it at home & see how it tastes :) I must admit it is a long process & has a lot of work to do, but it was fun learning something new & getting to see the end result. I would never dare to say that I nailed it. There were a lot of hiccups like wet dough & oozy butter & separated layers while frying. But each failure taught me something new, thanks to the guidance of Swathi, Archana, Suja (whose notes on the method helped me) & my fellow bakers :) And I know that next time, I would definitely make a better one :) 


So this is what I treated myself to, frying & eating kronuts when I turned a year older again yesterday ;) So let's see how it is made, do not get scared seeing the long steps & process & also do not omit reading any line, coz the tips & precautions are also listed along with the method :D Taste wise, they were great, crispy & flaky, but I did not use any filling or glaze to make them soft. And also I baked a few to see how it would turn out, but they were nowhere near the fried ones. They could not retain the shape & were falling apart & was also soft & tasted very doughy. So it is best to fry them to enjoy them :D


Recipe Source: Bootleg Cronut

I Took: 3 days/3-4 hours

Makes: 16 kronuts


I Used:


For Dough
All purpose flour - 510 gm | 3.75 cups
Salt - 7 gm | 1 tsp
Sugar - 100 gm | ½ cup
Milk - 150 gm | ½ cup+2 tbsp
Yeast - 2 ¼ tsp
Eggs - 2 jumbo | 3 large
Unsalted Butter - 50 gm | 3.5 tbsp

For Butter Layer
Butter - 295 gm | 1 ¼ cup+ ½ tbsp

For Frying
Canola Oil - 2-4 cups
Water - 200 gm
Cinnamon Sugar - 400 gm sugar + 100 gm cinnamon


The Way:


Day 1: Prep the dough
  1. Take out butter & eggs from the refrigerator half an hour before the dough preparation. This is to allow them to reach room temperature
  2. Prep-ing the yeast                                                                                                                                                                            Fresh Yeast  - Mix with milk (at room temperature) beforehand to activate the yeast                                                                    Active Yeast - Heat half milk to lukewarm (around 110F / 43C) & add yeast. Set aside for 5-7 minutes to proof
  3. Heat milk in microwave for about 30 seconds & add butter to it. This is for butter to melt easily. Keep aside
  4. Combine all the dry ingredients - flour, sugar, salt & instant yeast (if using) in a bowl of a stand mixer
  5. Add the butter-milk mixture to the dry ingredients. Add yeast (if not instant) & eggs
  6. Mix on low speed for 3 minutes or until everything is incorporated. Mix on high speed for another 8 minutes. If kneading by hand, as I did, knead well for about 10-15 minutes until you get a smooth shiny dough ! Do not over knead the dough
  7. Remove the dough & tuck under edges to form a ball. Grease a bowl with oil or cooking spray & place the dough in the bowl with seams down. Cut a cross across the top of the dough with a knife to help the dough relax
  8. Cover the bowl tightly with clear plastic wrap & make sure it is not in contact with the dough. Place the dough in a warm area & allow it to double in size, which would take about 60 minutes
  9. Once the dough has proofed to double, refrigerate it overnight

Day 2: Incorporating butter to dough

Prepping butter
  1. Cut the cold butter lengthwise into ½ inch thick slabs. Arrange the slabs on a piece of parchment/waxed paper to form a 5 or 6 inch square, cutting the butter crosswise as necessary to fit. Cover it with another piece of parchment paper
  2. Using a rolling pin, pound the butter with light even strokes. As the pieces begin to adhere, use more force
  3. Pound them until it's about a 4x6 inch rectangle. Then trim the edges & place the trimmings on top of the rectangle & pound again lightly. When done, place the butter in refrigerator for 2 hours
  4. Do not over work with butter. If the butter starts to leak, try to put it back in the refrigerator
Laminating the dough
  1. Unwrap & place the dough on a lightly floured work surface. Roll into a 10 inch square. Brush excess flour off the dough
  2. Unwrap & place the butter at the centre of the rolled dough square
  3. Fold one flap of the dough over the butter, stretching it slightly that the flap just reaches the centre of the butter. Repeat the same with the 3 other flaps to form an envelope
  4. Press the edges together to completely seal the butter inside the dough
First turn
  1. Lightly flour the top & bottom of the dough. With a rolling pin, firmly press the dough to elongate it slightly & then start rolling to lengthen the dough and keep the edges straight
  2. Now turn the dough so that the shorter end faces you. Roll again to expand the length of the dough. Make sure the dough does not stick to the work surface. Add flour if needed
  3. When the rolling yield you a rectangle of 21x9 inches, mark the rectangle into 3 equal columns. Fold the right third of the rectangle into the centre third. Fold the left third of the rectangle into the centre third like a business letter. This is the first turn
Second Turn
  1. Try to do this right away after the first turn, but if the dough is too warm, wrap in film (aluminium foil) & place in refrigerator
  2. Repeat rolling just like the First Turn and make sure to lock the unsealed edges of the dough & roll over the dough to form a rectangular shape
  3. Again, as in first turn, mark the rectangle into 3 equal columns. Fold the right third of the rectangle into the centre third. Fold the left third of the rectangle into the centre third
  4. Marking the dough allows you to track your progress, and ensure that the orientation of the dough is correct when you remove it from the refrigerator
  5. Cover the dough in parchment paper & refrigerate for at least an hour
Third Turn
  1. The dough will be hard, so gently pound the dough to warm the butter. If it is too cold the butter will separate and not spread as it should
  2. Repeat the previous steps, and turn again, marking the corner with three fingerprints
  3. Cover dough with parchment paper and plastic wrap and refrigerate for 1 hour
Fourth Turn

Make the final turn, repeating the steps from turns 1-3. Refrigerate overnight


Day 3 - Kronuts frying day:

Rolling out the dough

  1. Lightly dust a work surface with flour and roll out the dough to approximately the size of a sheet pan, ½ inch thick
  2. The dough should stay cold, without sticking to the surface. If it starts to stick, place in the refrigerator and roll again when cool
  3. Transfer to a sheet pan with parchment paper and chill before use
Punching out Kronuts
  1. Prepare a sheet pan with parchment paper & greased with oil  
  2. Remove dough from fridge and take two ring moulds, with the larger mould around 3½ inch and inner around 1½ inch 
  3. Make sure that the dough is really cold while you punch out the holes. Or else the kronuts will not fry straight
  4. Transfer the punched kronuts to the sheet pan, leaving enough space between them to allow them to proof. Brush the top of the kronuts with water and set aside  
  5. Leave in a warm area until they have proofed which would take about 30 min
  6. Once it is proofed keep it in the refrigerator for 1 hour or in the freezer for 15 minutes before frying
Frying the Kronuts
  1. Heat canola oil in a pot over medium temperature. about 3 inches high
  2. Once the oil is ready for deep frying, turn heat to low and place Kronuts in oil to fry (1-2 at a time to avoid overcrowding) 
  3. Turn and flip the kronuts often so that they brown evenly. Fry them in a low temperature otherwise outside become too dark soon and also the inside will not cook properly. Also if the temperature is very low, the layers would start to separate out in the oil & you would not get a full kronut
  4. Once golden brown throughout, remove from oil and strain them on paper towels
    Once it is no longer shiny transfer to a container with sugar and cinnamon and toss. Enjoy with some icing sugar dusting or with a glaze of your choice.

    Notes:

    • Eat them immediately as they have a short shelf life 
    • Do not refrigerate them as the humidity from the refrigerator will cause them to go stale and soggy 
    • If filled with cream or glazing, avoid serving them warm

    Cheers,
    Chitz

    Monday 16 September 2013

    'Ona Sadhya' & my rattlings on Onam !

    I know I am a bit late here at my space, but better late than never coz the sun has just rose at some part of the world, so all my kin & kith out there celebrating Onam, 'Wish you a very happy Onam & a glorious year ahead'. Onam has always been a memorable time for me right from childhood. When I was young it was about holidays & when I grew up it was about food. And somehow it was always easier for me to talk or write for a pretty good time about Onam starting with 'Onam is the harvest festival of Kerala. It spans for 10 days & usually occurs in the month of August or September!' Now that's what Onam actually is, but for me it has struck a slightly deeper & different chord. I have always been amused when I think about it from that point of view !

    It's one festival that I have seen people really thrive to be with their extended family & spend time together - be it in dicing up veggies, prepping up for the sadhya, lining the courtyards with lovely patterns of flowers & leaves or just discussing the current issues or catching up with each other ! Spirits do go down when they can't make to their hometown for an Onam hols. And what do such souls do? They do have associations which chirp in together & have the 'Ona Sadhya' & the innumerous games & programmes like Vadamvali (pulling the rope) & Kaserakali (Musical chair) to name a few ! All these feels & conveys one of the commendable aspect of the natives of 'God's own land' - their sense of oneness & their undying faith in the age ole adage 'Kanam Vittum Onam Unnanam' (You have to eat the Ona Sadhya even if it is by selling your land)

    Onam 2012 - back in Kerala

    Still in confusion on how to make this pookalam beautiful with the limited flowers in hand


    Finally, this is what we managed !!

    So moving on from my rattlings, we did celebrate Onam this year in our own small way, with whatever we could muster up. This time we had to celebrate here in Norway & couldn't get to fly back home like we did last year :( So we had a mini Ona Sadhya served in lovely plantain leaves, the traditional way. Luckily I found a pair of leaves last week from the Asia shop, it did cost me a bit but c'mon it's Onam & I wanted to gather up all that I could to make it feel as homely as it could be. But sadly, I could not find enough ingredients to make some 'Aviyal', the must have dish for any Sadhya as Deeps puts it. And also Ada for making Ada Pradhaman & that's when google gods helped me. Me & Deeps prepared some Ada yesterday. It was so exciting to do that from scratch ! Pineapple Pachadi was also prepared by Deeps & stacked up yesterday night. And Puliyinchi is from my Mil, which we got when we came back from our vacation. And the rest all was prepared today morning by me ! I did forget to get some bananas, but still the platter looks good, right? I didn't get enough time to take individual pics of the different dishes, but then maybe some other day? Do let me know if you would like to see any of the particular recipes here & I would prepare & post them soon :)


    Dishes in order

    1. Pappad
    2. Manga Achar (Mango Pickle)
    3. Naranga Achar (Lemon Pickle)
    4. Puliyinchi
    5. Ishtu (Stew)
    6. Pineapple Pachadi
    7. Mathanga Erissery (Made with Vanpayar/Red Cow Peas instead of Tur Dal in recipe) 
    8. Cabbage Thoran
    9. Achinga Payar Upperi (Long Beans Stir Fry)
    10. Rice
    11. Rasam
    12. Pulissery
    13. Sambar
    14. Palada Pradhaman

    Cheers,
    Chitz

    Thursday 12 September 2013

    Turnip Stir fry | Noolkol Poriyal | Madhuramullangi Thoran

    Turnips & Shallots stir-fried & served with coconut dressing


    Turnips, I seriously am not sure what they are called in Tamil or Malayalam or any other Indian language for that matter :D When I asked my mom she said, 'It's Nukal na??' But somewhere else I read Nookal is actually called 'Kohlrabi' in English & it means German Turnip. When I asked my fellow bloggers in FB, Sangeetha, Nithya & Princy also told me it's Madhuramullangi in Malayalam & Nookal in Tamil. Anyways, the turnips that I got here does not exactly resemble the one that we get in India. This is white in color & does not have those antennae-like shoots from the bulb. Rather the bulbs are smooth & round and they have the leafy extensions from the top of the bulb (like in carrots). 

    So putting aside the confusion on the name, I went ahead & prepared it just like how mom makes the Nukal poriyal. It tasted almost the same as the original Nukal that we get back in India. So do not hesitate to try them out as they are very low in calories & also rich in Vitamin C & dietary fiber. Moreover it is a very easy & simple recipe to prepare. 


    Recipe Source: Ma

    I Took: 30 minutes

    Serves: 3-4 persons


    I Used:

    Turnips - 1 cup - diced
    Shallots - 8-10 no - sliced
    Grated Coconut - 3 tbsp
    Mustard - 1 tsp
    Red Chilly - 2 no
    Curry leaves - A sprig
    Oil - 1 tbsp
    Salt - As Needed


    The Way:

    1. Peel the skin of the turnips & rinse them thoroughly. Dice into small cubes
    2. Boil the diced turnips along with salt & turmeric powder (optional). Avoid turmeric powder if you want to retain the yellow color 
    3. In a frying pan, heat oil. Splutter the mustard seeds. Add red chilly & the sliced shallots
    4. Saute them for a while until they turn slight brown. Add the curry leaves & the boiled turnips. Mix well
    5. Allow them to become dry. Add the grated coconut & give it a nice stir. Switch off the flame & serve
    Cheers,
    Chitz

    Monday 9 September 2013

    Chinese Scallion Pancakes with Ginger dipping sauce - IFC Challenge #1 | Cong You Bing


    When  Saraswathy and Shobana geared up to create this new event 'International Food Challenge' I knew I that I am definitely gonna participate in this one ! C'mon, who would want to miss a chance to learn some exotic dishes from the cuisines around the world? The added advantage is you can make them at home without having to search for that speciality restaurant in your locality :D And as it would please anyone, the first challenge was to experiment on Chinese cuisine especially from the Cantonese region. So let me give you guys some heads up on this cuisine as shared to us from the event organisers. 

    Cantonese Cuisine, also named Yue Cuisine or Guangdong cuisine, is one of the main cuisine styles in China. It comes from Guangdong Province in southern China and it is one of among the eight great traditions of Chinese cuisine. The basic cooking techniques of Cantonese cuisine include roasting, stir-frying, sautéing, deep-frying, braising, stewing and steaming. Steaming and stir-frying are most commonly used to preserve the ingredients' natural flavors. The most characteristic cooking methods of Cantonese Cuisine are cooking in salt, cooking in wine, baking in a pan, and soft ¨C frying. 

    We were given four recipes to choose from namely Spiral Moon Cake, Cantonese Savoury Glutinous Rice Dumplings, Cantonese Wonton Noodles Soup & Chinese Scallion Pancakes. I chose Chinese Scallion pancakes, the simpler one. This closely resembles the Kerala parottas in that APF is used to make these pancakes. Spring onions or Scallions is used as a stuffing. This is served with a sweetishly sour dip. I enjoyed having these, especially the dip which made the pancakes more tastier !


    Recipe Source: Adapted from here

    I Took: 40 minutes

    Serves: 3-4 pancakes (5 or 6 inch dia)


    I Used:

    For Pancake:


    All purpose flour/Maida - 1 cup + more for dusting
    Scallions/Spring Onions - ¼ cup
    Oil - 4 tbsp
    Salt - 1 tsp / As Needed
    Boiling-hot Water - ¼ cup / As Needed

    For Ginger-Dipping Sauce:


    Thin Soya Sauce - ¼ cup
    Rice Wine Vinegar - ¼ cup
    Chopped Scallions - ¼ cup
    Crumbled Dried Red Chilly - 1 tsp
    Ginger - 1 tsp
    Toasted Sesame seeds - 1 tsp
    Sugar - 1 tsp

    The Way:


    1. Sift together flour & salt. Add 2 tbsp oil and mix well
    2. Slowly add the boiling-hot water & knead until it forms a soft & smooth dough
    3. Cover with a damp cloth & allow it to stand for 20-30 minutes
    4. Divide the dough into 3-4 pieces of equal size & roll them into balls using hand
    5. On a floured surface, place a ball & roll it into a thin circle using a rolling pin
    6. Spread a tsp of oil evenly over the pancake & sprinkle 1-2 tbsp of scallions over it
    7. Roll up the pancake from one end (horizontally) like a rug
    8. Curl (vertically) the roll around in a spiral. With the palm press the top of the spiral to flatten it. Using a rolling pin, roll again & flatten to achieve a 5 or 6 inch pancake
    9. In a hot non-stick pan, pan sear both sides of the pancake (like you make chapathis) until golden brown. Add oil if necessary
    10. Mix all the dipping ingredients together. Cut the pancake into wedges and serve them with the dipping sauce


    Notes:

    • I omitted rice wine vinegar in the dip as I did not have them. Still tasted awesome !

    Cheers,
    Chitz