Showing posts with label Nuts. Show all posts

Saturday, 4 January 2014

Ambur Mutton Biryani | Ambur Biryani | Easy Mutton Biriyani


So without much delay, let me wish all you wonderful friends & readers 'A Happy & Prosperous New Year'. How did the new year go for you all? Hope it was a colorful and bright one :) I have yet another reason to celebrate this new year. My blog turned one this year. To be exact, day before yesterday. The blog did bring out a year of fun, learning & a new excitement for me. I do not want to bore you guys with long speeches of my enthusiasm. 

So what am I bringing you today? It is not a sweet or dessert. By now, you must be knowing that I celebrate the anniversaries & occasions with chicken & mutton rather than sweets & cakes :) This is yet another amazing biriyani recipe that has been a constant hit in our kitchen. Actually I am only the photographer for this recipe. Everytime, to be frank every Sunday, it has been Deeps who makes this at our home :) We always are on the lookout for different varieties of biriyani & the famous South Indian Ambur biriyani was on our list for a long time. Once we tried it it become quite a regular at our place. Even our guests are a huge fan of it :) So try it out, you guys will definitely fall for it !!

Ambur Biryani is one of the famous food recipes of South India which emerged during the Nawab of Arcot's regime. This was served for the army of Carnatic as it was difficult to prepare Rotis or Parathas to cater to the need of lakhs of jawans. Today, it is served in all Muslim weddings along with Chicken Kebabs & sweet dishes. Courtesy: Wikipedia


Recipe Source : Adapted from Here

Marination Time : 1 hour

Preparation Time : 10 minutes

Cooking Time : 40-45 minutes


I Used:

Basmati Rice - 2 ½ cups
Water - 4 ½ cups (2 ½ * 1 ¾ cups)
Mutton - ½ kg
Onion - 3-4 nos - medium - sliced
Tomato - 2 small nos - chopped
Ginger-Garlic Paste - 1 tbsp
Mint leaves - ½ cup - chopped
Corainder leaves - ½ cup - chopped
Red Chilly powder - 1 tbsp
Coriander powder - 1 tbsp
Turmeric powder - ½ tsp
Oil - ¼ cup
Ghee - ¼ cup
Salt - As Needed


To Marinate:

Red Chilly powder - 1 tbsp
Coriander powder - 1 tbsp
Turmeric powder - ½ tsp 
Garam Masala - 1 tbsp
Yogurt - ½ cup
Ginger-Garlic paste - ½ tbsp
Lemon juice - 2 tsp 
Whole Spices:

Cinnamon  - 1 inch stick
Cloves - 2
Cardamom - 2
Bay leaves - 2
Star Anise - 2

To Grind:

Cashews - 10
Fennel Seeds - ½ tsp
Cumin Seeds - ¼ tsp
Green Chilly - 2
Garlic - 3

The Way:

Preparation:

  1. Marinate mutton with the ingredients listed under 'To Marinade' for about 45-60 minutes
  2. After an hour pressure cook the marinated mutton with sufficient water until done and keep aside
  3. Wash and soak the rice for about 10-15 minutes
  4. Add 2 tbsp of ghee in a pan & fry the soaked basmati rice for 2 minutes
  5. Grind the ingredients under 'To Grind' into smooth paste and keep it aside

Cooking:

  1. Heat ghee and oil in a wide bottomed pan. Add the whole spices to it and fry them in a low heat until a nice aroma comes out
  2. Now add the sliced onions and fry till it becomes translucent. Add ½ tbsp of ginger & garlic paste and saute for 2-3 minutes until the raw smell goes off
  3. Then add red chili powder, coriander powder and add turmeric powder. Fry well and add the chopped tomatoes along with salt and fry them for 3-4 minutes
  4. Finally add the mint leaves & coriander leaves and mix it all together. Add the pressure cooked mutton and mix well 
  5. Now add the ground paste and saute it for another 5 minutes in low flame
  6. Then add the fried basmati rice to the gravy and water and mix well. Sprinkle some coriander leaves.
  7. Taste the mix for salt and hotness. Add if required to suit your taste buds
  8. Cover the pan and cook in medium fire for 15 minutes
  9. After 15 minutes check if the rice is done and water has evaporated completely. Else  reduce the flame further and cook for another 5-10 minutes
  10. Once the rice is done, off the flame and leave the pan in the heat of the stove till you serve
Serve with onion-cucumber raita, mint-coconut chutney & mutton gravy of your choice.

Notes:

  • Rice : Water ratio of 1:1 ¾ works perfectly well for me. I use India Gate basmati rice for making this biriyani
Cheers,
Chitz

Wednesday, 16 October 2013

Halloween Special - Vegan Pumpkin Bread - Baking Partner Challenge #15


Come the month of October, it's festival time !! Dussera & Diwali here in India & the infamous Halloween in US. For me Halloween means kids in scary outfits & pumpkins carved in funny shapes ;) Actually I get reminded of the Harry Potter Halloween dinner scene :D Since pumpkin is such an inevitable part of Halloween, we Baking Partners decided to bake some Pumpkin bread for the occasion. So when Swathi announced the recipes & asked us to choose from among the three variants of pumpkin bread, my eyes & heart fell for the Vegan version. 

It is such a breeze recipe, just like a normal cake where in you combine all wet ingredients & dry ingredients separately & eventually mix them both & bake ! I was so much in love with the end result ! It was so soft & tender & tasty. I even took some to my send-off party (by the ladies gang ;)) back in Norway & all the ladies loved them. When they ask you for the recipe, you know that they too loved it to the core. So what you waiting for my pals, try this out soon & you too are gonna enjoy baking & eating them like us :)


Recipe Source: Here

I Took: 40 + 50 minutes

Serves: 1 loaf


I Used:

All purpose Flour - 1 cup
Whole Wheat Flour - ¾ cup
Dark Brown Sugar - 1 cup (I used normal sugar)
Baking Soda - 1 tsp
Baking Powder - ½ tsp
Salt - ½ tsp
Nutmeg - ½ tsp
Cinnamon - ½ tsp
Allspice - ½ tsp
Cloves - ¼ tsp
Pumpkin Purée - 1 cup (Refer first 2 steps)
Oil - ½ cup
Maple Syrup - 3 tbsp ( I omitted this)
Water - 3 tbsp 
Walnuts or pepitas - ½ cup - chopped (I used almonds)

The Way:


  1. Peel the skin off the pumpkin & rinse them well. Cut them into big chunks and pressure cook or microwave with ½ cup water for 15 minutes
  2. Allow them to cool. Then blender it to make a fine puree. If you want to remove the extra moisture, strain the puree using a cheese cloth. Set aside
  3. For this recipe, you can also blend the spices along with the boiled pumpkin !
  4. Preheat oven to 175 °C. Grease and flour a loaf pan
  5. In a large bowl mix together the all purpose flour, whole wheat flour, sugar, baking soda, baking powder, salt and spices (Nutmeg, cinnamon, cloves & allspice)
  6. In a small bowl whisk together pumpkin, oil, maple syrup, and water
  7. Add wet mixture to dry, combine until just moistened. The batter will be very thick, it is not a problem!
  8. Fold in nuts and pour the batter into the prepared pan
  9. Bake for about 45-50 minutes or until top is browned and a toothpick inserted in the center comes out clean. It took 50 minutes for me
  10. Allow it to cool for 20 minutes. Use a butter knife to gently loosen bread from sides of pan & then invert onto a cooling rack
Cheers,
Chitz

Thursday, 15 August 2013

Chinese Almond Cookies - Baking Partner Challenge #13


Here comes yet another beautiful challenge from the Baking Partners. This time it's cookies from around the world & I chose to go Chinese with these beautiful Almond cookies. I have baked Ameretti cookies (Italian) before, so I was sure that this would also be acceptable to our taste buds. And as I had expected this tasted crunchy & great with the lovely almond flavor. It's very easy to make & I found the method quite similar to the Indian flat bread 'Chapathi/Roti' :) Try this out as your yummy tea time snack !


Recipe from here

Makes: 8-12 cookies


I Took: 

Preparation Time: 30 minutes
Refrigeration Time: 1 hour
Baking Time: 20-25 minutes


I Used:

All purpose flour - ¾ cup + 1 tbsp
Butter - 4 tbsp
Sugar - ¼ cup
Almond paste - 2 ½ tbsp
Baking powder - ½ tsp
Vanila Essence - ½ tsp
Grated lemon zest - 1 tsp
Salt - ¼ tsp
Egg - 1 tbsp
Beaten egg white - of 1 egg
Almonds - 8-12 no


The Way:

  1. In a large bowl sift together all purpose flour, baking powder & salt together. For even mixing sift for two or three times
  2. Beat the egg nicely & keep aside
  3. In another wide bowl cream the butter until pale yellow. You can use an electric mixer or whisk. I used whisk
  4. Add ¼ cup sugar, almond paste, lemon zest & amaretto (or vanilla essence) & mix until it is smooth & lump free
  5. Now add about one third of the beaten egg and mix well. Now gradually add the flour & mix well until everything is fully incorporated. Use hands instead of whisk while incorporating flour
  6. Transfer the dough into a parchment paper & refrigerate it for about an hour
  7. Preheat the oven to 175 degree C in conventional mode. Adjust the rack to the lower third of the oven. Line baking sheets with parchment paper
  8. Once the dough is chilled, prep your working surface with 1 tbsp of sugar. Roll the dough over the sugar and then make small balls out of it (like you do for Indian flatbread or chapathi)
  9. Flatten out the balls into cookie shapes of your desired diameter & thickness using your palm. Place them two inches apart on the prepared baking sheets
  10. Brush each cookie lightly with beaten egg white and press a whole or chopped almond into the center of each 
  11. Bake for 15- 20 minutes or until golden brown around the edges
  12. Remove the baked cookies from the oven and allow to cool  to room temperature before serving

Notes:


Almond paste is nothing but powdered almond. Grind around 15-20 almonds in a mixie to get the above mentioned almond paste

Cheers,
Chitz

Tuesday, 30 July 2013

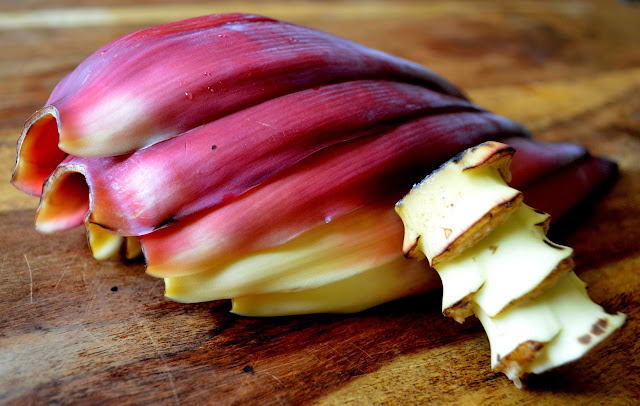
Vazhaipoo Poriyal | Vazhachundu Thoran | Banana Blossom Stir Fry - without Coconut

Banana Blossom stir fried with shallots & peanuts


There are certain veggies that we hate in childhood but turn close to heart when we grow up right? And when u relish on it now, you can always hear your amma saying 'How difficult was it to make her eat this one when she was young?' Isn't it?? Vazhapoo was one such veggie.. But to say the truth, I was a very picky eater when I was young, rather I had an aversion to food as such. Though you would never believe that if you see me munching & gobbling varieties of cuisines now ! 

Called by a wide variety of names as Vazhakoombu/Koombu/Kudappan/Chundu/Vazhapoo/Plantain or Banana Flower, this veggie is a very healthy & is a rich source of Vitamin E & antioxidants (now does that impress you?) And this dish you can say is yet another handiwork of my mom to make it even more healthier by avoiding coconut & substituting it with crushed peanuts. I would say that it retains the original flavor of the Vazhapoo which is usually shadowed by the addition of coconut & also the peanuts adds an extra crunch to the dish ! Even Deeps who is not a fan of this veggie would have a helping when the stir fry is prepared this way :)

The below picture goes to the Color me Purple (And Blue & Violet!) event of the "The Color Me Photography Challenge Series" - the brainchild of Priya !


Recipe Source: Ma
Serves: 3-4 persons


I Took:
Preparation Time: 1 hour
Cooking Time: 25 minutes


I Used:

Banana Blossom/Vazhapoo - 1 flower - about 2 cups after cleaning & chopping
Peanuts - 3 tbsp
Shallots - 4-6 no
Red Chilly powder - 2 tsp
Mustard - ½ tsp
Oil - 1 tbsp
Salt - As Needed

The Way:

  1. Clean vazhapoo & chop them finely. Then rinse them in water. Use a big strainer or colander to rinse them as it is more easier that way
  2. In a pan mix the cleaned vazhapoo, red chilly powder & salt. Add enough water & cook until the vazhapoo is done
  3. Coarsely grind the peanuts. You may just pulse it for 3-4 times
  4. In another pan, heat oil. Splutter mustard
  5. Then add shallots & saute till they turn golden in color. Now add the peanuts & saute well for a minute or so
  6. Finally add the cooked vazhapoo & give a thorough mix 
Serve with rice & a gravy of your choice :)

Cheers,
Chitz

Sunday, 21 July 2013

Fresh Basil Pesto Sauce Recipe


Some days I do not like to cook elaborate meals. Then I stick on to easy, ready to make dishes. This basil pesto sauce is one among them. I mostly use it for pasta but you can very well use them in a variety of ways. Spread it on a bruschetta or as an appetizer dip or use it as a spread or chutney for your sandwich. You can also mix it up with some mayonnaise to use up as a salad dressing or use as a spread or dip for your grilled chicken !! The uses are many & it's an effortless recipe :) Great right? 

I have some freshly growing basil sprigs on my window sill & I had been waiting for them to grow up to a considerable height so that I can use them. And now my emotions are that of a happy little kid :D This pesto sauce can be refrigerated for a week. Store them in air tight containers then. Alternately, it can also be freezed for upto six months.


Recipe Source: Adapted from here

I Took: 10 minutes

Makes: ¼ cup


I Used:

Fresh Basil leaves - ¼ cup
Walnuts/Pine Nuts - 4 tsp (I used Walnuts)
Garlic - 1 clove
Grated Parmesan Cheese - 2 tbsp
Olive Oil - 2 tbsp
Salt - As Needed

The Way:

  1. Add walnuts/pine nuts & garlic in a blender/mixer. Pulse it till crushed
  2. Add the fresh basil leaves to it & blend again
  3. Add olive oil and give it a quick pulse. Finally add the grated Parmesan cheese & salt and blend or pulse to your desired consistency
  4. I like it smooth rather than crunchy, so I blend it to a smooth paste. You can add water if necessary for the consistency 
Use as desired :)

Cheers, 
Chitz

Monday, 1 July 2013

Mughlai Chicken | Murg Mughlai

Chicken cooked with onions & spices and served with cream & almond sauce


I love cooking chicken.. That's an ingredient which will almost always guarantee taste, unless you mess with it that badly :D  So here I am, to tell a tale of my recent success story - "Mughlai Chicken".. My mom used to make this a long ago, when the entire family was in the prime of our healthy & extra indulgence of cream & nuts were a routine.. Ahh, Bliss !! Mughlai Chicken, Butter Chicken, Chicken 65.. the list was never ending. It had been a long while since I had this, so I succumbed to the craving & went ahead & prepared it.. Suits best with Rotis & Naan, but not a crime if u pair it up with steamed rice coz it again tastes great ;)


What I loved the most was that, my kitchen was smelling awesome after I cooked this.. The smell of ghee mixed with our Indian spices & cream.. Yupz.. I was loving it ;) B\ut the only minus is that I can't make it a routine in my menu, coz of the extra calories that I wud have to burn out.. Only if tasty dishes were healthy & nutritious to the core !! So enoough of my ramblings about this dish, let's check out how this is made :)


Recipe Source: Adapted from here & here


Serves: 2-3 persons


I Took: 

Preparation Time: 20 minutes

Cooking Time: 30 minutes


I Used:


Chicken - 400 gm
Onion - 1 medium - grated
Ginger-Garlic paste - 2 tsp
Cinnamon - An inch piece
Cardamom - 2 nos
Red Chilly powder - 1 tsp
Coriander powder - 1 ½ tsp
Cumin seed powder - ½ tsp
Garam Masala - 2 tsp
Cream - 3-4 tbsp
Egg - 1 no
Almonds - 15 no
Sugar - 1 tsp
Ghee - 2 tbsp
Salt - As Needed


The Way:

  1. Blanch the almonds - Soak the almonds in hot water for 5 minutes & then remove their skin
  2. Grind the almonds to a fine paste & keep aside
  3. Heat ghee in a pan over medium heat. Add the grated onions & fry them till they become translucent
  4. Then add in ginger-garlic paste, cinnamon & cardamom. Saute well till the onions turn golden brown & the raw smell goes off
  5. Now add the chicken (Refer notes below) and mix well so that the chicken pieces are smeared with the onion paste. Add salt and ½ cup water and cook till the chicken is half done. This may take around 12-15 minutes
  6. Meanwhile, in a small bowl mix together cream, eggs, sugar & powdered almonds thoroughly. Use a whisk to thicken, if the cream is liquidy
  7. Lower the heat once the chicken is half cooked. Add the cream mixture to it
  8. Cook on low flame until the chicken is cooked & tender for another 5-7 minutes
  9. Garnish with flaked almonds if u wish :)
Serve with hot phulkas or Naan :-)

Notes:


Instead of adding chicken pieces directly, you can grill it & add to the sauteed onions which would give you an extra zing. Marinate it for half an hour with red chilly powder, salt, turmeric, lemon juice & a little curd before grilling :)

Linking this to the event 'Flavours of Cusines - Mughlai' hosted by Shruthi & started by Julie


Cheers,
Chitz

Thursday, 25 April 2013

Cream Fruit Salad

Assorted fruits & nuts in Cream


This is a post that has been in my drafts for a week, the one which I had planned to post before I started to India. But in the hurry burry of the packing & cleaning & last minute shopping & preparations, I did not get time. Yes, this was a sudden twist in the normal vacation plan of ours. We had to start 2 weeks ahead of our anticipated plan & that too in a notice of 5 days.. So u can imagine the work package that come with it :D But anyways happy to get an extended vacation & enjoyment in the scorching heat of South India !! 


So back to the post, this is a very simple & quick dessert that can be prepared with the available fruits & nuts at hand. I had it at my friend Rameena's place & immediately fell in love with it. And so one day when I had a craving I messaged her for the recipe.. I knew it was a simple one, but wanted to get it right, exactly like hers ;) You know, this is an easy way to feed fruits to kids & also even adults too !! So, off to the recipe ;)

I Took: 20 minutes


Serves: 4 ppl


I Used:

Cream - 300 ml
Vanilla Essence - 1 tsp
Sugar - 3 tbsp or As Needed
Mango - 1 no
Apple - 1 no
Honey dew - ½ a normal sized fruit
Almonds - As Needed
Cashews - As Needed
Raisins - As Needed


The Way:

  1. Whip up the cream with sugar & vanilla essence till it gives a nice foamy texture
  2. Cut the fruits into cubes as for fruit salad and add it to the whipped up cream
  3. Add the chopped nuts and give a mix. This tastes more heavenly when you roast the nuts in a little ghee before adding to the whipped up cream
  4. Refrigerate for an hour or overnight as time permits & serve chilled


Notes:

You can use any fruit & nut of your choice. I used the ones that I had available that day !!

Cheers,
Chitz

Sunday, 31 March 2013

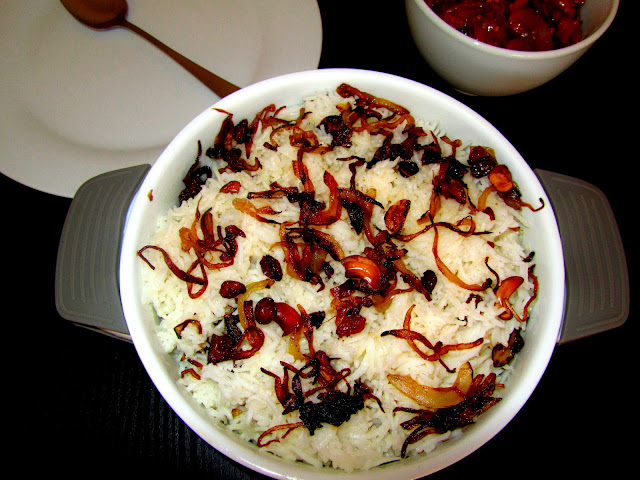
Nei Choru | Ney Choru | Malabar Neychoru | Ghee Rice

Rice cooked in ghee & layered with fried onions & nuts


 Come the long weekends & it's always the heavy one pot rice varieties with spicy non veg gravies.. Asking me why?? Guests, get together, quiet family dinner - name it, we have everything. And this one is no different. Day before it was Veg pulav, today it's Nei Choru & tomorrow it's Chicken Biriyani !! Ahaa, yeah all planned and implementing to the plan :D 

'Nei chooru' - this is yet another name that makes me drool. A very popular dish in Kerala, particularly the Northen Malabar side. Most of the Muslim weddings would be incomplete without this lip smacking, aromatic rice. It is quite simple to prepare and guarantees you a rich flavor & aroma. This used to feature in my college hostel mess once every week, usually during Sundays. Accompaniment was Spicy Chicken gravy & raita signed off with a glass of lime juice.. Ohh my God.. Heavenly!! And an afternoon nap with an overfilled tummy following that. What more can you ask for during college times, right??


And as many other recipes, I never ever dreamt that I would prepare this one at home. It was my mom-in-law who taught me how to make this. The way she described itself made me quite confident that this is 'As easy as an apple pie' task (though I have never tried to prepare an apple pie :P ) Then there was no stopping me, this one now features in our menu quite often.


And if you ask me the best accompaniments for this I would say any spicy  non veg curry (I personally love chicken) would go with it.  But recently I read in one another blogger page that dhal goes very well this is. I am but yet to try that combo. Am sure this would make some of the vegetarians out there very happy :) So off to the recipe now..


Recipe from Amma (Mil)

Serves: 2-3 persons

I Took: 40 minutes


I Used:

Basmati Rice - 2 cups
Onions - 3 nos - big sized - sliced
Water - 4 cups
Ghee - As needed
Cinnamon - An inch stick
Cloves - 4 nos
Cardamom - 3 nos
Cashews - 15-20 nos
Raisins - 15-20 nos
Lemon juice - 1 tbsp
Oil - 2 tsp
Salt - As needed


The Way:

  1. Boil the 4 cups of water
  2. In a pressure cooker, heat 2 tbsp of ghee. Add cinnamon, cloves and cardamom
  3. As it starts to sputter & release its aroma, add the washed & cleaned rice. Fry for a minute
  4. Add the oil, lemon juice and the boiling water
  5. Now close the cooker & pressure cook for just 1 whistle and remove immediately from flame. Or to be more precise, switch off the flame when the cooker starts making screeching noises just before the first whistle and allow it to stay in that heat for 10 more minutes
  6. Heat a pan. Add ghee. Roast the cashews & raisins & keep aside
  7. Fry the onions in the same ghee till golden brown
  8. To serve the rice, alternate the fried onions & nuts with the layers of cooked rice 
Serve with parippu/dhal or with spicy chicken curry.

Cheers,
Chitra