Showing posts with label Shallots. Show all posts

Wednesday, 12 February 2020

Chammanthi Podi | Nadan Chammanthi Podi | Nalikera Podi | Kerala Style Roasted Coconut Powder for Rice


Chammanthi Podi needs no intro for a Malayalee ;) It is a staple at many Mallu homes and almost every other mallu going abroad would have taken this condiment, packed & sealed tightly and buried deep inside the suitcase :D If they do not take it during their first visit, they will definitely remember to pack some when they come & go back after the vacation :)

It is really yummy, easy to make, can be stored for quite some time if handled properly and can be had with just rice and curd. It is the most yummax combo if you ask me :) And we eat a pot full of rice when we eat them with matta rice & curd combo. Of course, we make a fluffy omelette loaded with onions also to go with it ! So now without much talk, let's see how this is made.. 

P.S: This one is made by my mil & I took only the pics :D And these are one of the first set of food pics taken with iPhone XR. Am going to ditch my SLR for a while now...

Recipe Source: Amma


Serves: 3-4 persons


I Took: 

Preparation Time: 5 minutes

Cooking Time: 30 minutes


I Used:


Coconut - 2 medium sized coconuts - Around 4 cups - grated
Tamarind - 3 tbsp - A big lemon sized 
Shallots - 15-20 nos - medium sized
Curry Leaves - 4-5 sprigs
Red Chilly - 20-22 nos


The Way:


1. Grate the coconut finely without bigger scrapes. If you get big scrapes while grating, then you can add them in a mixie jar and give a quick pulse so that the scrapes are even. This will ensure that the colour of the powder/podi is even and dark without white specks

2. Take the grated (& pulsed) coconut in a wide and thick bottomed pan/uruli. Roast them on a low/medium flame. Keep roasting them as often as possible to ensure that they do not get burnt or get stuck at the bottom of the vessel

3. Once the coconut starts to brown slightly, add the tamarind pieces (If you wish, can wash them and add) and keep roasting

4. After 2-3 minutes add the curry leaves and shallots. If shallots are bigger, slice them and add


5. Keep roasting them till they turn deep brown in colour. Keep caution to not to burn them else the taste of the podi will not be up to the mark

6. In a separate kadai/vessel roast the dry red chillies for 2-3 minutes till they swell up and give out a good glaze. Do not roast for long as it will get burnt 

7. Now allow them to cool till they reach room temperature


8. Then add all the contents including the red chilly to a large mixie jar and grind them coarsely. Ideally it should be a little coarse. You can grind them as fine or coarse as you wish though :)

Serve with matta rice, curd & pickle :)

Cheers,
Chitz

Tuesday, 21 May 2019

Red Coconut Chutney | Kerala Style Coconut Chutney with Shallots | Easy Kerala Style Coconut Chutney


An idly or dosa breakfast at my place usually means there will be a red chutney or white chutney to accompany it :) Both are coconut chutneys with the red one made with red chillies and the white one made with green chillies. Very easy to make if there is grated coconut at hand. Usually I grate the coconut the previous night or during weekends and refrigerate (You can even freeze them if you have more quantity) them. Morning first thing I take the grated coconut from fridge and keep outside. And while grinding I use slightly warm water so that it grinds easily without a slimy appearance (frozen grated coconut tends to make the chutney slimy, so better to use freshly grated ones) This makes life easier on busy mornings :) So today I will share how I make the red coconut chutney :) Other chutney recipes on the blog are Onion Tomato Kara ChutneyUlli SammanthiPudina Chutney (without coconut)Pudina Chutney with coconutPudina-Verkadalai Chutney


Serves: 3 persons


I Took: 

Preparation Time: 10 mins


I Used:


Grated Coconut - ½ cup
Red Chilly - 2-3 nos
Ginger (optional) - An inch piece
Shallots/Small Onions - 2-3 nos
Salt - As Needed
Water - As Needed

To Temper:


Coconut Oil - 2 tbsp
Mustard - ½ tsp
Curry Leaves - 2 sprigs


The Way:


1. Take the grated coconut, shallots, red chilly and ginger in a mixer jar along with required salt. Add little water (¼ cup)


2. Grind them nicely to a smooth (as smooth or coarse as you want) consistency


3. In a tadka pan, heat oil. Splutter mustard seeds

4. Then add the curry leaves. Switch off flame

5. Add the tadka to the chutney


Serve with idly, dosa, uthappam, pongal !


Notes:


  • Use freshly broken & scraped coconut. The taste really differs when you use even a day old (refrigerated) coconut
  • Avoid using old coconut and also kopra
  • Add water according to the consistency of the chutney that you need. I would suggest using less water while grinding. Add more if needed once you grind and transfer the chutney to a container
  • Ginger is optional
  • Adjust the chillies as per your taste. Quantity of ingredients given are guidelines and can be adjusted to suit personal tastes
  • If the chutney becomes too runny, add more grated coconut and grind

Cheers,

Chitz

Friday, 14 December 2018

Pavakya Pulin Curry | Kaipekka Puli Curry | Kerala Style Kaipakka Pulincurry without coconut | Bitter Gourd in Tamarind Gravy


I am not a fan of bitter gourd but the better half is crazy about it :( So it kinda features regularly in our menu. I try to make it as appeasing as possible by making Bitter Gourd Fry (really deep ;)) or something like this Pitla, which uses lesser quantity of bitter gourd and where the dominating taste is that of the dal and the masala ;) Once in a while I am okay with the Pavakka Puli Kuzhambu and that's only because it uses coconut ;) This is the first time i am liking something which does not mask the bitter gourd taste nor uses coconut or has another dominating taste. But even then I do not eat the bitter gourd in this gravy. But this gravy is just awesome and tastes quite like Meen Mulakittathu. Now you understood why I liked it right? Just a little of this gravy is enough for me to eat scoopfuls of rice ;) And this is getting featured in our menu too quite often :) So you wanna know how to make it. Head on to the recipe then.. 

If you would like to, check out Khatta Meeta Karela too !


Recipe Source: Adapted from here


I Took: 

Preparation Time: 10 minutes

Cooking Time: 30 minutes


Serves : 3-4 persons


I Used:


Coconut Oil - 1 tbsp
Onions - 1 medium sized one - sliced
Garlic - 4-5 cloves
Bitter Gourd - 1 small sized one or ½ a medium sized one
Turmeric powder - ¼ tsp
Red Chilly powder - 2 tsp
Coriander powder - 1 tsp
Fenugreek powder - ¼ tsp
Tamarind - A gooseberry sized ball

To Temper:
Coconut Oil - 2 tbsp
Mustard - ½ tsp
Red Chilly - 2 nos
Shallots - 6-8 nos - sliced
Curry leaves - 2 sprigs


The Way:


1. Clean the bitter gourd and cut into small pieces suitable for the gravy. You can do this by cutting the bitter gourd into half (vertically) and then remove the pith. Then cut the bitter gourd into small pieces. Also slice the onions and peel the garlic and keep ready

2. Soak tamarind in warm water for 15-20 minutes. Then extract the pulp and keep aside


3. In a bowl, mix together red chilly powder, coriander powder and fenugreek powder with little (around 1-2 tbsp) water and make into a smooth paste and keep aside

4. Heat coconut oil in a pan/kadai/manchatti 


5. Add the sliced onions and garlic pods and saute for a minute. Add the cut bitter gourd pieces and give a stir. Then add turmeric powder and salt and mix well


6. Add water - around 1/4 cup and close and cook for 5-6 minutes

7. Now add the masala paste to the bitter gourd and mix well and let it cook for another 3-4 minutes or till the raw smell of the masala goes away


8. Then add the tamarind water and give a nice stir. Allow it to boil

9. Once it boils, simmer the flame and cook covered for another 10-15 minutes. Then switch off flame


10. In another tadka pan, heat the coconut oil. Splutter mustard

11. Then add the broken red chilly, curry leaves and the sliced shallots. Stir continuously in low flame till the shallots turn colour and start turning brown. Take care not to burn the tadka

12. Add the tadka/tempering to the gravy and give a gentle stir. Allow it to sit for half an hour if possible before serving


Cheers,
Chitz

Tuesday, 14 August 2018

Koorka Upperi | Kurka Ularthiyathu | Kerala Style Koorka (Chinese Potato) Stir fry


I know that this is not the season for Koorka (Chinese Potato). But I so love them that I have been dreaming about them for the past couple of days :D They are very tasty but slightly difficult to clean ! To know more about them read my Koorka Thoran post. You can actually call this a cousin of potato. But I feel it's more tastier than potato coz of the fibrous feel in that every bite :) I know I'm praising this tuber too much but if you can get past the cleaning and make this stir fry you wouldn't think twice to agree with me ;) And today's recipe is an easy stir fry with koorka and that also without coconut. My family is little partial to Koorka Thoran which is with coconut. But this also tastes excellent. Pair it with moru curry or moru kachiyathu and a non veg ularthiyathu or just some hot pickle, you will definitely go for that extra helping of rice :D So let's dive into the recipe!


Preparation Time : 25 minutes

Cooking Time : 25 minutes


Recipe source : Amma


Serves : 4 persons


I Used:


Koorka-250 gm (around 2 cups after slicing)
Coconut Oil-3 tbsp
Mustard -1 tsp
Curry leaves-2 sprig
Shallots/Small Onions-10 nos
Red Chilly-2 nos
Garlic
Turmeric powder
Salt
-
-
-
5 nos 
¼ tsp
As Needed


The Way:


1. Soak the koorka/chinese potato in water for half an hour to one hour. Then scrape the skin off it using a knife. Alternately you can pressure cook the koorka for 1 whistle and then peel the skin off like you do for a potato. Or there is a third method that is predominantly followed in many Kerala families, you take the koorka in a jute or sack or a gunny bag and hit the bag gently on the floor repeatedly. After a while you can see that the koorka skin comes off easily

2. Once the skin is removed completely, rinse them again in water. Then chop them or slice them, as you prefer, to bite sized pieces


3. Take shallots, red chilly and garlic in a mixer jar and give a coarse blend. 3-4 pulses is sufficient. Do not grind to a smooth paste

4. Heat coconut oil in a pan/kadai. Splutter mustard 


5. Then add the coarsely ground shallot paste. Saute for 3-4 minutes till it's cooked and the raw smell of the garlic and shallots goes off

6. Then add turmeric powder and salt. And then add the curry leaves


7. Now add the koorka and give a stir. Allow it to cook in low flame with the lid of the pan closed. This will take around 15 minutes or so. In between remove the lid and give an occasional stir so that it does not get burnt 

8. If needed sprinkle water. Do not add more water as the koorka will turn soggy. Once cooked, remove from fire and serve


Serve with red rice, moru curry and pappad!

Notes:

  • There are a few ways in which you can clean koorka like
    • Soak the koorka/chinese potato in water for half an hour to one hour. Then scrape the skin off it using a knife. 
    • Pressure cook the koorka for 1 whistle and then peel the skin off like you do for a potato
    • This method is predominantly followed in many Kerala families, you take the koorka in a jute or sack or a gunny bag and hit the bag gently on the floor repeatedly. After a while you can see that the koorka skin comes off easily
  • Always if possible, parboil the koorka, drain off the excess water and use it. Or cook the koorka normally like potato as detailed in this recipe. Pressure cooking the koorka reduces it's taste. It tastes much better while cooked normally 
  • I have used lesser quantity of garlic here as my family prefers it that way. If you like the flavour more then you can add more
Cheers,
Chitz

Tuesday, 22 May 2018

Unakka Chemmeen Pacha Maanga Curry | Unakka Chemmeen Maanga Muringakka Kootan

Kerala Style Dried Prawns & Raw Mango Curry with Drumsticks


And here I am with the last post of the season with dried shrimps. I promise :) My stock of the dried prawns is over :D So this is a recipe of the summer season coz the dried shrimps are paired with raw mangoes to make this gravy. It is a yummy tangy gravy that you can make when you do not have fresh fish in stock to enjoy a fish curry. Here in this gravy tamarind is not used, instead the raw mangoes impart the necessary tanginess for the gravy.. It is easy to make and you can pair it with aviyal or any thoran or stir fry of your choice. Deeps liked this gravy and did ask for a second helping (proof that he liked this and I can continue to make it as part of our menu ;)) and so this is going to be a regular whenever I get hold of some dried shrimps. So let's see how to make this yummilicious gravy..

Other recipes with Dried Shrimps:

Unakka Chemmeen Chammanthi Podi | Dried Shrimp Chutney powder
Unakka Chemmeen Roast | Dried Shrimp Fry

Other recipes with Mango:


Recipe Source: Adapted from Here


Preparation Time : 15 minutes

Cooking Time : 45 minutes


Serves : 3-4 persons


I Used:


Dried Shrimp - ½ cup
Raw Mango - 1 no (big sized one - totapuri/kilimooku) - cut into cubes
Drumstick - 1 no - cut into 2 inch long pieces
Shallots - 4-5 nos - sliced
Ginger - 1 inch piece - sliced
Green Chilly - 2 nos
Curry leaves - 3 sprigs
Red Chilly powder - 2 tsp
Turmeric powder - ¼ tsp
Salt - As Needed
Water - As Needed

To Grind:

Coconut  - ½ cup

To Temper:

Coconut Oil - 2 tbsp
Shallots - 4-5 nos


The Way:


1. Rinse and wash the shrimp thoroughly 3-4 times to remove any dirt or dust particles in them. They tend to absorb water, so be quick to rinse and once done, drain them and keep aside for 10-15 minutes


2. Now heat a man chattai (earthen pot) or a kadai. Add the washed dried shrimps and roast on medium/low flame for 5-10 minutes till they turn golden in colour. Once done and dried, remove them on to a plate


3. If you have bigger shrimps and would want to remove their heads and tails now would be a good time to do so


4. Then in the same man chatti or pan take the roasted shrimps, drumstick, cut mangoes, sliced shallots, sliced ginger, green chilly, 1 sprig curry leaves, red chilly powder, turmeric powder and salt (add cautiously as dried shrimps already have salt in them)


5. Add water and mix well. Cook them on high flame till water begins to boil


6. When it starts boiling, reduce the flame to low and cover the vessel and cook till everything is cooked. Check occasionally to see that water doesn't evaporate off completely and they get burnt. This would take around 15-20 minutes


7. Meanwhile grind grated coconut to a smooth fine paste by adding water. Once the mangoes and shrimp is cooked, add the coconut paste to it and stir well. Check for salt and hotness. Add accordingly if required


8. Cook for another 10-15 minutes in low flame 


9. Meanwhile heat coconut oil in a tadka pan. Add sliced shallots and fry them till golden brown

10. Once the gravy is done, pour this tempering on the gravy and add 2 sprigs of curry leaves and give a gentle stir


Serve with rice and a stir fry of your choice!


Notes:

  • The tanginess for the gravy comes from the raw mangoes. So add accordingly. I used the whole of a kilimooku/totapuri mango. If you are in doubt, first add half of the mango. Then once the shrimp and mangoes are half cooked, check for the tanginess, add more if needed 

Cheers,

Chitz

Sunday, 20 May 2018

Unakka Chemmeen Roast | Unakka Chemmeen Fry | Kerala Style Dried Shrimp Roast | Dry Prawns Fry | Dried Prawns Stir fry

Unakka Chemmeen Ularthiyathu | Unakka Chemmeen Mulakittathu


I'm back with another delicacy with dried shrimps :) See that's what I do when I get hold of something exotic to us.. GO overboard ;) But this is also something that you all would love and enjoy. It's a roast or fry with the unakka chemmeen or dried shrimps (prawns).. You know what Deeps asked when I served this dish. "Deep fried???"  I was like, "No, shallow with 2 tbsp oil ;) That's the magic here.. Looks and feels like a deep fry, but have used minimal oil here. And I paired this with some spinach dal and cabbage poriyal.. Oh my, it tasted just awesome with the dal ! You can have it with kanji (rice gruel) as well and I'm sure you wouldn't need another side dish :) or just dal or mild gravy. This is so easy to make and will take your simple meal to another level. And spice and shallots, feel free to increase or decrease according to your needs..So let's see how easily this is made :)


Preparation Time : 10 minutes

Cooking Time : 30 minutes


Serves : 2 persons


I Used:


Dried Shrimp - 1 cup
Shallots - 10-12 nos
Red Chilly - 2-3 nos
Coconut Oil - 2 tbsp
Curry leaves - 2 sprigs
Red Chilly powder
Turmeric powder
-
-
2 tsp
¼ tsp
Salt - As Needed


The Way:


1. Peel the shallots and rinse them well in water. Take the shallots and red chillies in a mixer jar and coarsely pulse them 2-3 times. Do not have to grind them to a smooth paste

2. Rinse and wash the shrimp thoroughly 3-4 times to remove any dirt or dust particles in them. They tend to absorb water, so be quick to rinse. Once done, drain them and keep aside


3. Heat coconut oil in a pan/kadai. Splutter the curry leaves

4. Now add the coarsely pulsed shallot-red chilly mix. Saute them for about 3-4 minutes in medium flame


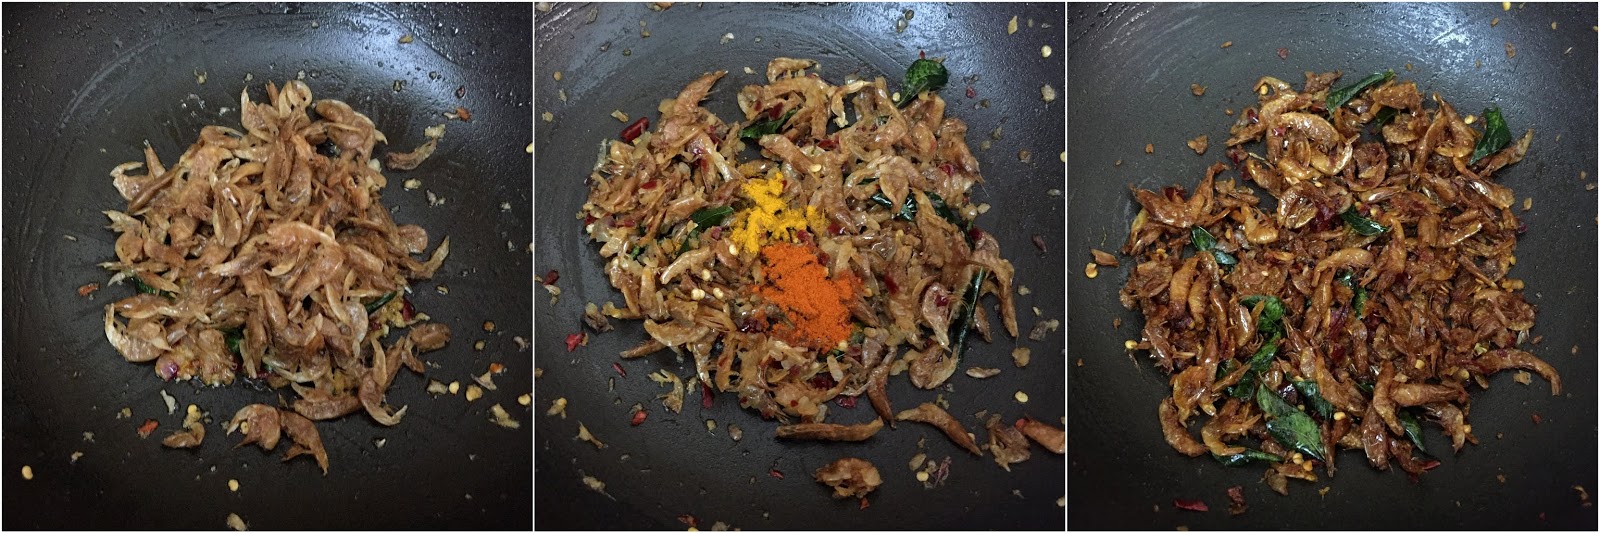
5. Then add the rinsed dried shrimps and give a quick mix. Keep sauteeing for another 4-5 minutes till they start to become dry

6. Now add the turmeric powder, red chilly powder and salt (Dried fish will already have salt in them, so add cautiously) and give a nice stir

7. Reduce the flame to low and keep stirring occasionally to avoid the shrimps getting burnt. If you feel they need a little more oil, add a tsp or two and mix. Check for salt and hotness and add salt and red chilly powder if needed. They should turn golden and dry (no moisture content). this would take around 15-20 minutes


When done, serve with hot rice and a gravy of choice or kanji(rice gruel)!

Notes:

  • I have used 2 tsp red chilly powder here which is fairly hot and suited for our taste buds. You can very well increase or decrease the quantity according to the needs of your family
  • If you want you can increase the amount of shallots for more masala
  • Dry shrimps comes with added salt. Hence add salt accordingly
  • If your shrimps are larger and you want to remove the head and tail then you can do the same after rinsing them
Cheers,
Chitz