This yam fry is one of my most favourite and go-to side dish during Saturdays as a non-veg equivalent :) Coz I do not eat non veg during Saturdays.. As most of my recipes are, this too is very easy to make and tastes as good as a non-vegetarian roast or dry fry would do :) So this is a family favourite as well. Here I have detailed 2 methods of making this fry. First one is the one I follow when I do not have much time in hand. It is just mix the masalas and marinate the yam with it and just shallow/pan fry them.
The second method is slightly elaborate with the peeling of the shallots and grinding a paste to make the marinade. It is the same masala that I use for my fish fry. So if I have that masala handy or if I have time to make them from scratch I go for this method. This is obviously more tastier coz of that extra work involved ;) So let's see how to go about to make this yummilicious fry :)


Serves: 2-3 persons
I Took:
Preparation Time: 20 mins
Cooking Time: 30 mins
I Used:
| Elephant Yam/Chena | - | 150 gm (1¼ cup after cutting) |
| Chilly powder | - | 1 tsp |
| Coriander powder | - | 1 tsp |
| Turmeric powder | - | ¼ tsp |
| Garam Masala | - | ½ tsp |
| Ginger Garlic Paste | - | 1 tsp |
| Asafoetida | - | 2 pinch |
| Oil | - | 2-3 tbsp |
| Salt | - | As Needed |
The Way:
1. Scrape the skin of the yam. Rinse them in water. Then cut them into slightly (not very) thick slices
2. In a plate take the red chilly powder, coriander powder, turmeric powder, garam masala, asafoetida, ginger-garlic paste and salt and mix well. You can add 1-2 tsp of water and make a paste or you can mix it without water

3. Then coat the yam slices on both sides with the masala paste and place them in a bowl
4. In a pressure cooker take about 1-2 glass of water. Place the plate used for double boiling in the cooker. Then place the bowl with the yam pieces on the plate. Close the cooker and put on the weight. Pressure cook it for 1 whistle. Don't cook for more else the yam will get very soft or mashed and cannot be used for the fry

5. Heat oil for shallow frying in a frying pan. When the oil is hot, reduce the flame to simmer and arrange the yam slices
6. After 1-2 minutes, flip the yam slices gently using a spatula
7. After another 1-2 minutes flip one more time. Slightly increase the flame and allow the slices to get roasted and get a nice deep red colour. It may take about a minute or two. Be cautious not to get the slices burnt
8. Now flip over and get the other side also a deep red colour. Switch off the flame. If you have another batch to fry, then proceed with the next batch

Serve with rice and a mild gravy
1. Scrape the skin of the yam. Rinse them in water. Then cut them into slightly (not very) thick slices
2. Take the yam slices in a pressure cooker. Add the coriander powder, turmeric powder and salt. Add about ¼ cup of water and give a gentle mix
3. Pressure cook for 1 whistle. Don't cook for more else the yam will get very soft or mashed and cannot be used for the fry

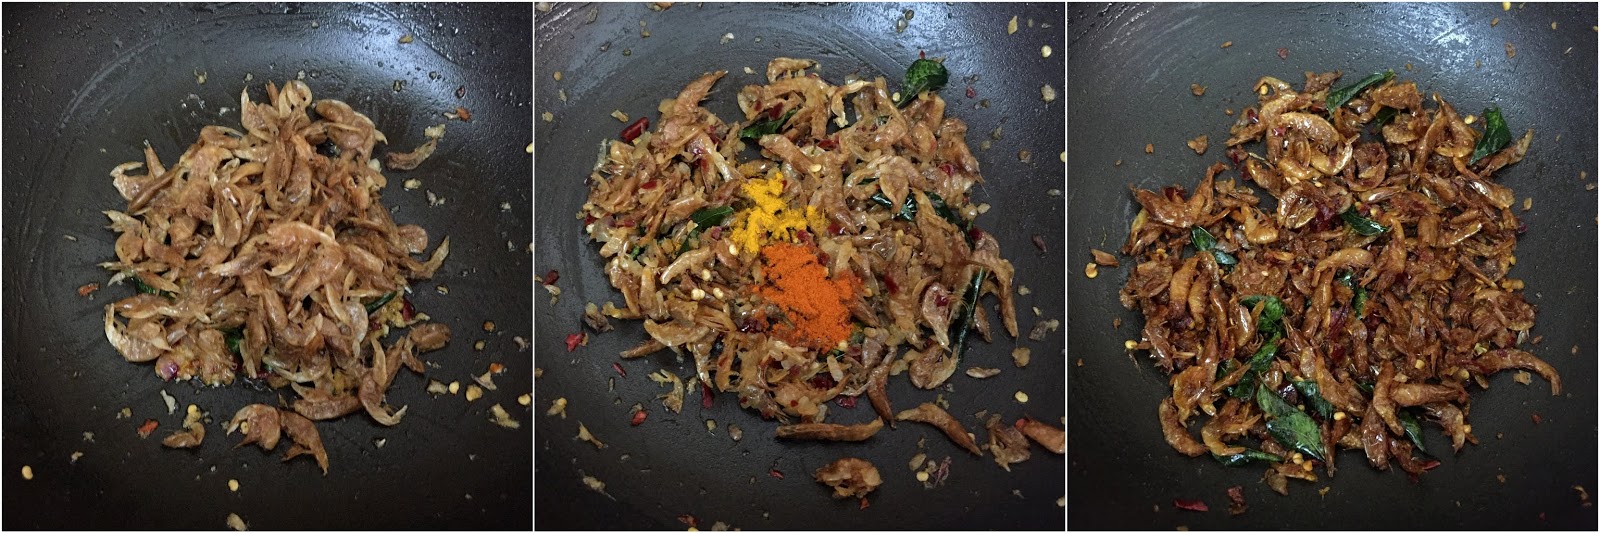
4. Meanwhile in a mixer jar add the shallots (or onions, preferably shallots),peppercorns and garlic. Grind it to a smooth paste with little water
5. Now take the paste in a plate. Add red chilly powder and salt to it and mix well. Coat the yam pieces with the paste and keep aside

6. Heat oil for shallow frying in a frying pan. When the oil is hot, reduce the flame to simmer and arrange the yam slices
7. After 1-2 minutes, flip the yam slices gently using a spatula
8. After another 1-2 minutes flip one more time. Slightly increase the flame and allow the slices to get roasted and get a nice deep red colour. It may take about a minute or two. Be cautious not to get the slices burnt
9. Now flip over and get the other side also a deep red colour. Switch off the flame. If you have another batch to fry, then proceed with the next batch

Serve with rice and a mild gravy
6. After 1-2 minutes, flip the yam slices gently using a spatula
7. After another 1-2 minutes flip one more time. Slightly increase the flame and allow the slices to get roasted and get a nice deep red colour. It may take about a minute or two. Be cautious not to get the slices burnt
8. Now flip over and get the other side also a deep red colour. Switch off the flame. If you have another batch to fry, then proceed with the next batch

Serve with rice and a mild gravy
Method 2:
I Used:
| Elephant Yam/Chena | - | 150 gm (1¼ cup after cutting) |
| Shallots | - | 5-6 nos |
| Garlic | - | 3-4 nos |
| Pepper | - | ½ tsp |
| Red Chilly powder | - | 1 tsp |
| Coriander powder | - | 1 tsp |
| Turmeric powder | - | ¼ tsp |
| Salt | - | As Needed |
The Way:
1. Scrape the skin of the yam. Rinse them in water. Then cut them into slightly (not very) thick slices
2. Take the yam slices in a pressure cooker. Add the coriander powder, turmeric powder and salt. Add about ¼ cup of water and give a gentle mix
3. Pressure cook for 1 whistle. Don't cook for more else the yam will get very soft or mashed and cannot be used for the fry

4. Meanwhile in a mixer jar add the shallots (or onions, preferably shallots),peppercorns and garlic. Grind it to a smooth paste with little water
5. Now take the paste in a plate. Add red chilly powder and salt to it and mix well. Coat the yam pieces with the paste and keep aside

6. Heat oil for shallow frying in a frying pan. When the oil is hot, reduce the flame to simmer and arrange the yam slices
7. After 1-2 minutes, flip the yam slices gently using a spatula
8. After another 1-2 minutes flip one more time. Slightly increase the flame and allow the slices to get roasted and get a nice deep red colour. It may take about a minute or two. Be cautious not to get the slices burnt
9. Now flip over and get the other side also a deep red colour. Switch off the flame. If you have another batch to fry, then proceed with the next batch

Serve with rice and a mild gravy
Notes:
- If you may like, add a 1 tsp of tamarind paste also while marinating the yam pieces. Some add it as the yam can make the tongue itchy sometimes
- If you like your yam fry more crispier, add 1 tbsp of rice flour & besan flour also to the marination. But I like the fry without them itself. So I never add them
Cheers,
Chitz