Showing posts with label Jaggery. Show all posts

Friday, 14 June 2019

Raw Mango Pachadi | Pacha Maanga Pachadi | Mangai Pachadi | Mamadikaya Pachadi


This is a dish with a lot of emotions attached to it.  This was one of my grandfather's favourite dish. This is my mom's favourite. And now it's mine too.. Earlier I was not a great fan of this. But after a point, I started relishing this relish. And what happened was I never used to get it right. So I have made this a couple of times and clicked a couple of times over a couple of years but somehow I was not satisfied. 

This year when my mom was home, I made her do this and after that I made it again a couple of times and it was tasting perfect each time. Just like that childhood days taste I have in my senses :) And this time I jotted down the measurements too and so it made it's way to the blog now. Sometimes (Many a times) the simplest of the dishes are the ones that take time to master than the complex ones. At least for me ;) This dish can be had like you have the pickle, as a side dish/relish for rice. Or if you are like me, can have it as such too :D

Makes: 1 cup


I Took: 

Preparation Time: 5 mins

Cooking Time: 20 mins


I Used:


Raw Mango - 1 medium sized (A heaped ½ cup)
Red Chilly Powder - 1 tsp
Turmeric Powder - ¼ tsp
Salt
Water
-
-
As Needed
¼ cup
Jaggery - 2-3 tbsp
Oil - 2 tsp
Mustard  - ½ tsp
Red Chilly   - 1-2 nos
Curry Leaves - 2 sprigs


The Way:


1. Trim the edges and peel the skin of the mango. Wash it well. The area near the stalk may have milk in it. So wash well else you will get a bitter taste

2. Chop the mango to small pieces (around ¼ inch pieces)

3. Take the chopped mangoes along with the red chilly powder, turmeric powder and salt in a kadai/pan. Add water and mix well


4. Keep the kadai on flame. When it comes to a boil, simmer the flame and  close the kadai with a lid and allow the mango pieces to get cooked. It will take around 5-7 minutes

5. Check once in a while to see that the water is not dried and the mango pieces doesn't get stuck at the bottom of the kadai

6. Once cooked you can see that much of the water has evaporated and you have a thick mix. Now add the jaggery granules to it. I use organic jaggery granules. So added as such

7. If you are using normal jaggery, scrape the jaggery and take them in a separate vessel. Add little water to it and heat it over flame. Once they dissolve switch off the flame and allow to cool. Then strain them using a strainer to remove any impurities in the jaggery and then add it to the pachadi


8. Once you add jaggery, it will release some water. Keep mixing over low flame for 2-3 minutes. The mix will come together. Switch off the flame then

9. In another tadka pan, heat oil. Splutter mustard


10.Add broken red chilly and curry leaves

11. Add this tadka to the pachadi. Mix well and serve


Notes:

  • Quantity of the red Chilly powder and jaggery mentioned here are that which I used for a moderately sour mango. Adjust them according to the mango that you use 
  • Use raw mangoes for making this pachadi. My mom says that the best ones for making this pachadi are the ones that are starting to turn ripe. The ones which are firm like raw mango but have a mild yellow colour to it
  • Adding tadka is optional. If you do not like, you can skip it

Cheers,
Chitz

Friday, 24 May 2019

Pavakkai Fry | Pavakya Fry | Kakarakaya Fry | Easy Bitter Gourd Fry (Deep Fry)


By know you guys would be knowing my family's love for bitter gourd. Though I am very picky about the dishes made with pavakkai, this one is a personal as well as family favourite. Deep frying can make even the boring bittery bitter gourd yum and this recipe is a testimonial for that ;) And even my guests adore this fry. It tastes yum with curd rice, rasam sadam and samabar sadam.. My little one munches them as such :D And this is the only way he eats bitter gourd. Can't blame him ;) So let's hop on to the recipe now..

Some other recipes with bitter gourd that are there in the blog are PitlaPavakya Pulin Curry, Pavakkai Puli Kuzhambu & Khatta Meeta Karela..


Serves: 2-3 persons


I Took: 

Preparation Time: 10 mins

Cooking Time: 15 mins


I Used:


Bitter Gourd/Pavakkai - 2 medium sized ones
Red Chilly powder - 1 ½ tsp
Coriander powder - 1 ½ tsp
Turmeric powder - ½ tsp
Tamarind Paste - 1 tsp (or a gooseberry sized piece)
Grated Jaggery (refer notes)
Salt
Oil
-
-
-
1 tsp
As Needed
To deep fry


The Way:


1. Rinse the bitter gourd well in water. You can scrape off the edges if needed. Else can use them as such. Trim the edges and cut them into thin round slices. The seeds and the skin are edible. If you do not prefer you can remove the seeds

2. Take the cut bitter gourd slices in a bowl. Add the red chilly powder, coriander powder, turmeric powder, salt, jaggery and tamarind paste, besan and rice flour (if using) to it and mix well. I did not have tamarind paste handy so I added a goseberry sized tamarind instead

3. Allow it to rest for 10-15 minutes


4. Heat oil for deep frying in a kadai or tadka pan

5. First add the tamarind piece (if using paste, directly add the marinated bitter gourd slices) to it. After 30-40 seconds, add a batch of the bitter gourd pieces and fry it till it turns colour and becomes deep and crisp

6. Remove onto a plate and fry the remaining bitter gourd pieces also like this in batches and serve with rice and gravy


Notes:

  • To remove some bitterness you can rub salt to the bitter gourd pieces and rest it for 20 minutes. Then rinse it under water and then use. Alternately you can soak in curd as well and squeeze or rinse off the curd and then use. But since this recipe calls for deep frying the bitter gourd, the bitter taste is not felt much and hence I avoid that step
  • You can skip jaggery if you do not want. The tamarind and jaggery are to reduce the bitterness of the gourd
  • You can add 2-3 tbsp each of besan flour and rice flour or either one of the flour to the bitter gourd slices while marinating. The flours will add a coating to the bitter gourd slices and make them look more appealing :) I generally do not add them

Cheers,
Chitz

Wednesday, 7 February 2018

Instant Gooseberry Pickle | Instant Nellikai Pickle | Amla Pickle | Easy Nellikka Achar


Is Amla something that you would like to eat raw? I don't.. I like it when brined or made into a pickle or maybe a chutney or something.. I think it's coz of it's bitter taste and many would agree with me on that.. But it's a very healthy berry loaded with Vitamin C and antioxidants and many other minerals and vitamins. I don't have to elaborate that it's widely used in Ayurvedic medicines and treatments.. They are also low in calories and fat and cholesterol free. 

I have heard that it doesn't lose it's medicinal properties much even after cooked or pickled.. Not sure if it's true.. But believe me when I say that this recipe is one of the best and can make any gooseberry hate eat some ;) There is jaggery added to balance the bitterness and that gives a lift to this pickle :) We love this pickle and make it whenever I find some gooseberries :) So let's see how to make this lip-smacking pickle!


Preparation Time : 5 minutes

Cooking Time : 30 minutes


Recipe source : Ma


Makes : A 300 gm bottle 


I Used:


Gooseberry/Nellikka - 8 nos (1 cup after de-seeding)
Turmeric powder - ½ tsp
Salt - As Needed
Gingelly Oil - ¼ - ½ cup
Asafoetida - 2 tsp
Red Chilly Powder - 1 tbsp
Jaggery - ½ cup
Lemon jucie/Vinegar - Juice of ½ a big lemon/ 3 tbsp vinegar
Mustard  - 2 tsp
Fenugreek - 2 tsp
Mustard-Fenugreek powder - ½ tbsp


The Way:


1. In a pan dry roast the mustard seeds and fenugreek seeds for 4-5 minutes on low flame. Take care not to burn them. It starts giving a nice aroma and also the mustard will start spluttering. Then off the flame. Allow it to cool and powder them in a clean and dry mixer jar. You can grind this powder in bulk and use it for all of your pickles

2. Boil the gooseberries with salt and turmeric powder for 10-12 minutes or until cooked. Alternately you can pressure cook for 1 whistle

3. Once cooked, remove the seeds. The gooseberry will have natural cut marks on it. Gently use a knife to remove one wedge and then the remaining wedges can be removed gently using hands. Then remove the seeds and keep aside. If you want to make even smaller pieces, then go ahead and chop them


4. Now take a pan and heat the gingelly oil (nallennai). Now reduce the flame. Then add asaoetida, don't go stingy here :) Add it liberally


5. Then add red chilly powder and saute for a minute. Then add the boiled gooseberries

6. Now add the jaggery. I have used powdered organic jaggery. So added it directly. If using normal big roundels of jaggery, then scrape and take the required amount of jaggery in a pan. Add 2 tbsp water and heat it so that it dissolves completely. Allow it to cool and then filter off the impurities. Do not add more water as it can spoil the pickle. Now add the filtered jaggery syrup to the gooseberries


7. Give a nice mix and then bring it to a boil. Now switch off the flame and add the mustard-fenugreek powder and give a gentle nice stir

8. Then add lemon juice or vinegar. Not both, either one and mix gently

9. Store the pickle in a clean, dry, glass container. You should be able to see oil floating on the top of the container else chances of the pickle getting spoilt are very high. Leave in a clean place for a day or two for the flavours to soak in and then refrigerate it


Notes:

  • If you do not like gooseberry bites in your pickle or want to mask it all together, after cooking the berries, mash them into a smooth paste 
  • Add either lemon juice or vinegar. Don't add both. I would suggest to go for lemon juice
  • Store in a clean and dry glass container for longer shelf life
  • Refrigerate if possible after a day of making the pickle for longer life
  • Always use a clean dry spoon to take the pickle from the bottle
  • Allow a layer of oil on top of the container for longer life and it prevents from mold formation on top of the pickle

Cheers,
Chitz

Saturday, 12 August 2017

Instant Wheat Appam | Godhumai Appam | Wheat Flour Appam | Krishna Jayanthi Recipes


So here it is as promised, next sweet recipe for your Janmashtami celebrations. It is an instant appam recipe, that too with wheat flour. If you have a paniyaram/appe pan then it's double damaka! No deep frying needed. And also it is sweetened with jaggery. What more does one need for a healthy sweet indulgence right? :) You can whip up the batter in 10 minutes and making 20 paniyarams would take around 20 minutes. So in half an hour you are done with it!
This recipe is very handy not only during festive occasions but also when you crave for a sweet with your evening cuppa kaapi/chai. Most of the ingredients would be readily there in any pantry. So it's an instant fix for that sudden sweet tooth. Initially I tried this with cup ½ jaggery and 2 bananas. Then Deeps felt it's not sweet enough and asked me to add more bananas next time. But that sweetness was fine with me. But anyways I did so the next time and also slightly increased the jaggery quantity as well. This time I got a thumbs up! So it all depends on your taste buds. So play along!

Makes: 20 appams


I Took: 

Preparation Time: 5 minutes

Cooking Time: 20 minutes


I Used:


Wheat Flour
-
1 cup
Rice Flour
-
1 tbsp
Grated Coconut
-
2 tbsp
Cardamom powder
-
of 1 pod
Baking Soda
-
A pinch
Salt
-
A big pinch
Jaggery
-
½ - ¾ cup
Banana
-
½ cup mashed (nearly 4 small bananas)
Water
-
As required

The Way:


1. Take the jaggery in a pan and add little water, just to immerse it. Heat it over low flame so that the jaggery dissolves completely. Filter it to remove any impurities (I use organic jaggery, hence did not filter) and keep aside. Allow it to cool

2. Mash the bananas to a smooth paste with a fork or you can also give a quick pulse in mixie


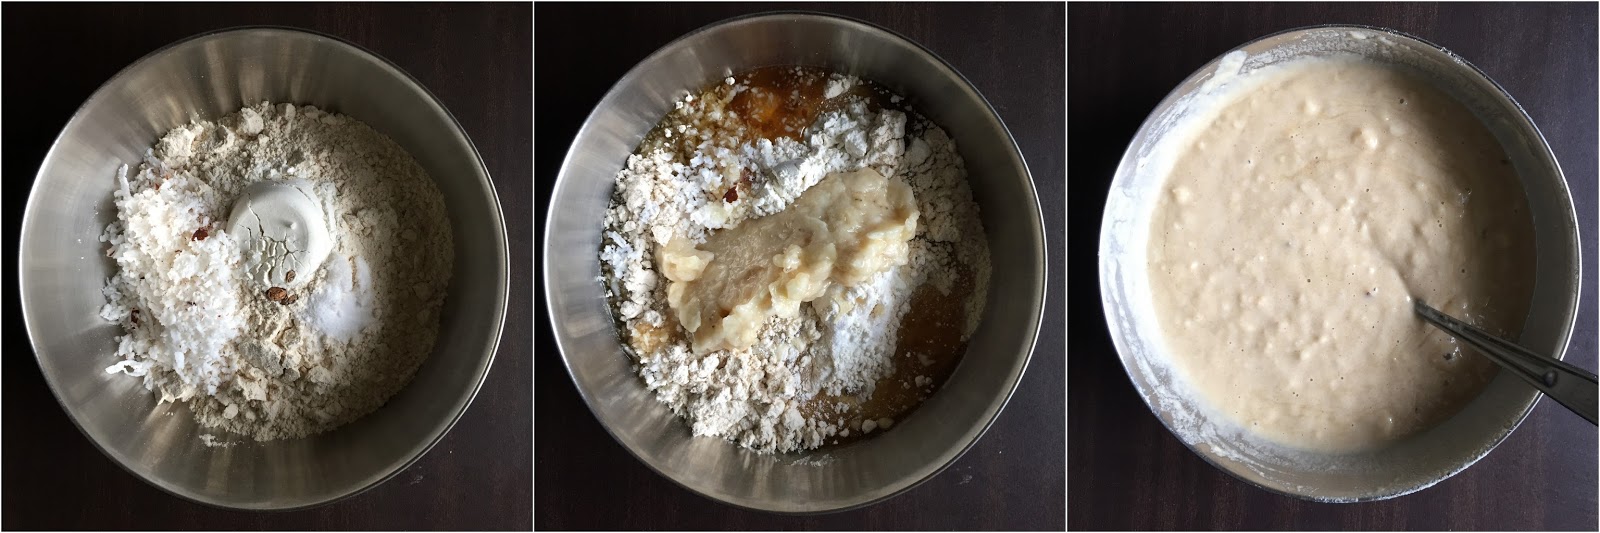
3. Now take the other ingredients together in a bowl viz. wheat flour, rice flour, grated coconut, baking soda, salt, cardamom and stir it well

4. Now add the mashed banana and jaggery syrup (it should not be hot) and mix evenly. Add water and mix well without any lumps. It should be of idly batter consistency


5. Now heat a paniyaram/appe pan. Add ½ tsp oil/ghee in all holes. Then add about 1 tbsp (depends on the size of your pan) of batter in each hole

6. Lower the flame and allow it to cook. You can cook covered for around 2-3 minutes and the flip over

7. Again now allow this side to cook for about 2-3 minutes. Transfer to a plate and it's now ready to be served with a hot cuppa chai !


Notes: 

  • If you do not have a paniyaram/appe pan you can also deep fry the appams. In that case take a laddle of the batter and pour it into hot oil. The appams should come up and not sink down. That would be the right temperature for the oil
  • If you do not have normal whole wheat flour you can also use atta. Taste would slightly vary as compared to normal whole wheat flour
  • I use cherupazham (yelakki) variety of banana for this recipe
  • Also don't pour the hot jaggery syrup to the flour mix. Allow it to cool and then add
  • Stick to a pinch of baking soda. More of it can make the appams flat and sticky and will be very difficult to cook properly

Cheers,
Chitz

Thursday, 1 August 2013

Pazhutha Manga Pachadi | Pazha Manga Pachadi | Mampazha Pachadi

Ripe Mango served with coconut-mustard-curd sauce & jaggery in Kerala Style


I would have never made this dish if not for my negligence ! I bought a raw mango - all for making some pickle & it was stashed away at the bottom of the rack of my refrigerator. Lazy me, I forgot all about it. One day, it peeped up & asked ' Aren't u gonna make use of me? I won't sit like this, neat & clean for long. Remember, I am a costly commodity at this part of the world' Did reality strike me hard?? Ohh yea, it did. So now me like a good girl, took it out & made the first slice. It was not all green & firm, but a bit soft & squashy on one end. Now Deeps saw me staring at it & made the quick decision 'Don't make pickle out of this. It won't taste good'. 'Is it spoiled?' came my quick question back. 'I don't think so. It has turned ripe inside. Just the outside color is still green', he said. 

I was at a loss. I was all happy that I would make some pickle, now it was like 'No soup for you, gal' ! I thought ok, I would make some Pazhutha Manga Kootan. I did some googling & was all set. But still at the bottom of my heart, I was still pondering, 'Is there some way to make a pickle out of this'. Then after a while when I was talking to Amma (Deeps' mom) I asked her about it. She said,'You can make pachadi out of it. It will taste great & Deeps also loves it'. Ok, that sounded like fun. A new dish for me as well as I have not had Mampazha Pachadi before. So I was thrilled to try it out. Quickly I jotted down the recipe in my notepad and lo, here it is. And as expected, Deeps loved it. He did not touch the main dish that day & had his entire share of rice with the pachadi. I too loved it with it's mix of tangy & sweet taste. And you know what, I loved it better the next day ;) So you now know what to do when you fall prey to this sort of negligence. So let's take a look at how I made it :)


Recipe Source: Mil

I Took: 30 minutes

Makes: 2 cups


I Used:

Pazhutha Manga/Ripe Mango - 1 no - big sixed - around 400 gms
Grated Coconut - ¼ cup
Grated Jaggery - 2 tbsp
Curd - 5 tbsp
Green Chilly - 2 no
Red Chilly powder - 1 ½ tsp 
Turmeric powder - ½ tsp
Mustard - 2 tsp
Red Chilly - 2 no
Curry leaves - 2 sprigs
Oil  - 1 tbsp
Salt - As Needed


The Way:


  1. De-skin the mango and cut it into small sized cubes. If using small sized mango, you can de-skin & use the whole mango (with the seed)
  2. Grind together grated coconut, mustard & green chilly. When they are ground well add curd & give another pulse or two so that the curd is mixed well
  3. In a saucepan mix together the ripe mango, red chilly powder, turmeric powder & salt along with ½ cup water & cook them over medium flame
  4. When the mango is cooked well, add the ground coconut mixture & grated jaggery & stir well. Make sure the flame is very low & it does not boil. This may take about a minute or so. Once mixed well, remove from flame 
  5. Heat oil in another pan. Splutter the mustard seeds. Add red chilly & curry leaves & saute. Take care that they are not burnt. Add this tempering to the pachadi (mango mixture) & give a stir & serve
Cheers,
Chitz

Friday, 19 July 2013

Khatta Meeta Karela | Sweet & Sour Bitter Gourd

Bitter Gourd stir fry with Indian spices & Jaggery


Summer is at it's good mood here & I should admit that I am having a great time. Usually it seems that,  summer here means no snow & frequent rains with sun peaking out once in a while. But this time it's more of the radiant bright yellow hue with less of rains & I sincerely hope it remains the same :) And the pathways & gardens & fences are lined with bright & chirpy flowers in brilliant & bold shades. Even the river that flows through the center of this town looks lush green with the shadow of the big pines & apple & cherry trees on it's banks !! And the days are long as 20 hours, that  you never see the night for nearly 4 months a year,  unless you are a very late sleeper.. Feels heavenly right?? Wait before you decide that this is more better than your hometown :D All these goodness is compensated during the next 8 months of the year, when it snows heavily & you see the sun only for 4 hours a day !! And you can talk about the temperatures in (minus two digit) range :( But, some people do enjoy that weather right, so all together it comes as a package :) So here are some pics for you my friends !!


I have been doing a lot of cooking these days, but the photo shoot does not happen that often & hence it doesn't make it to this space. I had been having a lot of guests & get togethers & some experimental cooking.. Come summer time & it is jolly time for we ladies out here. Frequent get togethers & that implies food, food & a lot of food.. But summer is just an excuse to meet more frequently than in winter :D So coming to today's recipe, it's a bitter gourd stir fry that gels well with rotis & parathas and even with steamed rice & Morukari (Gravy with curd) as I had. Bitter gourd is Deeps' favorite veggie & so it features often in our menu (& hence this space ;)) & I not being a great fan of it, like to experiment with it to suit my taste buds. This recipe is from my mom's old cooking diary which too has a story with it ;) Maybe some other time, I guess I have talked enough for now..  Definitely try this recipe if you are not a great fan of bitter gourd as it has the perfect blend of sweetness & sourness to it which would take you a step closer to liking the healthy veggie !! Some other recipes with bitter gourd that are there in the blog are PitlaPavakka Puli Kuzhambu, Pavakya Pulin Curry & Bitter Gourd Fry.. 

Recipe from Ma's ole diary 

Serves: 3-4 persons

I Took: 35 minutes


I Used:

Bitter Gourd/Karela - 500 gm
Onions - 2 nos - big - chopped
Ginger-Garlic Paste - 1 ½ tbsp
Red Chilly powder - ⅓ tsp
Coriander powder - ⅓ tsp
Amchur (Dry mango) powder - ½ tsp
Turmeric powder - ⅓ tsp
Jaggery - 4 tsp
White Vinegar/Lemon juice - 1 tbsp
Oil - 2 tbsp
Salt - As Needed


The Way:

  1. Wash & scrape the bitter gourd. Remove the seeds and cut them into ½ inch thick pieces
  2. Boil them in salt water. I kept on microwave high for 12 minutes. Drain the water & keep aside
  3. Heat oil in a pan. Fry onion slices. When they turn translucent add the ginger-garlic paste & saute well
  4. Once the raw smell goes off add turmeric powder, red chilly powder, coriander powder, amchur powder, salt & 4-5 tsp of water & mix well
  5. Add the boiled bitter gourd pieces and mix well. Cover & keep on low flame for 5-6 minvutes
  6. Remove the cover & add jaggery to it. Cover again & cook for 2 minutes 
  7. Remove from flame & add the white vinegar OR lemon juice & mix well
Serve hot with parathas or roti or puri

Cheers,
Chitz

Thursday, 4 July 2013

Pavakkai Puli Kuzhambu | Pavakkai Kara Kuzhambu | Tangy Bitter Gourd Gravy - with coconut

Bitter Gourd cooked in tamarind with coconut sauce


Can we say anytime that we are preparing an authentic dish?? Actually speaking, no right? Coz we may not have some ingredients at hand or we may substitute some costly or high fat content ingredient with some healthy or that which is readily available ones, na? Most of the times, we give consideration to our taste buds & tweak the recipe accordingly. And other times, it is the comfort factor involved in preparation. Mixie & grinders have replaced our traditional mortar & pestle, fresh ingredients are replaced with dry & dessicated & packaged & tinned & bottled !! We neither have the time nor the patience to try something the authentic traditional way ;)


You may be wondering what's the point I am trying to make here?? Actually nothing :D In simple words, I forgot the way that my friend makes this dish & ended up inventing my own one, but which still tastes great !! Too much talk for that right? ;) My friend K used to prepare some awesome dishes for us at our PG. Mostly we wud be her helpers, assisting her in chopping & cleaning :) The beauty is that, all her dishes would require minimal & simple preparation & would taste heavenly !! That inspired me to make some bitter gourd puli kuzhambu one day, but I could vaguely recollect how she did it.. U see, I was busy chopping & grinding then ;) But could remember the ingredients, so went ahead & made this kuzhambu. The highlight of the story is that Deeps liked the gravy & I was showered with all praises. So this time, I learnt from my mistake & I jotted down the way I did it. After that I have been preparing this gravy quite often & every time we relished it !! So this time, I decided that this should feature here.. It is a tangy gravy with maximum effort concentrated on reducing the bitterness of the bitter gourd.. So someone who is on the look out of such a recipe, here it is !! Some other recipes with bitter gourd that are there in the blog are PitlaPavakya Pulin CurryBitter Gourd Fry & Khatta Meeta Karela..

Serves: 2-3 persons

I Took: 40 minutes


I Used:


Bitter Gourd - 250 gm / 3 medium sized ones
Onion - 1 - medium sized - Chopped
Tomato - 1 - medium sized -Cut into 8 
Grated Coconut - ¼ cup
Tamarind - A small goosberry sized piece
Jaggery - 2 tbsp
Red Chilly powder - 1 tsp
Coriander powder - 2 tsp
Turmeric powder - ½ tsp
Green Chilly - 2 nos
Cumin Seeds - ½ tsp
Mustard - ½ tsp
Curry leaves - A sprig
Oil - 2 tbsp
Salt - As Needed


The Way:

  1. Heat 2 tsp oil in a pan. Add cumin seeds. When it splutters, add tomato & saute till the raw smell goes off & it becomes a little mushy
  2. Lower the flame to minimum & add red chilly powder & coriander powder & saute well. Switch off the flame once it is mixed well. Take care not to burn
  3. Add grated coconut to this sauteed tomatoes. Add 3-4 tbsp water & grind to a smooth paste
  4. Soak the tamarind in ¼ cup of water for 15-20 minutes. Extract the pulp from the tamarind & keep aside
  5. Wash the bitter gourd & scrape off the small thorns on it. Cut the bitter gourd into half and de-seed (remove the soft mushy part as well) them. Slice the bitter gourd into ½ inch pieces
  6. In the pan, heat 2 tbsp oil. Splutter mustard. Add onions & saute
  7. When the onions become translucent, add the bitter gourd pieces and saute well for around 4-5 minutes
  8. Now add turmeric powder, salt & the ground paste. Mix well. Add ¼ cup of water,  cover & cook till done which should take around 8-10 minutes
  9. Finally add the tamarind pulp & jaggery (Refer Notes) and allow it to come to a boil
Serve hot with steamed rice & a kootu of your choice :)

Notes:

Addition of jaggery is to reduce the bitterness of the bitter gourd. For the dark green bitter gourd, you may require a little more. Adjust according to your taste

Cheers,
Chitz