Showing posts with label Baking Soda. Show all posts

Saturday, 12 August 2017

Instant Wheat Appam | Godhumai Appam | Wheat Flour Appam | Krishna Jayanthi Recipes


So here it is as promised, next sweet recipe for your Janmashtami celebrations. It is an instant appam recipe, that too with wheat flour. If you have a paniyaram/appe pan then it's double damaka! No deep frying needed. And also it is sweetened with jaggery. What more does one need for a healthy sweet indulgence right? :) You can whip up the batter in 10 minutes and making 20 paniyarams would take around 20 minutes. So in half an hour you are done with it!
This recipe is very handy not only during festive occasions but also when you crave for a sweet with your evening cuppa kaapi/chai. Most of the ingredients would be readily there in any pantry. So it's an instant fix for that sudden sweet tooth. Initially I tried this with cup ½ jaggery and 2 bananas. Then Deeps felt it's not sweet enough and asked me to add more bananas next time. But that sweetness was fine with me. But anyways I did so the next time and also slightly increased the jaggery quantity as well. This time I got a thumbs up! So it all depends on your taste buds. So play along!

Makes: 20 appams


I Took: 

Preparation Time: 5 minutes

Cooking Time: 20 minutes


I Used:


Wheat Flour
-
1 cup
Rice Flour
-
1 tbsp
Grated Coconut
-
2 tbsp
Cardamom powder
-
of 1 pod
Baking Soda
-
A pinch
Salt
-
A big pinch
Jaggery
-
½ - ¾ cup
Banana
-
½ cup mashed (nearly 4 small bananas)
Water
-
As required

The Way:


1. Take the jaggery in a pan and add little water, just to immerse it. Heat it over low flame so that the jaggery dissolves completely. Filter it to remove any impurities (I use organic jaggery, hence did not filter) and keep aside. Allow it to cool

2. Mash the bananas to a smooth paste with a fork or you can also give a quick pulse in mixie


3. Now take the other ingredients together in a bowl viz. wheat flour, rice flour, grated coconut, baking soda, salt, cardamom and stir it well

4. Now add the mashed banana and jaggery syrup (it should not be hot) and mix evenly. Add water and mix well without any lumps. It should be of idly batter consistency
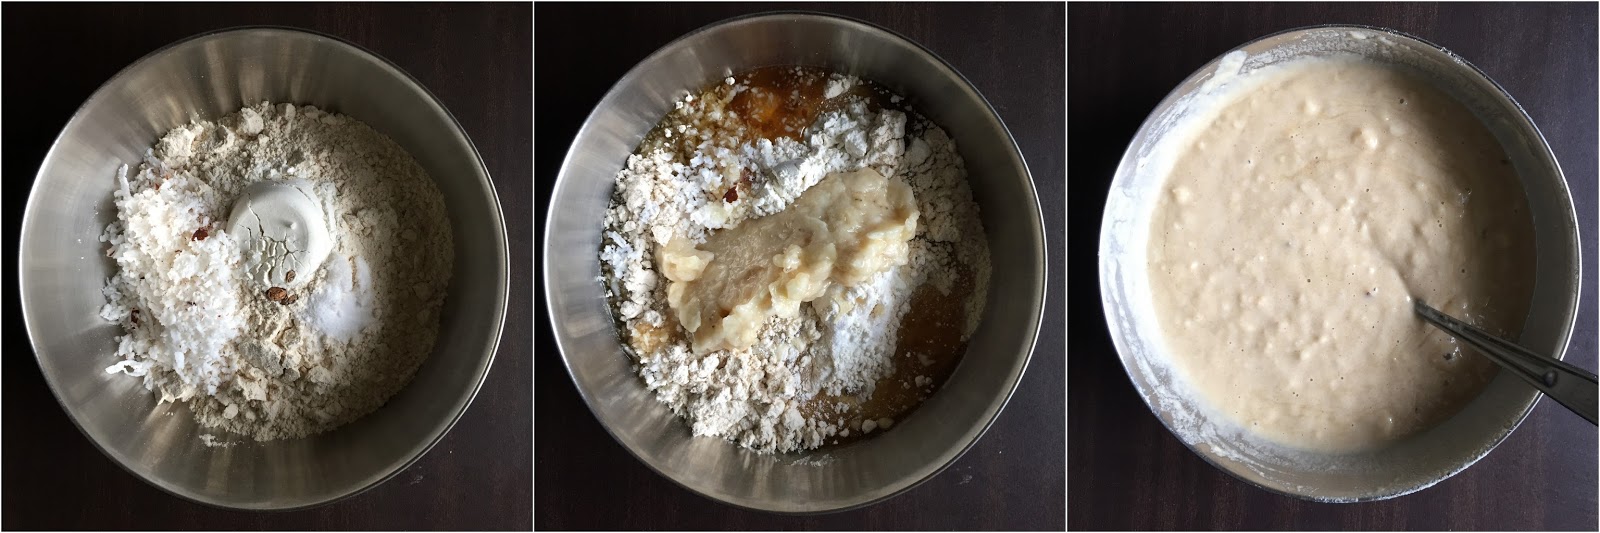

5. Now heat a paniyaram/appe pan. Add ½ tsp oil/ghee in all holes. Then add about 1 tbsp (depends on the size of your pan) of batter in each hole

6. Lower the flame and allow it to cook. You can cook covered for around 2-3 minutes and the flip over

7. Again now allow this side to cook for about 2-3 minutes. Transfer to a plate and it's now ready to be served with a hot cuppa chai !


Notes: 

  • If you do not have a paniyaram/appe pan you can also deep fry the appams. In that case take a laddle of the batter and pour it into hot oil. The appams should come up and not sink down. That would be the right temperature for the oil
  • If you do not have normal whole wheat flour you can also use atta. Taste would slightly vary as compared to normal whole wheat flour
  • I use cherupazham (yelakki) variety of banana for this recipe
  • Also don't pour the hot jaggery syrup to the flour mix. Allow it to cool and then add
  • Stick to a pinch of baking soda. More of it can make the appams flat and sticky and will be very difficult to cook properly

Cheers,
Chitz

Thursday, 2 June 2016

Savory Semolina Cake | Savoury Rava Cake | Eggless Savory Rava Bread


So, here I am back with an easy recipe for all you lovely readers out there.. Am I going to be regular here from now on? I hope so.. So this is a very interesting recipe that can be served for breakfast or as a snack too ! I always have a soft spot for baked goodies & when I saw this interesting recipe with a twist at 'Erivum Puliyum', I decided I had to make it :) It is very easy except for the veggie chopping part. The rest is just whisk, whisk, whisk & bake !


Recipe Source: Here


I Took : 

Preparation Time : 15 minutes

Baking Time : 30 minutes


Makes : An 8 inch loaf


I Used:

Semolina  - 1 cup
Carrot  - 1 medium sized (finely chopped)
Beans - 6-8 no (finely chopped)
Ginger - 1 inch piece (finely chopped or grated)
Green Chilly - 3 nos (finely chopped)
Thick Yogurt - ½ cup 
Butter - 1 tbsp
Baking Soda - ½ tsp
Oil - 3 tbsp
Water - As required
Salt - As required
Coriander Leaves - 2 tbsp (finely chopped)

To Temper:

Mustard  - 1 tsp
Cumin Seeds - 1 tsp
Sesame  - 1 tsp


The Way:

  1. Preheat the oven to 180 degree C
  2. Combine together the semolina (rava), salt & yogurt. Now add the chopped carrot, chopped beans, chopped ginger, finely chopped green chillies, chopped coriander & mix well
  3. Heat oil in a pan. When it heats up, splutter the mustard. Then add the cumin seeds & sesame. Take care not to brown. Now add this tempering to the semolina batter & give it a mix
  4. Grease the baking pan with butter
  5. Add baking soda to the batter & give it a whisk
  6. Pour the batter into the baking pan & garnish the top with some sesame seeds
  7. Bake for 25-30 minutes or till done (A tooth pick inserted would come out clean)
Serve warm with chutney or ketchup & a smoothie of your choice :)

    Notes:

    1. Baking soda is for the bread to rise properly. So add it in the end just before putting it to bake in the oven
    2. You can add veggies of your choice which can be baked easily like peas, zucchini etc
    3. Do not use sour yogurt. It can compromise the taste

    Cheers,
    Chitz

    Monday, 8 February 2016

    Vanilla cupcake | Easy Vanilla cupcake (Eggless & Butterless)


    I do not want to start the post with yet another apology for being away ;) as it is just the beginning of another fabulous year & also I am in a happy happy mood to share with you all the arrival of our bundle of joy - Dhruv. He is nearing his 4th month now & so you would all be understanding my busy schedule & lack of time to concentrate on other affairs :D But many a times I had been wanting to visit this another baby of mine as well, but you see, Dhruv takes precedence :D :D


    I was planning to post this cupcake recipe on his 100th day as a celebration but was not able to. This cupcake stays close to my heart for another special reason as I craved for it the most during my pregnancy time. Weird or cute, you guys should say, but this muffin stays top on my list still ! It is super easy to make with quite a few calories loaded as it has no egg & no butter. And it is fluffy soft and moist and just melts in your mouth and you can relish it absolutely fine without any topping or frosting or icing. So I am sure you would want to try this out today eve itself with your coffee & do let me know how it turned out :) 


    I Took : 

    Preparation Time : 15 minutes

    Baking Time : 40 minutes


    Makes : 20-25 muffins


    I Used:

    All purpose flour/Maida - 1 ½ cups - 3 tbsp
    Corn flour - 3 tbsp
    Sugar - ¾ cup
    Baking powder - 1 tsp
    Baking Soda - ½ tsp
    Oil - ½ cup
    Curd - 1 cup
    Vanilla Essence - 1 tsp


    The Way:

    1. Pre-heat the oven to 180 degree C
    2. Keep the muffin tray ready with the muffin liners or if you want to bake it as a cake, grease a 6 or 7 inch pan with butter & dust it with a tsp of flour
    3. Sieve well the all purpose flour & corn flour in a bowl and ensure that they are evenly blended & mixed
    4. In another bowl, mix well sugar & curd. Now add baking powder & baking soda into the mixture & mix well and allow it to rest for 2-3 minutes
    5. Now to this frothy mixture add oil & vanilla essence & mix well
    6. And then add the sieved flour, one tbsp at a time, and whisk well
    7. Once all the flour is mixed, pour in 1-2 tbsps of the batter into the muffin liners (or the baking pan)
    8. Bake them for around 35-40 minutes or until a toothpick inserted comes out clean
    9. Allow them to cool for about 10 minutes & serve with ice-cream or chocolate syrup or any dressing of your choice

    Cheers,
    Chitz

    Wednesday, 16 October 2013

    Halloween Special - Vegan Pumpkin Bread - Baking Partner Challenge #15


    Come the month of October, it's festival time !! Dussera & Diwali here in India & the infamous Halloween in US. For me Halloween means kids in scary outfits & pumpkins carved in funny shapes ;) Actually I get reminded of the Harry Potter Halloween dinner scene :D Since pumpkin is such an inevitable part of Halloween, we Baking Partners decided to bake some Pumpkin bread for the occasion. So when Swathi announced the recipes & asked us to choose from among the three variants of pumpkin bread, my eyes & heart fell for the Vegan version. 

    It is such a breeze recipe, just like a normal cake where in you combine all wet ingredients & dry ingredients separately & eventually mix them both & bake ! I was so much in love with the end result ! It was so soft & tender & tasty. I even took some to my send-off party (by the ladies gang ;)) back in Norway & all the ladies loved them. When they ask you for the recipe, you know that they too loved it to the core. So what you waiting for my pals, try this out soon & you too are gonna enjoy baking & eating them like us :)


    Recipe Source: Here

    I Took: 40 + 50 minutes

    Serves: 1 loaf


    I Used:

    All purpose Flour - 1 cup
    Whole Wheat Flour - ¾ cup
    Dark Brown Sugar - 1 cup (I used normal sugar)
    Baking Soda - 1 tsp
    Baking Powder - ½ tsp
    Salt - ½ tsp
    Nutmeg - ½ tsp
    Cinnamon - ½ tsp
    Allspice - ½ tsp
    Cloves - ¼ tsp
    Pumpkin Purée - 1 cup (Refer first 2 steps)
    Oil - ½ cup
    Maple Syrup - 3 tbsp ( I omitted this)
    Water - 3 tbsp 
    Walnuts or pepitas - ½ cup - chopped (I used almonds)

    The Way:


    1. Peel the skin off the pumpkin & rinse them well. Cut them into big chunks and pressure cook or microwave with ½ cup water for 15 minutes
    2. Allow them to cool. Then blender it to make a fine puree. If you want to remove the extra moisture, strain the puree using a cheese cloth. Set aside
    3. For this recipe, you can also blend the spices along with the boiled pumpkin !
    4. Preheat oven to 175 °C. Grease and flour a loaf pan
    5. In a large bowl mix together the all purpose flour, whole wheat flour, sugar, baking soda, baking powder, salt and spices (Nutmeg, cinnamon, cloves & allspice)
    6. In a small bowl whisk together pumpkin, oil, maple syrup, and water
    7. Add wet mixture to dry, combine until just moistened. The batter will be very thick, it is not a problem!
    8. Fold in nuts and pour the batter into the prepared pan
    9. Bake for about 45-50 minutes or until top is browned and a toothpick inserted in the center comes out clean. It took 50 minutes for me
    10. Allow it to cool for 20 minutes. Use a butter knife to gently loosen bread from sides of pan & then invert onto a cooling rack
    Cheers,
    Chitz

    Thursday, 25 July 2013

    Eggless Strawberry Banana Muffins | Strawberry Banana Yogurt Cupcakes


    I love strawberries, but they have to be sweet. Now that's an ambitious request right? Very seldom I come across fully sweet strawberries. Most of the times it will be semi-sweet or sour. Then I resort to milkshakes or smoothies or yummy bakes, as they would need a small amount of sugar & would taste out of the world :) Last week we had a guest for lunch & they bought us a lot of fresh berries - blue, black, red & straw ;) And also we had a small outing to a nearby lake during the weekend. Then I thought I would bake some of these muffins & make it a tea outing that day ! I should admit that I thoroughly enjoyed baking these cuties, as they filled my whole house with a yummilicious smell. Do try them out as they are very simple & less time consuming and also you are guaranteed of a fabulous outcome !


    Recipe Source: Joy of Baking 

    I Took: 25 minutes (Prep) + 25 minutes (Baking)

    Makes: 12 regular sized muffins


    I Used:

    Strawberry - ½ cup - cut into bite sized pieces
    Banana - 1 big sized - mashed
    All purpose Flour - 1 cup + 2 tbsp
    Butter - ¼ cup
    Yogurt - ¼ cup
    Vanilla Essence - 1 tsp
    Granulated Sugar - ¼ cup + 2 tbsp
    Baking Powder - ¾ tsp
    Baking Soda - ¼ tsp
    Ground Cinnamon - ¼ tsp or an inch stick mashed with banana
    Salt - ½ tsp


    The Way:

    1. Mash the bananas. If you do not have ground cinnamon then add the cinnamon stick to the banana & mash it
    2. Melt the butter (in an oven or saucepan) & allow it to cool to room temperature
    3. Pre-heat the oven to 175 degree Celsius in conventional mode 
    4. In a bowl whisk together yogurt, vanilla essence & mashed banana. Add the melted butter & stir to combine
    5. In another large bowl combine the flour, sugar, baking powder, baking soda, ground cinnamon (if available) & salt. You can sift it for 3 times for even mixing of the dry ingredients
    6. Then gently fold in the strawberries into the flour mixture making sure that they are coated well with the flour. This helps the berries to prevent from sinking during baking
    7. Now add the wet ingredients to the dry ingredients & stir gently so that they are combined. Do not over mix, else the muffins might become hard
    8. Line a muffin pan with paper liners or butter the muffin cups in the pan 
    9. Place 2 spoons of the batter in each cup using a spoon 
    10. Bake it for about 20-25 minutes or until a toothpick inserted through it comes out clean. Do not mistake the fruit within the muffin to be wet batter. Mine was done in 25 minutes
    Cheers,
    Chitz

    Monday, 15 July 2013

    Lemon Glow Chiffon Cake - Baking Partner Challenge #12

    So Baking Partners are back with a bang to celebrate it's one year anniversary of successful baking.. Yes, we have turned 1 year old. And this time there were 2 suggestions for baking the recipe of the month 'Cakes'. Humi suggested 'Medovik/Russian Honey Cake' & Saraswathy suggested 'Chiffon Cakes'. As I had an eye on baking Chiffon or Foam cakes from a long time, I chose Chiffon cake for this month's challenge. Thanks Saraswathy & Swathi for this wonderful challenge. Now let me share some facts with you that Saraswathy shared with us on Chiffon cake.


    Chiffon (pronounced She-fon) cakes are a type of foam cakes and are light & soft & definitely yummy !! They contain egg yolks and whites separately whisked and folded in together with vegetable oil, all which makes them moist, soft & light.. This cake doesn't call for butter & the lower quantity of sugar gives me an extra reason to savor this low cholesterol cake;) Use of oil instead of butter aides in the airy quality of the cake & gives a longer shelf or refrigeration life. Refrigeration makes the oil in the cake soft & the cake becomes all the more tender. Deeps liked to have it chilled & directly from the fridge. He said, 'It tastes better when chilled'. Even my neighbor & friend 'P' was very happy with the cake & said it tasted awesome :D

    The chiffon cake was created by Harry Baker, a Los Angeles insurance agent, in 1927.  Baker carefully guarded his secret technique for almost two decades, only selling his cakes to celebrities and the famous Brown Derby restaurant. The popularity of his cakes grew quickly, and he eventually sold the recipe to General Mills in 1947. 

    I have halved the recipe here & used some substitutes for ingredients not available in this town. Refer the notes too while baking this cake, as they can help you get a perfect cake on your first attempt itself. The whisking of the egg whites is the most important part.. U get that right, consider half the work done. So lets see how to make this soft & tender cake. I have used normal buttercream icing & strawberries for serving.


    Recipe Source: Adapted from The Cake Bible by Rose Levy Beranbaum


    Serves: An 8 inch round cake pan with a ramekin in the middle


    Store: Stays fresh for 3 days in room temperature, 10 days refrigerated, 2 months frozen


    I Took:

    Preparation Time: 30 minutes

    Baking Time: 50 minutes

    Cooling Time: 85 minutes


    I Used:


    Dry Ingredients
    All purpose Flour-1 cup (refer notes)
    Corn flour-2 tbsp
    Caster Sugar-¾ cup
    Salt-¼ tsp
    Baking Soda-¼ tsp
    Lemon Zest-½ - 1 tbsp
    Wet Ingredients
    Canola/Sunflower Oil-¼ cup
    Large Egg yolks-1 no / 65 g
    Water-⅓ cup
    Lemon juice-1 tbsp
    Vanilla Essence-½ tsp
    For Meringue
    Cream of Tartar-¾ tsp (refer notes)
    Sugar-1 tbsp
    Large Egg Whites-3 nos


    The Way:


    1. In a large mixing bowl combine the dry ingredients. First work the sugar & lemon zest together with your fingertips until the sugar is grainy & very aromatic. Add the all purpose flour, corn flour (or the cake flour - refer notes), baking soda and salt to it
    2. Whisk together until all the dry ingredients are incorporated. If you have a stand mixer, use the beater attachment & beat on low
    3. Then make a well in the center of the ingredients and add the oil, egg yolks, lemon juice and vanilla. Mix until the batter is smooth & has no lumps. In a stand mixer, mix for about 1 minute on medium speed
    4. In a second large mixing bowl, beat the egg whites until they are foamy. Add lemon juice (or cream of tartar) & beat (if on stand mixer, beat on medium speed) until they reach soft peak stage. This happens when the whisk or the beater start to leave a trail or when the peaks fall over when the whisk is raised
    5. At this stage add the 1 tbsp sugar & continue to beat the egg whites until they form stiff peaks when the whisk is raised
    6. Using the balloon whisk (or a slotted spoon) add ⅓ of the egg whites to the cake batter & gently stir until incorporated. Add the remaining egg whites to the cake batter and very gently fold them into the batter until they are incorporated and no trace of egg whites remain
    7. Pour the batter into an ungreased tube pan and run a metal spatula or knife through the batter to prevent air pockets. If you do not have a tube pan but would like to have a similar shape, then place an oven usable ramekin in the centre of your round pan and pour the batter to the sides of the ramekin as I did
    8. Preheat the oven on conventional mode at 165 degrees
    9. Bake in the lower rack of the oven for 50-55 minutes (refer your oven manual too) or until the cake bounces back when lightly pressed in the center
    10. Once cooked, take the cake pan & immediately turn it upside down on a bottle (or another ramekin or tumbler - whichever suits best for the pan). Allow to cool completely which took about 85 minutes for me
    11. Use a palette knife and loose the sides of the cake. Pull out the sides and work similarly on the bottom. Turn it over on to a plate upside down & sprinkle with a dusting of icing sugar or a topping of your choice & serve


    Notes:

    • Do not grease or line or flour the cake pan. This will hinder the cake from rising up
    • Always use large eggs as called for in the recipe. Do not use medium or small sized eggs
    • Try to use castor sugar than normal ones 
    • The recipe calls for cake flour, but since I could not get it here, I used the substitute. Take an equal amount of All purpose flour. Remove 2 tbsps of flour from it & replace it with 2 tbsps of corn flour (NOT corn meal). This works just fine
    • Cream of tartar is used to stabilize the egg whites while beating up. Since I couldn't get those, I used the substitute lemon juice. Works perfectly OK
    • Make sure that the bowl used to whisk egg whites are clean & grease free. Traces of grease or egg yolks will not guarantee you proper whisking of whites
    • Proper & correct whisking of egg whites is essential to ensure the texture of the cake. Under or over beating can cause the cake to collapse or become too hard. Do the 'Overturn bowl test' to ensure that your whisking is the right amount. When you overturn the bowl of the whisked egg whites, it should hold & must not fall off
    • Do not let the egg whites sit for long once whisked. Immediately fold it onto the cake batter as this stage of stiff peaks is short lived
    • Take care while folding in the egg whites as over folding can cause the egg whites & thus the cake to deflate. Fold in gently using a whisk
    • Before pouring the batter into the pan, take the bowl and hit against the kitchen counter. This will cause bubbles to rise up to the top and pop. Do not hit the pan after pouring the batter as this may cause the formation of more bubbles

    Here are some links that helped me greatly. Hope you guys too find it useful !

    http://allthatmatters2rei.blogspot.no/2008/07/chiffon-cake-tips-and-trouble-ii.html
    Cheers,
    Chitz

    Wanna see what the others in the Baking Partners group baked?? 

    Wednesday, 30 January 2013

    Ultra Moist Chocolate Cake


    I had been thinking for quite a while now to post a cake recipe. But the main reason I didn't do so far was because, I hadn't baked one for about a month now. Not because of anything else.. But with the New Year and all, I was thinking on reducing the calorie intake. You know !! 


    But I couldn't hold out for long. As always, New Year resolutions are meant to be broken ;). So I just found out the perfect excuse and the apt reason for me to bake one :D It was the birthday of three of my darling friends Iman, Pallavi and Lavanya on yesterday, day before and last Saturday.. Yes, we all are part of the same gang who used to hang out together for every breakfast, lunch and tea on weekdays. Quite a co-incidence na that the birthdays are so close !! And yes, we all love foooooodd... So here is it, a dedication from me to you guys ;) So here is my all time favorite dessert, moist chocolate cake which I had with a scoop of ice cream. Trust me, they tasted heavenly thumbs up


    Recipe Source : Maria's Menu


    I Took: 

    Preparation Time : 15 minutes

    Cooking Time : 50 minutes


    I Used:

      Milk                           - 1½ cups
      Butter                        - 100 gm
      Oil                            - ¼ cup 
      Cocoa Powder              - ½ cup
      Self Raising Flour        - 1 cup (refer notes below)
      Egg                            - 1 beaten (room temp)
      Baking Soda                - ½ tsp
      Sugar                         - 250 gm


      The Way:


      1. Preheat the oven @ 180 C for 10 minutes before baking
      2. Grease your cake mould with butter and keep aside
      3. In a pan mix together milk, butter, oil & coco powder and heat in a medium flame till the butter melts. Then allow it cool to room temperature
      4. In another bowl whisk together flour, baking soda and sugar
      5. Add the beaten egg followed by the cooled wet ingredients to the flour mix
      6. Beat it using a beater till its mixed well
      7. Pour the batter into the greased cake mould and bake for 35-40 minutes @ 180 C or until a toothpick inserted comes out clean

      Notes:


      Substitution for Self Raising flour
              All purpose flour - 1 cup
              Baking powder   - 1 ½ tsp
              Salt                   - ¼ tsp

      Cheers,
      Chitz