Showing posts with label Eggs. Show all posts

Tuesday, 4 July 2017

Egg Rice | Mutta Rice | Muttai Sadam | Easy Lunch box recipes


This is one of the most nostalgic lunch box dish from my school days for me ! In fact for my sister as well. This was her most favorite lunch that she liked to take to school :) Now Dhruv also likes this rice ;) Cute right :D This is very easy to make and will be ready in a jiffy and also fancy, heavy and protein packed for a lunch box.. You can have it as such or can also pair it up with raita or pappad. You can make it dry or little juicy based on your taste. If you do not like it dry, don't saute the eggs much and also make sure that when you cook the rice it's not very dry and for that adjust the water accordingly. If you have not made this rice before, try it out soon coz it's not gonna disappoint you for sure :)


Other Egg Recipes:
Boiled Egg Fry | Masala Egg Fry
Udaitha Muttai Curry | Egg Drop Gravy

Recipe Source: Ma

Serves: 3-4 persons


I Took: 

Preparation Time: 5 minutes

Cooking Time: 15 minutes


I Used:


Basmati Rice (uncooked) - 1 cup
Egg - 1 no  
Oil - 2 tbsp
Onion - 1 no (medium sized - finely chopped)
Tomato - 1 no (medium sized - finely chopped)
Ginger Garlic paste - 2 tsp
Pepper powder - 1 tsp
Salt - As Needed


The Way:


1. Rinse the rice in water and cook them as you normally do. I used basmati rice here and have taken water and rice in the ratio of 2:1 and have pressure cooked for 1 whistle. You can steam cook the rice or pressure cook it, as per your convenience

2. Chop finely the onions and tomatoes and keep aside. In a wide pan, heat oil


3. Add the chopped onions and salt and saute. The onions should turn translucent. Then add the ginger-garlic paste and saute. Leave it about for 2 minutes, sauteeing in between, for the raw smell to go

4. Now add the chopped tomatoes and saute again. The tomatoes should turn mushy


5. Add the pepper powder and give a quick stir. Adjust pepper powder according to your taste

6. Now break and add the egg and saute like you do for the scrambled eggs


7. Once the egg is cooked and mixed well, switch off the flame. Add the cooked rice to it and mix well and evenly


Serve with raita or pappad or can be had as such as well :)

Cheers,
Chitz

Friday, 16 June 2017

Boiled Egg Fry | Masala Egg Fry | Muttai Fry | Simple Mutta Roast


This is a very very simple preparation of egg which is very flavourful and steals the mind of any egg lover. Deeps never have had this before I introduced to him and let me tell you, he was bowled over by this simple mutta roast.. My amma used to make this often and it tastes really good when you pair it up with sambar rice or rasam rice. Don't worry if you do not have a fish fry or chicken roast for your sambar sadam, this egg roast will do all justice as good as them ! This is so simple that you may think that this need not even count as a recipe, but trust me, some egg loving souls are going to thank me later !


Other Egg Recipes:
Egg Rice | Muttai Sadam
Udaitha Muttai Curry | Egg Drop Gravy

Recipe Source: Ma

Serves: 3 persons


I Took: 

Cooking Time: 20 minutes


I Used:


Eggs - 3 nos
Red Chilly powder - ½ tsp
Coriander powder - ½ tsp
Turmeric Powder - ¼ tsp
Salt - As needed


The Way:


1. Take the eggs in a saucepan and add water to it such that the eggs are immersed in the water. And then boil the eggs along with a tsp of salt added to the water 

2. Once the eggs are done, remove them from flame and keep them immersed in cold water for about 3-5 minutes. Then peel the eggs off the shell. Make small cuts (around 4-5 on each egg) on the eggs so that the masala is absorbed inside the eggs while you fry them


3. Heat oil in a pan or kadai. Keep flame on low. Else the masala will get burnt. When it is midly hot add turmeric powder, red chilly powder, coriander powder and salt and mix well

4. Add the boiled eggs to it and give a quick stir. Switch off the flame 


Serve the eggs along with rice and a gravy !

Notes:

  • You can use sambar powder instead of red chilly powder, coriander powder and turmeric powder
  • Also you can make a paste of all the powders and salt together and then add it to the oil instead of adding each one by one. This way you can ensure that the masala doesn't get burnt

Cheers,
Chitz

Thursday, 3 November 2016

Udaitha Muttai Gravy | Udacha Mutta Curry | Egg Drop Gravy | South Indian Style Poached Egg Gravy


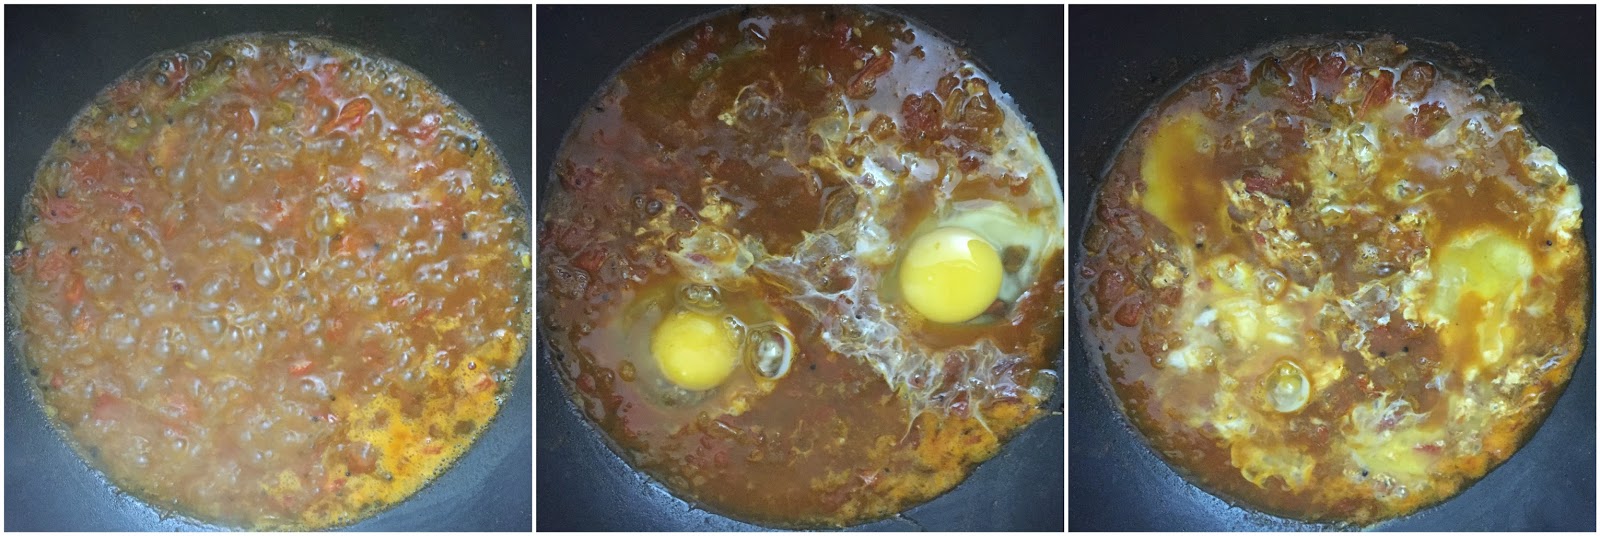
Does the name of this dish intrigue you? Or is this your family favorite, a quick fix recipe at your place? Many might not know or would not have heard of this recipe. At least, Deeps does not know. It was a surprise for him that eggs can be cooked this way. Actually it was a surprise for me too, that Deeps did not know this way of preparing eggs as he is an avid egg eater :D So all egg lovers and eggetarians' out there, here is an easy quick recipe with eggs for you. Instead of adding boiled eggs to the gravy, we break and drop the eggs as such into the gravy and allow them to cook in the gravy and thereby slowly infusing the heat, salt and tart from the gravy into the eggs :) Sounds nice??

My mom used to make this dish regularly at our home before. Actually this was one of the dishes that she learnt to cook during her initial days after marriage. She learnt this recipe from one of my dad's buddy as this was one of my dad's favorite way of having eggs back then :) So you can call this a bachelor special recipe as well as it is easy to make and tastes great and is a non-veg dish as well. So let's see step by step how this is made..


Other Egg Recipes:
Egg Rice | Muttai Sadam


Recipe Source: Ma


I Took: 

Preparation Time: 20 minutes

Cooking Time: 10 minutes


Serves : 2 persons


I Used:


Oil - 2-3 tbsp
Egg - 2 nos
Mustard - ½ tsp
Onion - 1 medium sized - chopped
Tomato - 2 medium sized - chopped
Green Chilly - 1 no - slited
Tamarind - A small goosberry sized
Turmeric powder - ½ tsp
Red Chilly powder - 2 tsp
Coriander powder - 1 tsp
Garam Masala - ½ tsp
Salt - As needed
Curry leaves - To garnish
Coriander leaves - To garnish


The Way:


1. Soak tamarind in ¼ cup of water (preferably warm) for 10-15 minutes. Then extract the pulp and keep aside.

2. Heat oil. Splutter mustard seeds.


3, Add onion, green chilly and salt. Saute well. The onion should turn slightly brown in colour.

4. Now add all the masala powders - turmeric powder, red chilly powder, coriander powder and garam masala. Saute well for 2-3 minutes till the masala blends nicely with the onion and the raw smell goes off.

5. Now add the tomatoes and saute. 


6. The tomatoes should become soft and mushy. Saute occasionally till then. Take care that they do not stick to the bottom of the pan or get burnt.

7. Now when the tomatoes have mashed down well, add the extracted tamarind juice.

8. Also add sufficient quantity of water. You can add water suitable for your gravy needs. I added 1.5 cups of water.


9. Allow the water to come to a boil. Check the salt at this point and add if required.

10. Now break the eggs and drop them gently into the gravy.

11. If you like, you can gently break the yolk as shown in the pic below so that they cook well and also faster.


12. Allow the eggs to cook well. You can close the pan and also cook. This may take about 3-4 minutes. 

13. Once the eggs are cooked, garnish with curry leaves and coriander leaves and serve hot with phulkas/rice.


Notes:

  • Instead of chopped tomatoes, you can add tomato puree as well. Just grind two tomatoes in mixie and add them instead of the chopped ones
  • You can add ginger-garlic paste if you like, Without them also, the gravy tastes awesome :)
  • Add little tamarind only as specified in the ingredients list. Else both the tomatoes and tamarind can contribute and make the gravy extra sour
  • You can use tamarind paste also instead of extracting juice from fresh tamarind. Use ½ tsp then

Cheers,
Chitz

Wednesday, 18 September 2013

Crouu-doughnuts | Kronuts - Baking Partner Challenge #14


 You know what is the latest sensation in the pastry or bakery world?? It's none other than the 'Cronut™' which is one of the most viral desserts of all time ! Developed by chef Dominique Ansel for Dominique Ansel Bakery in New York City & launched in May 2013, this dessert has fans all over the world & the imitation versions are being tried all over US & Australia. So what is this dessert actually? You can say in simple words that it is a hybrid of a croissant & donut, but let's listen to what the inventor says about the delicacy (from the Dominique Ansel Bakery website)


Taking 2 months and more than 10 recipes, Chef Dominique Ansel’s creation is not to be mistaken as simply croissant dough that has been fried. Made with a laminated dough which has been likened to a croissant (but uses a proprietary recipe), the Cronut™ is first proofed and then fried in grapeseed oil at a specific temperature. Once cooked, each Cronut™ is flavored in three ways: 1. rolled in sugar; 2. filled with cream; and 3. topped with glaze. Cronuts™ are made fresh daily, and completely done in house. The entire process takes up to 3 days.


So when Swathi decided to challenge us with making Kronuts this month, I was very excited. Since I could not get to eat this delicacy from any bakeries here, I wanted to make it at home & see how it tastes :) I must admit it is a long process & has a lot of work to do, but it was fun learning something new & getting to see the end result. I would never dare to say that I nailed it. There were a lot of hiccups like wet dough & oozy butter & separated layers while frying. But each failure taught me something new, thanks to the guidance of Swathi, Archana, Suja (whose notes on the method helped me) & my fellow bakers :) And I know that next time, I would definitely make a better one :) 


So this is what I treated myself to, frying & eating kronuts when I turned a year older again yesterday ;) So let's see how it is made, do not get scared seeing the long steps & process & also do not omit reading any line, coz the tips & precautions are also listed along with the method :D Taste wise, they were great, crispy & flaky, but I did not use any filling or glaze to make them soft. And also I baked a few to see how it would turn out, but they were nowhere near the fried ones. They could not retain the shape & were falling apart & was also soft & tasted very doughy. So it is best to fry them to enjoy them :D


Recipe Source: Bootleg Cronut

I Took: 3 days/3-4 hours

Makes: 16 kronuts


I Used:


For Dough
All purpose flour - 510 gm | 3.75 cups
Salt - 7 gm | 1 tsp
Sugar - 100 gm | ½ cup
Milk - 150 gm | ½ cup+2 tbsp
Yeast - 2 ¼ tsp
Eggs - 2 jumbo | 3 large
Unsalted Butter - 50 gm | 3.5 tbsp

For Butter Layer
Butter - 295 gm | 1 ¼ cup+ ½ tbsp

For Frying
Canola Oil - 2-4 cups
Water - 200 gm
Cinnamon Sugar - 400 gm sugar + 100 gm cinnamon


The Way:


Day 1: Prep the dough
  1. Take out butter & eggs from the refrigerator half an hour before the dough preparation. This is to allow them to reach room temperature
  2. Prep-ing the yeast                                                                                                                                                                            Fresh Yeast  - Mix with milk (at room temperature) beforehand to activate the yeast                                                                    Active Yeast - Heat half milk to lukewarm (around 110F / 43C) & add yeast. Set aside for 5-7 minutes to proof
  3. Heat milk in microwave for about 30 seconds & add butter to it. This is for butter to melt easily. Keep aside
  4. Combine all the dry ingredients - flour, sugar, salt & instant yeast (if using) in a bowl of a stand mixer
  5. Add the butter-milk mixture to the dry ingredients. Add yeast (if not instant) & eggs
  6. Mix on low speed for 3 minutes or until everything is incorporated. Mix on high speed for another 8 minutes. If kneading by hand, as I did, knead well for about 10-15 minutes until you get a smooth shiny dough ! Do not over knead the dough
  7. Remove the dough & tuck under edges to form a ball. Grease a bowl with oil or cooking spray & place the dough in the bowl with seams down. Cut a cross across the top of the dough with a knife to help the dough relax
  8. Cover the bowl tightly with clear plastic wrap & make sure it is not in contact with the dough. Place the dough in a warm area & allow it to double in size, which would take about 60 minutes
  9. Once the dough has proofed to double, refrigerate it overnight

Day 2: Incorporating butter to dough

Prepping butter
  1. Cut the cold butter lengthwise into ½ inch thick slabs. Arrange the slabs on a piece of parchment/waxed paper to form a 5 or 6 inch square, cutting the butter crosswise as necessary to fit. Cover it with another piece of parchment paper
  2. Using a rolling pin, pound the butter with light even strokes. As the pieces begin to adhere, use more force
  3. Pound them until it's about a 4x6 inch rectangle. Then trim the edges & place the trimmings on top of the rectangle & pound again lightly. When done, place the butter in refrigerator for 2 hours
  4. Do not over work with butter. If the butter starts to leak, try to put it back in the refrigerator
Laminating the dough
  1. Unwrap & place the dough on a lightly floured work surface. Roll into a 10 inch square. Brush excess flour off the dough
  2. Unwrap & place the butter at the centre of the rolled dough square
  3. Fold one flap of the dough over the butter, stretching it slightly that the flap just reaches the centre of the butter. Repeat the same with the 3 other flaps to form an envelope
  4. Press the edges together to completely seal the butter inside the dough
First turn
  1. Lightly flour the top & bottom of the dough. With a rolling pin, firmly press the dough to elongate it slightly & then start rolling to lengthen the dough and keep the edges straight
  2. Now turn the dough so that the shorter end faces you. Roll again to expand the length of the dough. Make sure the dough does not stick to the work surface. Add flour if needed
  3. When the rolling yield you a rectangle of 21x9 inches, mark the rectangle into 3 equal columns. Fold the right third of the rectangle into the centre third. Fold the left third of the rectangle into the centre third like a business letter. This is the first turn
Second Turn
  1. Try to do this right away after the first turn, but if the dough is too warm, wrap in film (aluminium foil) & place in refrigerator
  2. Repeat rolling just like the First Turn and make sure to lock the unsealed edges of the dough & roll over the dough to form a rectangular shape
  3. Again, as in first turn, mark the rectangle into 3 equal columns. Fold the right third of the rectangle into the centre third. Fold the left third of the rectangle into the centre third
  4. Marking the dough allows you to track your progress, and ensure that the orientation of the dough is correct when you remove it from the refrigerator
  5. Cover the dough in parchment paper & refrigerate for at least an hour
Third Turn
  1. The dough will be hard, so gently pound the dough to warm the butter. If it is too cold the butter will separate and not spread as it should
  2. Repeat the previous steps, and turn again, marking the corner with three fingerprints
  3. Cover dough with parchment paper and plastic wrap and refrigerate for 1 hour
Fourth Turn

Make the final turn, repeating the steps from turns 1-3. Refrigerate overnight


Day 3 - Kronuts frying day:

Rolling out the dough

  1. Lightly dust a work surface with flour and roll out the dough to approximately the size of a sheet pan, ½ inch thick
  2. The dough should stay cold, without sticking to the surface. If it starts to stick, place in the refrigerator and roll again when cool
  3. Transfer to a sheet pan with parchment paper and chill before use
Punching out Kronuts
  1. Prepare a sheet pan with parchment paper & greased with oil  
  2. Remove dough from fridge and take two ring moulds, with the larger mould around 3½ inch and inner around 1½ inch 
  3. Make sure that the dough is really cold while you punch out the holes. Or else the kronuts will not fry straight
  4. Transfer the punched kronuts to the sheet pan, leaving enough space between them to allow them to proof. Brush the top of the kronuts with water and set aside  
  5. Leave in a warm area until they have proofed which would take about 30 min
  6. Once it is proofed keep it in the refrigerator for 1 hour or in the freezer for 15 minutes before frying
Frying the Kronuts
  1. Heat canola oil in a pot over medium temperature. about 3 inches high
  2. Once the oil is ready for deep frying, turn heat to low and place Kronuts in oil to fry (1-2 at a time to avoid overcrowding) 
  3. Turn and flip the kronuts often so that they brown evenly. Fry them in a low temperature otherwise outside become too dark soon and also the inside will not cook properly. Also if the temperature is very low, the layers would start to separate out in the oil & you would not get a full kronut
  4. Once golden brown throughout, remove from oil and strain them on paper towels
    Once it is no longer shiny transfer to a container with sugar and cinnamon and toss. Enjoy with some icing sugar dusting or with a glaze of your choice.

    Notes:

    • Eat them immediately as they have a short shelf life 
    • Do not refrigerate them as the humidity from the refrigerator will cause them to go stale and soggy 
    • If filled with cream or glazing, avoid serving them warm

    Cheers,
    Chitz

    Thursday, 15 August 2013

    Chinese Almond Cookies - Baking Partner Challenge #13


    Here comes yet another beautiful challenge from the Baking Partners. This time it's cookies from around the world & I chose to go Chinese with these beautiful Almond cookies. I have baked Ameretti cookies (Italian) before, so I was sure that this would also be acceptable to our taste buds. And as I had expected this tasted crunchy & great with the lovely almond flavor. It's very easy to make & I found the method quite similar to the Indian flat bread 'Chapathi/Roti' :) Try this out as your yummy tea time snack !


    Recipe from here

    Makes: 8-12 cookies


    I Took: 

    Preparation Time: 30 minutes
    Refrigeration Time: 1 hour
    Baking Time: 20-25 minutes


    I Used:

    All purpose flour - ¾ cup + 1 tbsp
    Butter - 4 tbsp
    Sugar - ¼ cup
    Almond paste - 2 ½ tbsp
    Baking powder - ½ tsp
    Vanila Essence - ½ tsp
    Grated lemon zest - 1 tsp
    Salt - ¼ tsp
    Egg - 1 tbsp
    Beaten egg white - of 1 egg
    Almonds - 8-12 no


    The Way:

    1. In a large bowl sift together all purpose flour, baking powder & salt together. For even mixing sift for two or three times
    2. Beat the egg nicely & keep aside
    3. In another wide bowl cream the butter until pale yellow. You can use an electric mixer or whisk. I used whisk
    4. Add ¼ cup sugar, almond paste, lemon zest & amaretto (or vanilla essence) & mix until it is smooth & lump free
    5. Now add about one third of the beaten egg and mix well. Now gradually add the flour & mix well until everything is fully incorporated. Use hands instead of whisk while incorporating flour
    6. Transfer the dough into a parchment paper & refrigerate it for about an hour
    7. Preheat the oven to 175 degree C in conventional mode. Adjust the rack to the lower third of the oven. Line baking sheets with parchment paper
    8. Once the dough is chilled, prep your working surface with 1 tbsp of sugar. Roll the dough over the sugar and then make small balls out of it (like you do for Indian flatbread or chapathi)
    9. Flatten out the balls into cookie shapes of your desired diameter & thickness using your palm. Place them two inches apart on the prepared baking sheets
    10. Brush each cookie lightly with beaten egg white and press a whole or chopped almond into the center of each 
    11. Bake for 15- 20 minutes or until golden brown around the edges
    12. Remove the baked cookies from the oven and allow to cool  to room temperature before serving

    Notes:


    Almond paste is nothing but powdered almond. Grind around 15-20 almonds in a mixie to get the above mentioned almond paste

    Cheers,
    Chitz

    Monday, 15 July 2013

    Lemon Glow Chiffon Cake - Baking Partner Challenge #12

    So Baking Partners are back with a bang to celebrate it's one year anniversary of successful baking.. Yes, we have turned 1 year old. And this time there were 2 suggestions for baking the recipe of the month 'Cakes'. Humi suggested 'Medovik/Russian Honey Cake' & Saraswathy suggested 'Chiffon Cakes'. As I had an eye on baking Chiffon or Foam cakes from a long time, I chose Chiffon cake for this month's challenge. Thanks Saraswathy & Swathi for this wonderful challenge. Now let me share some facts with you that Saraswathy shared with us on Chiffon cake.


    Chiffon (pronounced She-fon) cakes are a type of foam cakes and are light & soft & definitely yummy !! They contain egg yolks and whites separately whisked and folded in together with vegetable oil, all which makes them moist, soft & light.. This cake doesn't call for butter & the lower quantity of sugar gives me an extra reason to savor this low cholesterol cake;) Use of oil instead of butter aides in the airy quality of the cake & gives a longer shelf or refrigeration life. Refrigeration makes the oil in the cake soft & the cake becomes all the more tender. Deeps liked to have it chilled & directly from the fridge. He said, 'It tastes better when chilled'. Even my neighbor & friend 'P' was very happy with the cake & said it tasted awesome :D

    The chiffon cake was created by Harry Baker, a Los Angeles insurance agent, in 1927.  Baker carefully guarded his secret technique for almost two decades, only selling his cakes to celebrities and the famous Brown Derby restaurant. The popularity of his cakes grew quickly, and he eventually sold the recipe to General Mills in 1947. 

    I have halved the recipe here & used some substitutes for ingredients not available in this town. Refer the notes too while baking this cake, as they can help you get a perfect cake on your first attempt itself. The whisking of the egg whites is the most important part.. U get that right, consider half the work done. So lets see how to make this soft & tender cake. I have used normal buttercream icing & strawberries for serving.


    Recipe Source: Adapted from The Cake Bible by Rose Levy Beranbaum


    Serves: An 8 inch round cake pan with a ramekin in the middle


    Store: Stays fresh for 3 days in room temperature, 10 days refrigerated, 2 months frozen


    I Took:

    Preparation Time: 30 minutes

    Baking Time: 50 minutes

    Cooling Time: 85 minutes


    I Used:


    Dry Ingredients
    All purpose Flour-1 cup (refer notes)
    Corn flour-2 tbsp
    Caster Sugar-¾ cup
    Salt-¼ tsp
    Baking Soda-¼ tsp
    Lemon Zest-½ - 1 tbsp
    Wet Ingredients
    Canola/Sunflower Oil-¼ cup
    Large Egg yolks-1 no / 65 g
    Water-⅓ cup
    Lemon juice-1 tbsp
    Vanilla Essence-½ tsp
    For Meringue
    Cream of Tartar-¾ tsp (refer notes)
    Sugar-1 tbsp
    Large Egg Whites-3 nos


    The Way:


    1. In a large mixing bowl combine the dry ingredients. First work the sugar & lemon zest together with your fingertips until the sugar is grainy & very aromatic. Add the all purpose flour, corn flour (or the cake flour - refer notes), baking soda and salt to it
    2. Whisk together until all the dry ingredients are incorporated. If you have a stand mixer, use the beater attachment & beat on low
    3. Then make a well in the center of the ingredients and add the oil, egg yolks, lemon juice and vanilla. Mix until the batter is smooth & has no lumps. In a stand mixer, mix for about 1 minute on medium speed
    4. In a second large mixing bowl, beat the egg whites until they are foamy. Add lemon juice (or cream of tartar) & beat (if on stand mixer, beat on medium speed) until they reach soft peak stage. This happens when the whisk or the beater start to leave a trail or when the peaks fall over when the whisk is raised
    5. At this stage add the 1 tbsp sugar & continue to beat the egg whites until they form stiff peaks when the whisk is raised
    6. Using the balloon whisk (or a slotted spoon) add ⅓ of the egg whites to the cake batter & gently stir until incorporated. Add the remaining egg whites to the cake batter and very gently fold them into the batter until they are incorporated and no trace of egg whites remain
    7. Pour the batter into an ungreased tube pan and run a metal spatula or knife through the batter to prevent air pockets. If you do not have a tube pan but would like to have a similar shape, then place an oven usable ramekin in the centre of your round pan and pour the batter to the sides of the ramekin as I did
    8. Preheat the oven on conventional mode at 165 degrees
    9. Bake in the lower rack of the oven for 50-55 minutes (refer your oven manual too) or until the cake bounces back when lightly pressed in the center
    10. Once cooked, take the cake pan & immediately turn it upside down on a bottle (or another ramekin or tumbler - whichever suits best for the pan). Allow to cool completely which took about 85 minutes for me
    11. Use a palette knife and loose the sides of the cake. Pull out the sides and work similarly on the bottom. Turn it over on to a plate upside down & sprinkle with a dusting of icing sugar or a topping of your choice & serve


    Notes:

    • Do not grease or line or flour the cake pan. This will hinder the cake from rising up
    • Always use large eggs as called for in the recipe. Do not use medium or small sized eggs
    • Try to use castor sugar than normal ones 
    • The recipe calls for cake flour, but since I could not get it here, I used the substitute. Take an equal amount of All purpose flour. Remove 2 tbsps of flour from it & replace it with 2 tbsps of corn flour (NOT corn meal). This works just fine
    • Cream of tartar is used to stabilize the egg whites while beating up. Since I couldn't get those, I used the substitute lemon juice. Works perfectly OK
    • Make sure that the bowl used to whisk egg whites are clean & grease free. Traces of grease or egg yolks will not guarantee you proper whisking of whites
    • Proper & correct whisking of egg whites is essential to ensure the texture of the cake. Under or over beating can cause the cake to collapse or become too hard. Do the 'Overturn bowl test' to ensure that your whisking is the right amount. When you overturn the bowl of the whisked egg whites, it should hold & must not fall off
    • Do not let the egg whites sit for long once whisked. Immediately fold it onto the cake batter as this stage of stiff peaks is short lived
    • Take care while folding in the egg whites as over folding can cause the egg whites & thus the cake to deflate. Fold in gently using a whisk
    • Before pouring the batter into the pan, take the bowl and hit against the kitchen counter. This will cause bubbles to rise up to the top and pop. Do not hit the pan after pouring the batter as this may cause the formation of more bubbles

    Here are some links that helped me greatly. Hope you guys too find it useful !

    http://allthatmatters2rei.blogspot.no/2008/07/chiffon-cake-tips-and-trouble-ii.html
    Cheers,
    Chitz

    Wanna see what the others in the Baking Partners group baked??