Showing posts with label Beans. Show all posts

Wednesday, 8 August 2018

Carrot Beans Thoran | Carrot Beans Poriyal | Kerala Onam Sadhya Recipe


Today's recipe is a simple and easy-peasy side dish with beans and carrot. It is another quick dish that you can prep for your Onam Sadhya :) This is a colourful dish and can grab the attention of toddlers too.. Ohh but not all toddlers and if at all, not always ;) That's the way with toddlers right :D I'm sure everyone has their own way of making this dish and while I was typing out the recipe was thinking if at all this needs to be blogged :D But you know, then I felt this is how I make it and sometimes even I google the simplest of recipes just to get some insight or confidence or coz 'I have not made it before, so let me check' thoughts. So I thought chalo, let me blog it anways ! And so, here's how I make this simple deli thoran with carrot & beans :)


I Took: 

Preparation Time: 15 minutes

Cooking Time: 20 minutes


Serves : 3-4 persons


I Used:

Carrot
Beans
Coconut Oil
Mustard
-
-
-
-
100 gm/0.5 cups (chopped) 
1 tbsp
¼ tsp
Turmeric powder-¼ tsp
Salt
Curry Leaves
-
-
As needed
A sprig


To Pulse:


Coconut-½ cup
Green Chilly-1 no


The Way:


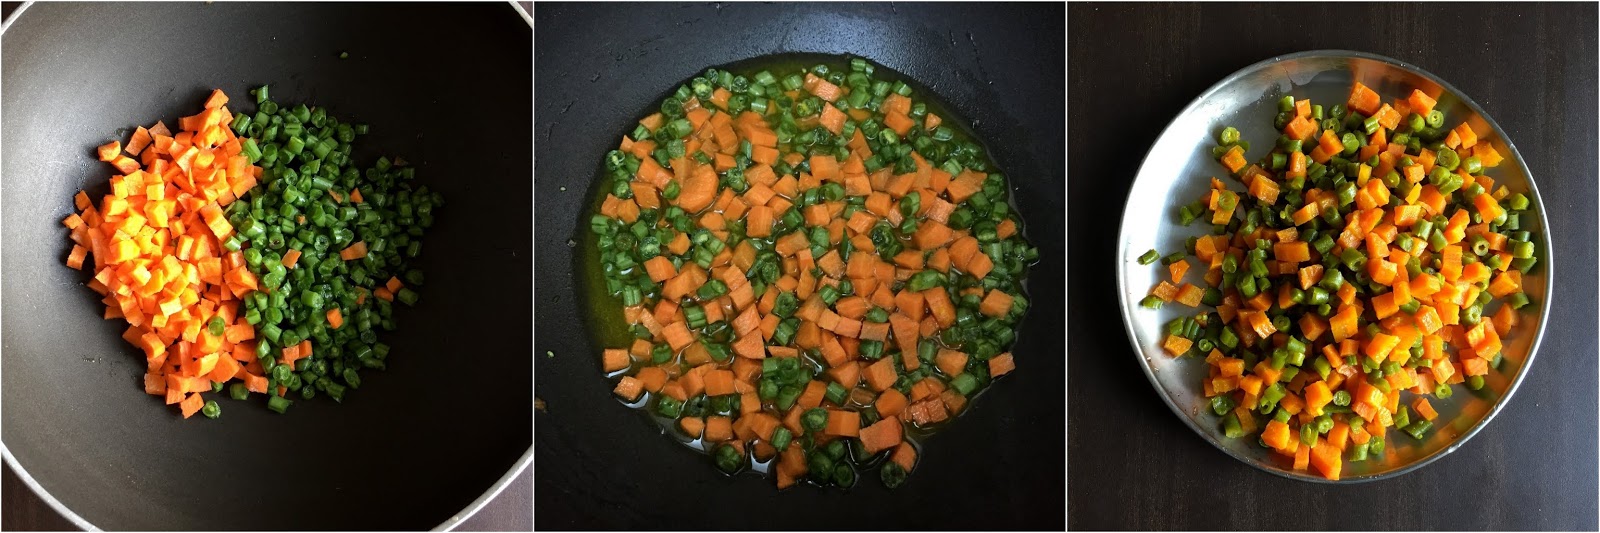
1. Scrape away the skin of the carrot. Nip away the ends of the beans. Then rinse them well in water. And chop them finely into small quarter inch pieces.

2. In a pan take the chopped carrots and beans along with ¼ tsp turmeric powder and salt and little water. Allow them to cook covered in a medium low flame until done. Check in between if water is sufficient, take care not to overcook or burn. When cooked transfer to a plate and keep them aside


3. Coarsely pulse together the grated coconut and green chilly in mixie without adding water. Do not grind to a smooth paste. Just 3-4 pulse until all the ingredients get crushed and mixed well would be sufficient

4. In the same pan used to boil the veggies, heat the coconut oil. Splutter mustard seeds and curry leaves


5. Add the ground coconut paste and and saute for 2-3 minutes. Now add the cooked carrot & beans and give a nice stir. Then switch off the flame in a minute or two and serve


Serve along with brown rice, Sambar and pappad or as a side dish in your Onam Sadhya :)


Notes:

  • Coconut is the key ingredient for thoran. So do not compromise on it :)
  • If needed can add 2-3 shallots and a tsp ¼ of cumin seeds while pulsing the coconut. We prefer it this way, so I do not add them
  • If you need a crunch, can add a tsp of urad dal while tempering the mustard as well

Cheers, 

Chitz

Friday, 23 September 2016

Beans Thoran | Kerala style French Beans Thoran | Green Beans Poriyal | Onam Sadhya Recipes

Beans sauteed in coconut-shallot tempering


I am still lingering in the Onam mood!! :) I took a 10 day vacation & was roaming and eating & visiting friends & relatives during this Onam. That is the essencce of Onam right? So I can say, that this Onam was well spent :) But what I miss now the most is the food :D as always! It's nice to have food prepared by someone else once in a while right.. I miss my mom's soul filling comfort food, the elaborate sadhyas of Kerala, the heavy biriyani & meen curry of Deeps' aunt.. 

So to relive the Onam moments, it's a simple Beans Thoran today. Very easy to make and a quintessential to the Onam Sadhya,Thoran is basically veggie cooked/tempered with coconut shavings. It's not necessarily beans but Sadhya can be served with a thoran made with any veggie. It can be Long beans or Cabbage or Beetroot or any veggie of your choice for that matter. 

So what was the thoran that you served this Onam? 


Other Sadhya recipes:

Homemade Ada for Adapradhaman

Recipe Source: Ma


I Took: 

Preparation Time: 20 minutes

Cooking Time: 20 minutes


Serves : 3-4 persons


I Used:

Beans-250 gm/1.5 cups (chopped)
Turmeric powder-¼ tsp
Salt-As needed


To Temper:

Oil-1 tbsp
Mustard -½ tsp
Shallots-6-8 nos (sliced)
Red Chilly powder-1 tsp
Curry leaves-A sprig

To Pulse:

Coconut-3 tbsp
Shallots/Small Onion-2 no
Green Chilly-1 no
Garlic-1 pod
Cumin Seeds-¼ tsp


The Way:


1. Rinse the beans in water twice or thrice. And chop them finely into small quarter inch pieces.

2. In a pan, add the chopped beans along with ¼ tsp turmeric powder, salt and ¼ cup of water. Allow them to cook covered in a medium low flame until done. Check in between if water is sufficient, take care not to overcook or burn.


3. Now while the beans get cooked, coarsely pulse together the ingredients under 'To Pulse' in mixie without adding water. Do not grind to a smooth paste. Just 3-4 pulse until all the ingredients get crushed and mixed well would be sufficient.


4. Heat oil in a pan. Splutter the mustard seeds.

5. Now add the chopped shallots and saute for 2-3 minutes. When they start to turn colour, add the curry leaves.

6. Now add the ground coconut paste and saute for another minute.


7. Add red chilly powder and again saute for 3-4 minutes till the raw smell goes away. Now add in the cooked beans and give a nice stir till the coconut tempering is coated evenly all over the cooked beans.


Serve along with brown rice, Sambar and pappad or as a side dish in your Onam Sadhya :)

Notes:


  • Addition of garlic, cumin & shallots while crushing the coconut is completely optional. As a family who does not like the strong flavour of garlic, I always add 1 pod of it. So adjust the ingredients to suit your tastes
  • Coconut is the key ingredient for thoran. So do not compromise on it :)

Cheers,
Chitz

Thursday, 2 June 2016

Savory Semolina Cake | Savoury Rava Cake | Eggless Savory Rava Bread


So, here I am back with an easy recipe for all you lovely readers out there.. Am I going to be regular here from now on? I hope so.. So this is a very interesting recipe that can be served for breakfast or as a snack too ! I always have a soft spot for baked goodies & when I saw this interesting recipe with a twist at 'Erivum Puliyum', I decided I had to make it :) It is very easy except for the veggie chopping part. The rest is just whisk, whisk, whisk & bake !


Recipe Source: Here


I Took : 

Preparation Time : 15 minutes

Baking Time : 30 minutes


Makes : An 8 inch loaf


I Used:

Semolina  - 1 cup
Carrot  - 1 medium sized (finely chopped)
Beans - 6-8 no (finely chopped)
Ginger - 1 inch piece (finely chopped or grated)
Green Chilly - 3 nos (finely chopped)
Thick Yogurt - ½ cup 
Butter - 1 tbsp
Baking Soda - ½ tsp
Oil - 3 tbsp
Water - As required
Salt - As required
Coriander Leaves - 2 tbsp (finely chopped)

To Temper:

Mustard  - 1 tsp
Cumin Seeds - 1 tsp
Sesame  - 1 tsp


The Way:

  1. Preheat the oven to 180 degree C
  2. Combine together the semolina (rava), salt & yogurt. Now add the chopped carrot, chopped beans, chopped ginger, finely chopped green chillies, chopped coriander & mix well
  3. Heat oil in a pan. When it heats up, splutter the mustard. Then add the cumin seeds & sesame. Take care not to brown. Now add this tempering to the semolina batter & give it a mix
  4. Grease the baking pan with butter
  5. Add baking soda to the batter & give it a whisk
  6. Pour the batter into the baking pan & garnish the top with some sesame seeds
  7. Bake for 25-30 minutes or till done (A tooth pick inserted would come out clean)
Serve warm with chutney or ketchup & a smoothie of your choice :)

    Notes:

    1. Baking soda is for the bread to rise properly. So add it in the end just before putting it to bake in the oven
    2. You can add veggies of your choice which can be baked easily like peas, zucchini etc
    3. Do not use sour yogurt. It can compromise the taste

    Cheers,
    Chitz

    Monday, 25 March 2013

    Vegetable Biriyani


    'Biriyani', the mention of this word alone is enough to fill my mouth with water sufficient to sail a ship !!! Back at home this is not a very frequent dish. Mom used to prepare this maybe once in a month or so.. But once you are abroad or living with a group of friends the scene shifts completely rite?? I am not completely certain of the reasons, but this dish will find its way at least once a week or many a times more than that. Can be the lack/shortage of 'Thalapakattu Biriyani kadai' or other wonderful restaurants that serve you this, in every other street of the city where you live. Or the very pride that you feel in front of your friends when you are done with the preparation & the aroma fills your home.. And most importantly, this one 'one pot meal' along with a simple raita is enough for your Sunday menu or when friends come along for a casual weekend get together. So anyways, the reasons are plenty and so is the way in which this awesome food is prepared.


    And the version here is one which I learned from Deeps.. My mom makes the biriyani in slightly different styles, maybe I would post that sometimes later. Of all the homemade biriyanis that I have had, I would given Deeps' version the numero uno position. I simply love the correct blend of the spices & masala.. More importantly, the rice doesn't get burnt or stuck to the bottom of the pan nor does it break. You can see the long grains of the rice coated with masala inviting you very dearly.. Ohh my.. I am literally drooling writing this up. And mind you, veg biriyani was never in my list when there is a never ending palette of chicken, mutton, prawn etc etc etc biriyanis. But believe me, I started loving veg biriyani also very much, after I laid my hands on this version.


    But there was only one disadvantage.. Every Sunday, I would be his apprentice and clean up chicken or cut vegetables and he would be the chef. And I did not  learn how to make this. That's when the realization stuck me. Then, there was no stopping.. I donned the hat of the chef, learned and made it on my own. Yes, it came out very well and hence it has found it's way onto this space now. Over to the recpie..


    Recipe from Deeps:


    Preparation Time : 20 minutes

    Cooking Time : 40-45 minutes


    I Used:


    Basmati Rice             -  3 cups
    Water                      -  5 ¼ cups (3 * 1 ¾ cups)
    Onion                       -  3 nos (medium sized)
    Tomato                    -  1 no (medium sized)
    Carrot                      -  2 nos (medium sized)
    Beans                       - 15-20 nos
    Potato                      -  2 nos (medium sized)
    Green Peas               -  ½ cup (I used frozen ones)
    Mint leaves               -  10 sprigs
    Coriander leaves       -  10 sprigs
    Green Chilly                    -  2 nos
    Ginger Garlic paste    -  1 tbsp
    Lemon juice             -  ½ a lemon's
    Cinnamon stick         -  1 inch piece
    Cloves                     -  4 nos
    Cardamom               -  3 nos
    Bay leaf                   -  2 leaves
    Chilly powder           -  1 tsp
    Coriander powder     -  2 tsp
    Turmeric powder     -  ½ tsp
    Biriyani masala          -  1 tsp
    Garam masala            -  1 tsp
    Ghee                      -  As needed
    Salt                        -  As needed


    The Way:

    1. Rinse the rice and soak it in water
    2. Cut the vegetables - onion, tomato, carrot, beans & potato into thin slices
    3. Defrost the green peas
    4. Separate the mint leaves from the sprigs
    5. Chop the coriander leaves & green chillies
    6. Heat little ghee in a pan. Add the sliced carrot, beans & potato and fry for a few minutes. This is for the veggies to remain intact & not break when we add rice. Keep this aside
    7. Heat ghee in the same pan. Add cinnamon, cloves, cardamom (remove the pods & add the seeds inside), bay leaves (crush them before adding) and saute
    8. When the combined aroma of the spices start coming, add the sliced onions. Saute the onions till they become soft & oil separates from them
    9. Add ginger garlic paste and saute till the raw smell goes off
    10. Now add tomatoes & green chillies and saute till the tomatoes become soft
    11. Add the ghee tossed vegetables, green peas & half the mint leaves
    12. Add chilly powder, coriander powder, turmeric powder, biriyani masala & salt. Add one cup of water and mix well
    13. Cover the pan and cook until the vegetables are almost done
    14. Once the vegetables are soft and cooked, add rice and the remaining 4 ¼ cups of water
    15. Add garam masala, lemon juice, coriander leaves & remaining mint leaves and mix well
    16. Now taste the mix for salt and hotness. Adjust to your taste buds accordingly
    17. Cover the pan and cook in medium fire for 15 minutes
    18. After 15 minutes check if the rice is done and water has evaporated completely. Else  reduce the flame further and cook for another 5-10 minutes (It took me 5 extra minutes)
    19. You can see that the rice has neither stuck to the bottom of the pan & nor has broken down. Long beautiful grains of basmati rice gives the biriyani a rich look
    20. Once the rice is done, off the flame and leave the pan in the heat of the stove till you serve

    Notes:

    • Rice : Water ratio of 1:1 ¾ works perfectly well for me. I use India Gate basmati rice for making this biriyani
    Chitz

    Friday, 22 March 2013

    Chicken Spring Rolls | Chinese Chicken Spring Rolls using Pastry Sheets


    What's the first dish that comes to your mind when you hear 'Chinese' ? It must be 'Fried Rice' or 'Noodles', correct? Okay, now what's it that comes to your mind when I say 'Chinese Starter'. For me it's always 'Spring Rolls'. A visit to the Chinese restaurant is never complete without gulping this all time favorite of mine. And yes, not to for get the 'Sweet corn corn chicken soup'. I used to order this every other time, that my dad used to ask me, 'Why don't you try something new at least this time?' :D

    My mom used to make these spring rolls for us at home. So I knew it was not a Herculean task, barring the vegetable chopping. I think that's the only time consuming factor in Chinese cuisine. Once that's done, the rest is very simple.  It is one of the all time favorites of Deeps too.. He simply loves them and would be in full praises when I make them. And he did come home very early from office yesterday. I am still not sure which one of these two is the reason, 'Not much work today' (as he said) or 'I am making spring rolls for evening tea today' (as I told him in the morn). Anyways we both enjoyed this little delicacies over a hot cup of tea.


    Recipe from Ma


    I Took:

    Preparation Time: 40 minutes

    Cooking Time: 45 minutes


    Yield: 12 nos


    I Used:

    Carrot                        - 1 cup (refer notes)
    Capsicum                    - 1 cup
    Beans                         - ½ cup
    Celery                        - ½ cup
    Chicken                      - 1 cup
    Soya Sauce                 - 1 ½ tsp
    Tomato Sauce             - 1 tsp
    Chilly sauce                - 1 tsp
    Worcestershire sauce   - 1 tsp
    Sugar                          - ½ tsp
    Pepper powder            - ½ tsp
    Ground paste               - 1 tbsp
    Oil                              - For deep frying
    Salt                             - As needed
    Aginomoto                   - A pinch (optional)

    To grind:

    Ginger                       -  1 tbsp
    Garlic                        -  1 tbsp
    Chilly powder            -  1 tsp


    The Way:

    1. Chop all the vegetables. Clean and cut the chicken into small pieces (like chops)
    2. Heat 1 tbsp oil in a pan. Add the chicken pieces. Add a little salt & pepper and saute for 3-4 minutes
    3. Then add the ground paste and onion and mix well (Ignore the previous step for veg spring rolls)
    4. After 2 minutes of sauteeing add carrot, beans, capsicum, celery and aginomoto and fry
    5. Then mix in salt, soya sauce, tomato sauce, chilly sauce, worcestershire  sauce and the remaining pepper powder and saute in
    6. The veggies should become crisp & crunchy. Do not over cook as they again have to be deep fried
    7. The filling for the roll is ready. Allow it to cool and dry. Moisture content in the filling will make the wrapper wet which will suck in more oil during frying. Hence best to wait till the filling has cooled down with minimum moisture in it
    8. Now off to the spring roll sheets. Defrost them to room temperature before using them. Use the sheets after defrosting as they will dry out & crack if left unattended 
    9. Lay out one of the sheet. Place about a tbsp (depending on the size of your sheet) of the filling on one corner. Lesser the filling, the better. Over sized filling have a tendency to break apart in oil


    1. Fold over that corner and roll in
    2. Fold over both the left & right sides
    3. Make sure there is very little or no air pockets when you fold in the sheet, as they can allow oil to get inside the roll
    4. At this point you can freeze the rolls if required for future use. Make sure the rolls are placed one aside the other (not on top) & covered suitably to prevent drying while freezing
    5. Heat oil in a kadai. Deep fry the rolls. Keep turning the over in oil till the turn golden brown evenly 
    6. Place them over tissue paper to drain off the excess oil. Serve with tomato ketchup

    Notes:

    • You can include more vegetables like cabbage & cauli flower. I had run out of them. So did not use here
    • Aginomoto is added to enhance flavor but comes with a list of side effects. So highly recommended to avoid

    Linking this to 'Flavors of Chinese Cuisine' event at Julie's 'Erivum Puliyum'


    Cheers,
    Chitz