Showing posts with label Wheat Flour. Show all posts

Saturday, 12 August 2017

Instant Wheat Appam | Godhumai Appam | Wheat Flour Appam | Krishna Jayanthi Recipes


So here it is as promised, next sweet recipe for your Janmashtami celebrations. It is an instant appam recipe, that too with wheat flour. If you have a paniyaram/appe pan then it's double damaka! No deep frying needed. And also it is sweetened with jaggery. What more does one need for a healthy sweet indulgence right? :) You can whip up the batter in 10 minutes and making 20 paniyarams would take around 20 minutes. So in half an hour you are done with it!
This recipe is very handy not only during festive occasions but also when you crave for a sweet with your evening cuppa kaapi/chai. Most of the ingredients would be readily there in any pantry. So it's an instant fix for that sudden sweet tooth. Initially I tried this with cup ½ jaggery and 2 bananas. Then Deeps felt it's not sweet enough and asked me to add more bananas next time. But that sweetness was fine with me. But anyways I did so the next time and also slightly increased the jaggery quantity as well. This time I got a thumbs up! So it all depends on your taste buds. So play along!

Makes: 20 appams


I Took: 

Preparation Time: 5 minutes

Cooking Time: 20 minutes


I Used:


Wheat Flour
-
1 cup
Rice Flour
-
1 tbsp
Grated Coconut
-
2 tbsp
Cardamom powder
-
of 1 pod
Baking Soda
-
A pinch
Salt
-
A big pinch
Jaggery
-
½ - ¾ cup
Banana
-
½ cup mashed (nearly 4 small bananas)
Water
-
As required

The Way:


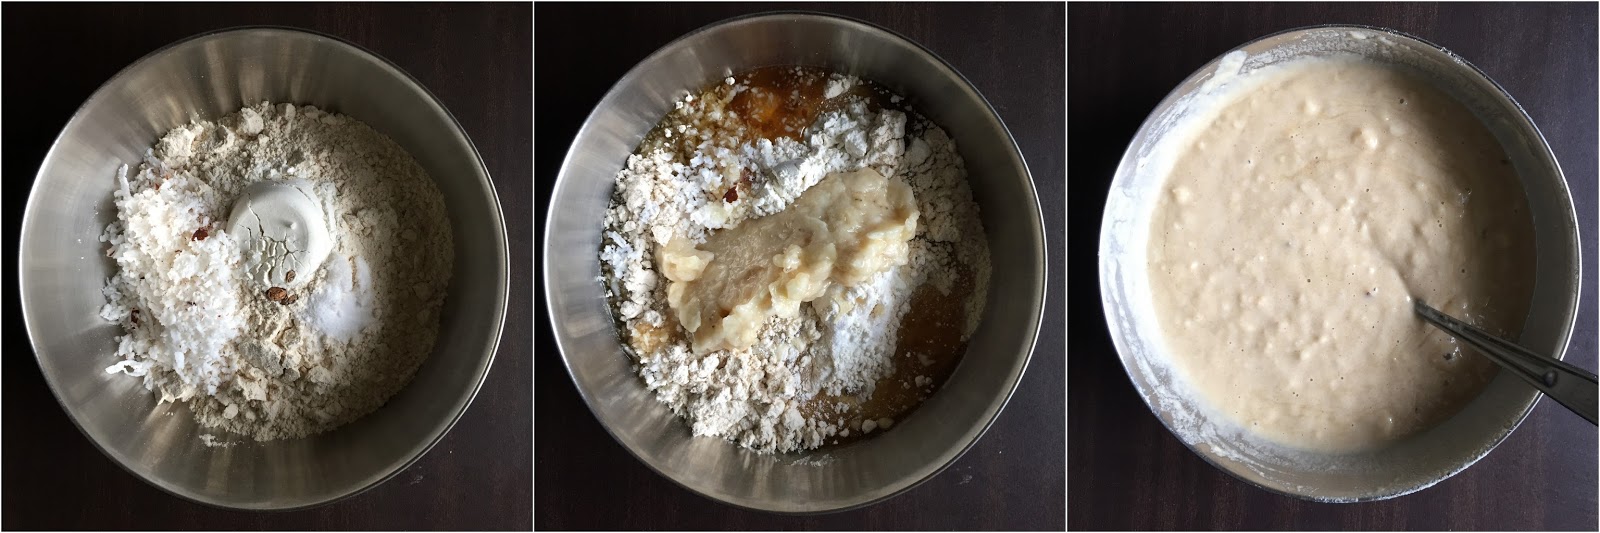
1. Take the jaggery in a pan and add little water, just to immerse it. Heat it over low flame so that the jaggery dissolves completely. Filter it to remove any impurities (I use organic jaggery, hence did not filter) and keep aside. Allow it to cool

2. Mash the bananas to a smooth paste with a fork or you can also give a quick pulse in mixie


3. Now take the other ingredients together in a bowl viz. wheat flour, rice flour, grated coconut, baking soda, salt, cardamom and stir it well

4. Now add the mashed banana and jaggery syrup (it should not be hot) and mix evenly. Add water and mix well without any lumps. It should be of idly batter consistency


5. Now heat a paniyaram/appe pan. Add ½ tsp oil/ghee in all holes. Then add about 1 tbsp (depends on the size of your pan) of batter in each hole

6. Lower the flame and allow it to cook. You can cook covered for around 2-3 minutes and the flip over

7. Again now allow this side to cook for about 2-3 minutes. Transfer to a plate and it's now ready to be served with a hot cuppa chai !


Notes: 

  • If you do not have a paniyaram/appe pan you can also deep fry the appams. In that case take a laddle of the batter and pour it into hot oil. The appams should come up and not sink down. That would be the right temperature for the oil
  • If you do not have normal whole wheat flour you can also use atta. Taste would slightly vary as compared to normal whole wheat flour
  • I use cherupazham (yelakki) variety of banana for this recipe
  • Also don't pour the hot jaggery syrup to the flour mix. Allow it to cool and then add
  • Stick to a pinch of baking soda. More of it can make the appams flat and sticky and will be very difficult to cook properly

Cheers,
Chitz

Wednesday, 16 October 2013

Halloween Special - Vegan Pumpkin Bread - Baking Partner Challenge #15


Come the month of October, it's festival time !! Dussera & Diwali here in India & the infamous Halloween in US. For me Halloween means kids in scary outfits & pumpkins carved in funny shapes ;) Actually I get reminded of the Harry Potter Halloween dinner scene :D Since pumpkin is such an inevitable part of Halloween, we Baking Partners decided to bake some Pumpkin bread for the occasion. So when Swathi announced the recipes & asked us to choose from among the three variants of pumpkin bread, my eyes & heart fell for the Vegan version. 

It is such a breeze recipe, just like a normal cake where in you combine all wet ingredients & dry ingredients separately & eventually mix them both & bake ! I was so much in love with the end result ! It was so soft & tender & tasty. I even took some to my send-off party (by the ladies gang ;)) back in Norway & all the ladies loved them. When they ask you for the recipe, you know that they too loved it to the core. So what you waiting for my pals, try this out soon & you too are gonna enjoy baking & eating them like us :)


Recipe Source: Here

I Took: 40 + 50 minutes

Serves: 1 loaf


I Used:

All purpose Flour - 1 cup
Whole Wheat Flour - ¾ cup
Dark Brown Sugar - 1 cup (I used normal sugar)
Baking Soda - 1 tsp
Baking Powder - ½ tsp
Salt - ½ tsp
Nutmeg - ½ tsp
Cinnamon - ½ tsp
Allspice - ½ tsp
Cloves - ¼ tsp
Pumpkin Purée - 1 cup (Refer first 2 steps)
Oil - ½ cup
Maple Syrup - 3 tbsp ( I omitted this)
Water - 3 tbsp 
Walnuts or pepitas - ½ cup - chopped (I used almonds)

The Way:


  1. Peel the skin off the pumpkin & rinse them well. Cut them into big chunks and pressure cook or microwave with ½ cup water for 15 minutes
  2. Allow them to cool. Then blender it to make a fine puree. If you want to remove the extra moisture, strain the puree using a cheese cloth. Set aside
  3. For this recipe, you can also blend the spices along with the boiled pumpkin !
  4. Preheat oven to 175 °C. Grease and flour a loaf pan
  5. In a large bowl mix together the all purpose flour, whole wheat flour, sugar, baking soda, baking powder, salt and spices (Nutmeg, cinnamon, cloves & allspice)
  6. In a small bowl whisk together pumpkin, oil, maple syrup, and water
  7. Add wet mixture to dry, combine until just moistened. The batter will be very thick, it is not a problem!
  8. Fold in nuts and pour the batter into the prepared pan
  9. Bake for about 45-50 minutes or until top is browned and a toothpick inserted in the center comes out clean. It took 50 minutes for me
  10. Allow it to cool for 20 minutes. Use a butter knife to gently loosen bread from sides of pan & then invert onto a cooling rack
Cheers,
Chitz

Sunday, 7 April 2013

Chiratta Puttu | Puttu | Pittu | Steamed Indian Rice Cake

Steamed Rice flour with coconut fillings in coconut shell


Chiratta Puttu. Wondering what?? It's none other than the traditional Kerala breakfast prepared in the very traditional way. Both me & Deeps go gaga over puttu. But we do not have the required apparatus (puttu kutti) here for preparing it. But that did not stop us from preparing and relishing it.. Yes, Deeps found the way. Infact amma (mil) used to prepare puttu using chiratta (coconut shell) it seems. And he says that it is more tastier than the ones prepared using the puttu maker. And so with this new found way, puttu is now a regular in our weekend menu happy


There are also several other ways to prepare and relish this dish. If you can't get hold of a coconut shell or puttu maker then also it's fine. Prepare the rice flour and you can double boil it till done (My mom use this way at times). Or use idly plates to place the prepared flour & steam in pressure cooker (I have never tried this, but have read about it). And as to serving, it can be enjoyed with Banana, sugar & pappad | Milk & sugar | Cherupayar (green gram) curry | Kadala (Chick peas) curry | Chicken gravy | Beef curry | Sambar. Ohh yes, I have tried all these combinations winking And Yet to be tried one is the stuffed egg masala puttu. Maybe, some other day batting eyelashes 


Preparation Time: 20 minutes

Cooking Time: 15 minutes


Yields: 5 nos


I Used:

Rice Flour/Puttu Flour - 2 cups
Grated coconut - ¼ cup
Salt  - As needed
Water - As needed
Coconut Husk - 2 halves


The Way:

  1. In a pan roast the rice flour on low flame for about 5-6 minutes. Stir continuously to avoid over roasting or burning
    • Home made rice flour or store bought rice flour can be used
    • For home made ones, 
      • Soak rice in water for 2-3 hours 
      • Drain off the water and dry the rice by spreading it over a large towel or white cloth
      • Once dried, grind to a coarse powder
      • Roast this flour as mentioned above. You can use this immediately for making puttu or idiyappam or store it away in air tight containers for further use
    • Store bought ones can also be roasted and stored away for future use
  2. If using store bought puttu powder, skip the first step
  3. Take the flour/powder in a bowl. Add salt and mix
  4. Sprinkle water over the powder and mix till it becomes moist or rather wet 
    • Do not add the entire water together. This would make the mixture into a dough form which is not what is required
    • It should be of a crumby consistency as in the pic
    • For beginners, it is better to use a large plate rather than a bowl. Take a little quantity of powder, sprinkle water & mix. Once that portion is ready keep that at one corner of the plate and start working on a new portion till the entire powder is done (Mom taught me this way :))
    • To check if it's done, take a fistful of the prepared flour. If it clings together & the flour doesn't fall off, then it is done (Mom's tip)
    • It took me around two third glass of water for 2 cups of flour
  1. Take one half of the coconut shell. Drill a hole through one eye using knife 
  2. If using the shell for the first time, you can soak it in water overnight so that it becomes soft (strictly optional)
  3. Place little grated coconut in the coconut shell. Add the prepared flour on top of it. Cover it off with another layer of grated coconut

  1. Take 2 glasses of water in the pressure cooker. Close it with the gasket on and leave it on medium flame
  2. Once steam starts coming off from the whistle (where we place the lid) of the pressure cooker, place the coconut shell on the pressure cooker as shown in the pic
  3. Steam the puttu for 10-12 minutes on medium flame
  1. Remove it from the flame and place the shell inverted onto a plate. Wait for 2 minutes. Then remove the puttu from the shell by giving it a gentle tap

Notes:


I used stored bought chemba rice puttu powder

Cheers,
Chitz