Showing posts with label Coconut Milk. Show all posts

Wednesday, 6 November 2019

Chiranga Olan | Bottle Gourd Olan | Churakka Olan | Surakka Olan | Lauki Olan


When the family loves Olan, I try to sneak in as many kind of veggies as I can into it :) Cheranga as such is not liked by us, but Olan with it is an exception. We love it when the bottle gourd is paired with the mild coconut milk and the soft crunch from the boiled red eyed beans.. I have already made olan with Zucchini and Pumpkin & Ash Gourd and this one is no different from them. It is simple to make and healthy and yummy too :) So let's see how to make this easy Olan with bottle gourd..


Serves: 2-3 persons


I Took: 


Preparation Time: 10 minutes

Soaking Time: 8 hours

Cooking Time: 30 minutes


I Used:


Cheranga/Bottle Gourd
Red Eyed Beans/Vanpayar
-
-
1 cup - cubed
¼ cup heaped (after boiling)
Green Chilly - 2 nos - slited
Salt - As Needed
Coconut Milk - ½ cup
Curry leaves - 2 sprigs
Coconut Oil - 1 tbsp

The Way:


1. Rinse and soak the vanpayar (red beans - I used 1/8 cup of the beans to soak) overnight for around 8 hours. In the morning, discard the water. Take the beans in a pressure cooker. Add enough water (around 2 cups) and salt and pressure cook till done. It took me 2 whistles in high and 2 in low. Keep aside

2. While they get cooked, extract the coconut milk and keep ready. I used around ½ cup of grated coconut and ¼ cup of water and ground it in a mixie till the coconut was smoothly ground. Then using a muslin cloth, extracted the milk from the ground coconut


3. Cut and discard the skin of the bottle gourd. Discard the thick pith if it's too ripe. Then cut them into thin cubes as shown in the picture. The thickness should not be more than ¼ inch along both width and length

4. Now take the cut pieces in a saucepan and add required salt and green chilly along with little water (¼ cup) (Instead of water you can also use 2nd coconut milk and boil the bottle gourd) and cook it till done. It will take around 15-20 minutes to get cooked

5. If there is excess water after cooking the bottle gourd, I remove them. Else the coconut milk becomes very thin


6. Add the cooked beans (a heaped ¼ cup) without water to the veggies. Give a gentle stir


7. Then add in the coconut milk and curry leaves and again give a gentle stir. Check the salt now. Add if required. Once the coconut milk is added, it should not boil. It should only get warm. And it would take about a minute or so. Switch off the flame. Add coconut oil and just swirl the pan


Transfer to the serving dish and serve along with rasam and pickle or as a dish in your Onam Sadhya leaf !

Cheers,
Chitz

Tuesday, 31 July 2018

Zucchini Olan | Kerala Onam Sadhya Recipe | Kerala Style Olan with Zucchini


This is one interesting Kerala Sadhya recipe that has been lying in my drafts for quite a while now. With Onam just around the corner, I thought to post it today so that if any of you want to try some interesting recipes for this Onam can do so :) Yes today's post is an Olan with Zucchini.. Olan is something that is always approved by the hubby, so I try and make as many varieties with the different veggies. Ash Gourd and Yellow Pumpkin are the most common ones used for making Olan, but you can also use Cheranga (Bottle Gourd) or Zucchini as well. While making Olan with yellow pumpkin alone I sometimes skip coconut milk. Believe me, it tastes yum too, a littler more subtle Olan. But with Cheranga and Zucchini, I don't skip coconut milk. Because those veggies as such are bland and coconut milk truly takes the flavour to the next level :) So let's now see how to make this easy and yummy olan with zucchini. If you are trying to make variety dishes with Zucchini, then this is not going to disppoint you for sure ! 


Serves: 2-3 persons


I Took: 


Preparation Time: 10 minutes

Soaking Time: 8 hours

Cooking Time: 20 minutes


I Used:


Zucchini-1 medium sized - ¾ cup heaped (after cutting)
Red Eyed Beans/Vanpayar-¼ cup heaped (after boiling)
Green Chilly-2 nos
Coconut Milk-½ cup
Salt-As needed
Curry leaves-A sprig
Coconut Oil-1 tbsp

The Way:


1. Rinse and soak the vanpayar (red beans - I used 1/8 cup of the beans to soak) overnight for around 8 hours. In the morning, discard the water. Take the beans in a pressure cooker. Add enough water (around 2 cups) and salt and pressure cook till done. It took me 2 whistles in high and 2 in low. Keep aside


2. While they get cooked, extract the coconut milk and keep ready. I used around ½ cup of grated coconut and ¼ cup of water and ground it in a mixie till the coconut was smoothly ground. Then using a muslin cloth, extracted the milk from the ground coconut


3. Cut and discard the skin of the zucchini. Cut them into thin cubes as shown in the picture. The thickness should not be more than ¼ inch along both width and length


4. Now take the cut pieces in a saucepan and add required salt and green chilly along with little water (¼ cup) and cook it till done. It will take around 12-15 minutes to get cooked


5. If there is excess water after cooking the zucchini, I remove them. Else the coconut milk becomes very thin. Add the cooked beans (a heaped ¼ cup) without water to the veggies. Give a gentle stir


6. Then add in the coconut milk and curry leaves and again give a gentle stir. Check the salt now. Add if required. Once the coconut milk is added, it should not boil. It should only get warm. And it would take about a minute or so. Switch off the flame. Add coconut oil and just swirl the pan


Transfer to the serving dish and serve along with rasam and pickle or as a dish in your Onam Sadhya leaf !

Cheers,
Chitz

Wednesday, 23 August 2017

Olan | Kerala Olan Recipe | Kumbalanga Mathanga Vanpayar Olan with coconut milk | Onam Sadhya Recipes

Ash gourd, Yellow pumpkin and Red Eyed Beans in coconut milk


Olan is one of my favourite Kerala recipes. It's a subtle dish that tastes mild and creamy. It can be made with or without coconut milk. I like both versions but I love the one with coconut milk more ! There can be many combinations of this recipe, with vanpayar (red eyed beans) and without it. You can also add both kumbalanga (ash gourd) and mathanga (yellow pumpkin) or either one.. It is a quintessential dish in an Onam Sadhya. 

When I make it on normal days mostly there will be some spicy side like a fish fry or chicken gravy. Else there will be pickles :) This time I had it with rasam and some tangy mango pickle. Another kinda comfort food for me :) If you use pressure cooker to cook this recipe, then it will be ready in less than 30 minutes. Slow cooking in a pan will time. So while making for an Onam Sadhya go with pressure cooker as it saves time for you. So let's see how to make this yummy and comforting Olan now..


Serves: 4-5 persons


I Took: 

Preparation Time: 15 minutes

Soaking Time: 8 hours

Cooking Time: 20 minutes


I Used:


Ash gourd/Kumbalanga - ½ cup heaped (after cutting) 
Yellow Pumpkin/Mathanga - ½ cup heaped (after cutting) 
Red Eyed Beans/Vanpayar - ½ cup heaped (after boiling)
Green Chilly - 2 nos
Coconut Milk - ½ cup
Salt - As needed
Curry leaves - A sprig
Coconut Oil - 1 tbsp

The Way:


1. Rinse and soak the vanpayar (red beans - I used ¼ cup of the beans to soak) overnight for around 8 hours. While making the olan, discard the water. Take the beans in a pressure cooker. Add enough water (around 2 cups) and salt and pressure cook till done. It took me 2 whistles in high and 2 in low. Keep aside


2. While they get cooked, extract the coconut milk and keep ready. I used around ½ cup of grated coconut and ¼ cup of water and ground it in a mixie till the coconut was smoothly ground. Then using a muslin cloth, extracted the milk from the ground coconut


3. Cut and discard the skin of the ash gourd and pumpkin. Discard the seeds along with the soft middle portion as well. Cut them into thin pieces as shown in the picture. The thickness should not be more than ¼ inch along both width and length


4. Now take the cut pieces in a cooker and add required salt and green chilly along with little water (¼ cup) and pressure cook it till done. I kept 1 whistle in high and 2 in low. Alternately you can cook in a pan as well, only difference would be that it would take time

5. Now once the pressure is released from the cooked veggies, open the cooker. Again switch on the flame. If there is excess water after cooking the veggies, I remove them. Else the coconut milk becomes very thin. Add the cooked beans (a heaped ½ cup) without water to the veggies. Give a gentle stir


6. Then add in the coconut milk and curry leaves and again give a gentle stir. Check the salt now. Add if required. Once the coconut milk is added, it should not boil. It should only get warm. And it would take about a minute or so. Switch off the flame. Add coconut oil and just swirl the cooker


Transfer to the serving dish and serve along with rasam and pickle or as a dish in your Onam Sadhya leaf !

Cheers,
Chitz

Thursday, 1 December 2016

Kerala Style Vendakka Gravy | Vendakka Mappas | Vendakka Thengapaal Curry

Okra in Coconut Milk - the best gravy for Kerala Appam


I like to experiment with new veg gravies for my lunch. I make them, eat them and then ask Deeps to taste them when he is back home for the day. If he likes them, then the dish features in our regular menu. If he doesn't like it and it's only me who has fallen for the recipe, then it is made for my lunch at times. This is one such dish which I found while googling, from a dear blogger buddy Julie at 'Erivum Puliyum'. And the best part is I finished the whole gravy at lunch itself not leaving anything for Deeps to taste even ;) 

I love coconut milk in my gravies. They have a mild taste yet feels so rich and tasty and they are very light on the tummy as well. It is much easier to prepare also, if you are using coconut milk powder. The curry will be ready in a jiffy. But if you are extracting milk from freshly grated coconut, then it is a slightly different story. It may take an extra 15 minutes. But I always vouch for homemade dishes from scratch. There is an un-doubting taste and freshness and authenticity in those dishes that can never be replaced with short cuts. 

And although I had this gravy with rice, with every mouth that I took, I had that inner voice telling me at the back of my head that this is going to taste just awesome with Appam, as this curry tastes like a cousin of our regular Vegetable Stew. I have that in mind, sometime soon I am going to try that combo :) If you are looking for some easy fast recipes for lunch at home or for your lunch dabba to office, do try this out. I am sure you will not regret :)


Recipe Source: Adapted from here


I Took: 

Preparation Time: 15 minutes

Cooking Time: 30 minutes


Serves : 2-3 persons


I Used:


Vendakka/Ladies Finger - 10 nos
Coconut Oil - 2 tbsp
Cinnamon - An inch piece
Cloves - 2 nos
Green Chilly - 2 nos - slited
Ginger - 1 tsp - chopped
Onion - 1 no - medium sized - sliced
Turmeric powder - ½ tsp
Red Chilly powder - 1 tsp
Curry leaves - A sprig
Coconut Milk - Thick - 1 cup
Coconut Milk - Thin - 1.5 cups
Lemon juice - 1 tbsp

To Temper:

Coconut Oil - 3 tbsp
Mustard seeds - ¼ tsp
Shallots - 4-5 nos - sliced
Curry Leaves - A sprig


The Way:


1. Rinse and clean the ladies finger in water. Chop off the edges and cut them into 2 inch length pieces or bite sized pieces as per your preference.

2. Heat 1 tbsp oil in a pan and add the cut ladies finger pieces and saute them for about 3-4 minutes till the stickiness of the ladies finger goes away.Once done transfer to another plate/bowl and keep them aside.

3. If preparing coconut milk from fresh coconut, grind coconut with water (as required) and extract the thick and thin coconut milk and keep aside. If using instant coconut milk powder, add the powder in warm water (as mentioned in the packet), prepare the thin and thick milk and keep aside.


4. Heat oil in a pan/kadai. Add the whole spices - cinnamon and cloves. Keep the flame in low or medium. After about a minute add the chopped ginger and green chillies. Saute for about half a minute.


5. Add the sliced onions and saute till it turns translucent. No need to make it brown.

6. Now add curry leaves, salt, turmeric powder and red chilly powder and saute well for about 2-3 minutes till the raw smell goes off.

7. Now add the sauteed ladies finger and give a nice stir.


8. Add the thin coconut milk and give a stir. Cover and cook till the ladies finger is cooked. This may take abut 6-7 minutes.

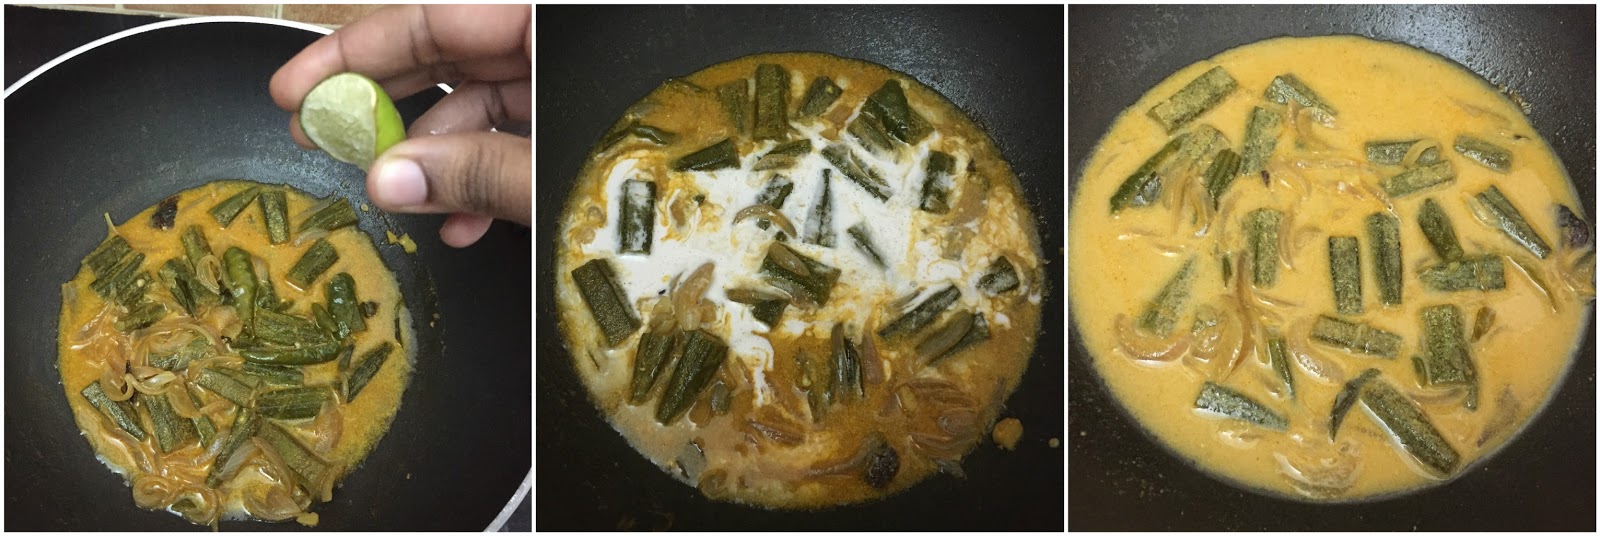
9. Now add the lemon juice (is optional) and adjust salt if needed.

10. Once the ladies finger is cooked, add in the thick coconut milk. Give a quick and nice stir. Switch off flame.


11. In another pan (tadka pan) heat oil. Splutter mustard seeds. Add in the chopped shallots and curry leaves. Saute till the shallots turn light brown in colour. Take care not to burn them. Add the tempering to the gravy and give a nice stir.


Serve hot with Appam / Idiyappam / Steamed Rice & Fish Fry :)

Cheers,
Chitz

Friday, 9 August 2013

Coconut Milk Rice | Thengai Paal Sadam | Thengapal Sadam | Coconut Pulav

Coconut Pilaf using Coconut Milk


This is yet another winner recipe from my mom & which always makes me drool just thinking about the dish. It has been a favorite of my friends too, especially for many of whom who had not come across this variety rice before ! Rich in it's own way without much ghee or nuts & raisins & flavored with the Indian whole spices this one is a perfect one pot meal for me. Pair it up with a spicy chicken gravy, ahh bliss !! I have never tried a veg side dish for this one, but I feel dal tadka or any other dal recipe for that matter would be apt. So without much chattering, let's move on to the recipe :)


Recipe Source: Ma

I Took: 30 minutes

Serves: 2-3 persons


I Used:

Basmati Rice  - 1 cup
Thick Coconut Milk - 1 cup
Water - 1 cup
Onion - 1 no - big sized - sliced
Green Chilly - 3 no - slited
Garlic - 7-8 cloves
Cinnamon - An inch piece
Clove - 2 no
Cardamom - 2 no
Bay Leaf - 2-3 no
Oil - 1 tbsp
Ghee - 1 tbsp
Salt - As Needed

The Way:

  1. Rinse the basmati rice & soak in water for 10-15 minutes
  2. Extract the coconut milk from coconut if using fresh one. For this recipe I used ½ a medium sized coconut to extract the milk
  3. In a pan, add 1 tbsp oil & add the soaked rice (without the water) & fry very gently for about 2-3 minutes. Keep this aside
  4. Heat another pan or pressure cooker. Add 1 tbsp oil & 1 tbsp ghee. Add the whole spices - cinnamon, cardamom, cloves & bay leaf. When it starts to crackle add the green chillies & garlic
  5. Saute till the garlic gives out the flavor. Now add the onions & salt & saute till it becomes translucent. Keep the flame low & take care not to burn or change the color of the onion else it will be reflected in the rice
  6. Now add the rice. Give a gentle mix & add the coconut milk & water. Cover the vessel & cook till the rice is done. Or pressure cook it till done. Mine was done in 1 whistle
Serve with a dal or non-veg gravy of your choice :)

Notes:

  • I used India Gate Basmati Rice for this recipe
  • The rice:liquid ratio is 1:2. Hence used 1 cup coconut milk & 1 cup water. Alternately you can use 1 cup thick coconut milk & 1 cup thin coconut milk or 2 cups of thick coconut milk depending on how rich you want the rice to be
  • You can add 2-3 leaves of mint/pudina for an extra zing & aroma. But I have not added here
  • Garlic is added for easy digestion as the coconut milk & ghee here makes the rice a heavy dish. You may reduce the quantity of garlic if needed. The quantity mentioned in the recipe gives out a subtle flavor & aroma & does not make it too strong

Cheers,
Chitz

Thursday, 7 March 2013

Karuvepilai Era Thokku - Curry leaf Prawn curry

Prawns cooked in coconut-curry leaf paste


Yes !!! It does look like am going overboard on prawns rite?? Well, I got hold of some fresh prawns and I guess I got a little excited.. We do not get much of fresh prawns here, rather  it's always the processed and packed ones. And the zest was more coz I get to peel and devein the prawns all by myself. Yes, now some of you might be thinking, 'Is it actually that great an accomplishment??' 


Nah.. must not be.. But all through my childhood I have watched my mom and grand mom and aunties do that.. And when they did that the general instruction for all the kids around was 'STAY AWAY'..But I was very intrigued and would watch them and ponder on how quick and swift and meticulous they were in that process.. A twist and a pull and a rinse.. And there goes the soft flesh to the pot. I should say that I was a little scared too.. 'Won't the sword like spines on the top of their heads hurt your fingers, if you were this fast????' 


Those were the wonderings of a small kid.. Now that I have mastered thy art myself, I do not see or wonder on the risk, rather enjoy it ;) And now back to the recipe, last week I saw a different Chettinad recipe on prawns in Asianet plus channel. I knew I should make it  and share it here. And my instincts were not wrong... Instant hit.. Deeps and I loved it...


Serves: 2 persons


I Took:

Preparation Time : 20 minutes

Cooking Time : 40 minutes


I Used:

Prawns - 200 gm
Curry leaf
- ½ cup
Coconut 
- 10 sprigs
Shallots - 6-8 nos (sliced)
Tomato - 1 no (medium sized - chopped)
Ginger-Garlic paste - 2 tsp
Tamarind pulp - 2 tbsp
Mustard - ½ tsp
Fenugreek - ¼ tsp
Fenugreek-Mustard powder - 2 tsp
Coconut Milk - 3 tbsp
Gingelly Oil - 1 tbsp
Turmeric powder - ½ tsp
Salt - As Needed


The Way:

  1. Clean and wash the prawns 
  2. Grind together coconut and curry leaves in a mixie by adding a little water. Keep the paste aside
  3. Heat oil in a kadai. Add mustard and  fenugreek
  4. When it splutters, add shallots and saute
  5. As the shallots start to change colour, add tomatoes and saute till they become mushy 
  6. Now add the coconut-curry leaf paste and saute 
  7. When it starts losing water, add ginger-garlic paste and saute till the raw smell fades off
  8. Add the tamarind pulp, salt and mix. Add the cleaned prawns and required amount of water to cook the prawn
  9. When the prawns are almost done, add the fenugreek-mustard powder and the coconut milk
  10. Cook till the prawns are done. Garnish with coriander leaves

Notes:

Dry roast equal amounts of mustard and fenugreek. Grind them in a mixer for the fenugreek-mustard powder


Cheers,
Chitz