Wednesday, 7 December 2016

Homemade Butter | How to make butter at home from milk | Homemade Makhan


Making food/food products from scratch gives me so much satisfaction. It is fun for me & I enjoy it to the core. And once I get the final outcome right, I am all like a happy little girl, smiling and celebrating. But it is not like that for many people. They feel it's a waste of time and effort and you can indulge in so many other activities if you have that time ! Earlier during my initial days of marriage I used to try very often to make butter & ghee at home, but used to fail miserably. All those times I used to ask my mil how to make it & try it on my own. Finally, once when she came to visit us, I asked her to make and show me. Then I learnt the nuances of ghee making & then there is no stopping me. 

I am a regular at ghee making now at home, that I stopped buying ghee from outside. I still buy butter as I use all of my homemade butter to make ghee as I use it for DD a bit more and not to mention for our weekly biriyani routine ! When I am writing this blog post what I remember is that during my preggy days my mil used to make this butter at home and send me and ask me to eat 1 spoon daily. That is coz she and her sisters strongly believe that eating butter daily while you are pregnant can help you get a normal delivery and the kid will be as soft and spongy as a butter :) But I did not share that belief and not only that I did not like the smell/taste of the unsalted butter during that time ;)  So this might be a slightly lengthy post because I used to feel very bad when I couldn't get this right initially. So I'm sharing all the tricks & tips that I learnt so that you guys have a happy butter/ghee making time :)


Recipe Source: Amma


Makes: 1 cup butter from close to 3 cups cream/malai


Serves: 2-3 persons


I Took: 

Preparation Time: 10 minutes


I Used:


Cream collected from milk / Paal Aadai / Paal Paada - 3 cups
Water - As Needed


The Way:


1. Boil milk on a medium flame. When it starts to boil and raise, simmer the flame and again allow to boil for 2-3 minutes. Then leave it aside and once it cools down, you can see a thin layer of cream on top. 

2.Refrigerate the milk for 3-4 hours. Now, you can see that thin layer of cream has transformed to a thick layer of creamy cream :) Scoop out that thick layer of cream and store it in another container. It is ok if few tsp of milk also come along while you scoop the cream. But if you find more milk or find it hard to separate the milk alone, then use a strainer.

3. Keep collecting the cream for 2 weeks. Ensure that you refrigerate the collected cream. I keep the container in fridge. Whenever the cream is ready, I take out the container, transfer the cream and stash it back in the fridge. 

4. I boil 1 litre of milk daily and collect the cream. At the end of 2 weeks, it gave me nearly 3 cups of cream. This cream can also be used while preparing gravies that calls for cream. Before using it, just give it a whisk so that no lumps are there and it gives a creamy smooth texture.

5.  Once you get a considerable amount of cream (at least 1 cup) or once the container is full, you can make butter and ghee from this cream. Take 1.5 - 2 cups of water in the mixie jar (big wet jar). Add 1 cup of cream to it. Do not add more as it may not have the space to churn up well. I do the churning up in 2-3 batches.

6. Now use the pulse option and pulse it for 15-20 seconds. Or you can run the mixie on the lowest speed for 20 seconds. Do not run it for more time as it can heat up the cream.

7. After about 4 pulses I could see the butter getting separated from the buttermilk. Separate the butter and buttermilk and store in 2 different containers. Clean off the milk solids if any in the butter by running it under water. 

8. Now in the same mixie, add water and repeat the steps from 5 to 7 for the other batches of cream. Every time use new water. Do not use the old water that has turned to buttermilk to churn out butter for a new batch of cream. It may not work. 

9. Transfer the butter to a container and refrigerate it till further use. My mil stores the butter immersed in water in a container in the refrigerator. I do not know the logic behind this, but maybe it is for it to remain solid or for a longer life, I'm not sure :)

Notes:

  • You can also collect the malai/cream from curd and use that as well. Alternately, you can collect the cream from milk and add it to curd and store and then make butter out of it. But I do not prefer that way. 
  • Instead of using a blender/mixie to churn out butter you can also whip it up using a traditional mathu. But it takes more time. In this method, the downside is a messy mixie which takes a bit of your time to clean up. 
  • You can use the buttermilk to make moru curry, pulissery or in whichever recipe that calls for buttermilk
  • My mil uses the buttermilk to make kondattam molagu (sun dried green chillies that is used as pappad). Specifically the water from the buttermilk. If you leave the buttermilk collected after churning undisturbed for sometime, you can see that some water will settle down at the bottom (Not always, happens mostly when there are more number of batches of cream to be churned). She uses this water for soaking those green chillies for kondattam molagu. And the upper buttermilk part is spiced up with ginger, greenchillies, hing, salt and curry leaves and whipped in a mixie and served chill on hot summer days ! 
  • I use desi cow milk and so collect the malai from that milk. And my mil uses packet milk. So it works well with any milk that you use
  • If you are travelling out and would be switching off the fridge (if not, there might be power cuts too), then use up the cream before your trip. It will be all rotten and wasted before you are back. This happened with me twice. Sometimes the smell would be very mild and you wouldn't even notice but it might have spoiled and it makes a very messy mixer to clean if you attempt to churn butter out of it!

Cheers,
Chitz

Tuesday, 6 December 2016

Kovakka Fry | Kovakka Upperi | Kovakkai Fry | Coccinia Fry

Pan stir fried Tindora with Indian spices


Tindora or Kovakka or Coccinia is yet another vegetable that is not liked by many. In some parts of South India, they do not use this veggie in their cuisine. They eat it raw by directly plucking from the plant. I have some friends who are of the opinion that it is goat's food and not to be eaten by we humans ;) A great explanation to avoid veggies, right? But as usual, I am a fan of this veggie. I know, there are a very few veggies that I do not like :)

This recipe is a damn simple one. It is a simple stir fry that goes well as a dry sabzi or upperi for your rice. It also tastes great with chapathi ! No mood to cook elaborate lunch, then this tastes just perfect with curd rice as well. I learned this simple stir fry from my mom. I have been trying other tindora recipes by googling as well. Last week I made tindora avial that was very delicious. Check out my insta feed for the details. So let's see how to make this simple stir fry..


Recipe Source: Ma


Serves: 2-3 persons


I Took: 

Preparation Time: 10 minutes


Cooking Time: 25 minutes


I Used:


Oil - 2-3 tbsp
Mustard - ½ tsp
Curry leaves - 1-2 sprigs
Kovakka/Tindora - 250 gm
Red Chilly powder - 1 tbsp
Turmeric powder - ½ tsp
Asafoetida - ¼ tsp
Garam Masala - 1 tsp (optional)
Salt - As Needed

The Way:


1. Rinse the kovakka/tindora in water 3-4 times. Remove any dirt particles on the skin. Then cut them into 4. If you prefer, you can cut into round pieces as well.

2. Add red chilly powder, turmeric powder, salt, asafoetida and garam masala (optional) to the cut tindora pieces. You can omit asafoetida if you are using garam masala. Here I have used only asafoetida and no garam masala.

3. Mix well and marinate them for 15-20 minutes.


4. Heat oil in a pan. Splutter mustard and curry leaves.

5. Add the marinated kovakka/tindora and saute. Sprinkle water and give a stir. Close the pan with a lid and cook in a low flame. Stir occasionally and take care not to burn. 


6. Do not add more water, wherever it becomes dry and starts sticking to the pan just sprinkle water and cook with the lid closed. It may take around 15-20 minutes for the tindora to cook and become a dry fry as below.


Serve with rice and a gravy of your choice !

Cheers,
Chitz

Sunday, 4 December 2016

Onion Tomato Chutney | South Indian Vengaya Thakkali Kara Chutney for Idly & Dosa


There is no dearth of chutney recipe ideas if you have a little imagination and a sense of what taste you want to have..I should admit that I am not yet an expert in that but I am learning. When you have such foodies and excellent cooks around you, you naturally will develop that "sense". My mom, Deeps, Deeps' aunt so many people around to inspire me. I should say that I particularly envy Deeps' aunt in this regard. Her chutney making skills (read cooking skills in general :) ) have made me go nuts. Actually I have tasted more of the 'chammanthi' recipes that you have with kanji (rice gruel). But whenever I think of chutney making skills, she is who comes to my mind :)

This recipe is a simple kara (hot) chutney with onions, tomatoes and urad dal that is a perfect side for idlys and dosas. This recipe I learned from my mom. It's simple, easy to make and since spicy I do not need any extra sambar or podis for my idlys and dosas. Do try this out & let me know how you liked it !

The other chutney recipes that might interest you are 


Recipe Source: Ma


Serves: 2-3 persons


I Took: 

Preparation Time: 10 minutes


Cooking Time: 10 minutes


I Used:


Oil - 2-3 tbsp
Onion - 2 no - medium sized - chopped
Tomato - 1 no - medium sized - chopped
Urad Dal - 3 tbsp
Red Chilly - 3 nos
Tamarind - A small piece (blueberry sized)
Garlic - 3-4 small cloves
Asafoetida - 1 tsp

To Temper:

Oil - 1 tbsp
Mustard - ½ tsp
Curry leaves - 1-2 sprigs


The Way:


1. In a pan heat 2 tbsp oil. Add the urad dal, red chillies, tamarind, garlic cloves and asafoetida. Roast till the urad dal turns golden in colour. Once done keep aside in a plate.


2. Now add 1 tbsp oil in the same pan. Add the chopped onions and salt and saute till they become translucent and turn slightly brown in colour. Once done keep aside.


3. Again add the chopped tomatoes in the same pan and saute till they become mushy. Once done, keep aside.


4. In a mixer, add the initially roasted urad dal mixture and grind coarsely. Add little water as well.


5. Now add the sauteed onions and grind again. 

6. Finally add the sauteed tomatoes and grind to a fine paste.


7. In a tadka pan or in the same pan, heat oil. Splutter the mustard seeds and curry leaves. Add them to the chutney and serve with piping hot idlis or dosas.


Notes:


  • Sometimes urad dal that we buy will not be very clean and can be dusty. If you are paranoid like me and can feel that while eating the chutney, then rinse the urad dal before roasting them :)

Cheers,
Chitz

Friday, 2 December 2016

Ragi Kanji for infants | Ragi Porridge | Muthari Kurukku | Fingermillet Porridge


It's been a long time since I'm thinking to post the recipes of food that I feed DD. Being a first time mom, I was at a very great dilemma of what to feed and what not to feed, advises pouring in from all sides. I'm sure many of you would have been or are now or are going to be in that situation :) As they say in an ad, there is no right way or wrong way ofparenting, there is only your way. You are the best person to decide what is best for your child :) But having said all that, it's always best to consult your child's pediatrician to guide you for do's and don'ts.

I wanted to start the baby food recipe series with DD's first food. Yes, this was what he had first. Ragi kanji or ragi paal koozh. It is also called as kooravu or muthari in Malayalam. I started this after he turned 5 months old. He liked it and was very enthusiastic to have it then. Now he gets bored at times. After a week of having this for his morning brunch he would need a break of another week ;) Some say that ragi can cause cold and is not suitable to be had in the evening or night. I give DD kooravu only during daytime and that too before 11 am and I avoid it when he has cold. Again it is a personal choice :)

This way of making ragi kanji by extracting milk was taught to me by my mom. My mil also does in the same way but she has another method too. She extracts the milk out of ragi in bulk (say around 500g to 1 kg). Then she dries them in sun for 2-3 days and then makes powder which can be used to make instant ragi kanji. Then you need not soak the ragi overnight. The process is tedious but it will save you if you forget to soak ragi overnight and making porridge daily out of that powder is also a breeze. No grinding and no soaking ! Maybe some other time I shall post that way too !


Recipe Source: Ma


I Took: 

Preparation Time: 10 minutes

Cooking Time: 10 minutes


I Used:


Ragi/Muthari/Finger millet - 2 tbsp
Water - As Needed
Salt - As Needed
Ghee - As Needed


The Way:


1. Rinse ragi in water for 3-4 times. Then soak it in water overnight. In the morning before using, again rinse for 2-3 times in water.


2. Take the soaked and rinsed ragi in a mixer. Add some water and grind it. I add quarter cup of water. 

3. Transfer the ground ragi into a sieve and extract the milk using a spoon. You can use a muslin cloth as well. Both would work. 


4. Add little more water to the ground ragi and grind again. Extract the milk again.


5. If the milk is too thick add little more water. I add around half to three-fourth cup of water as DD likes it to be a little thick than very watery. So adjust water according to your needs. 

6. If you are using salt then add at this point. If you like to make it sweet, then add when the porridge starts to get thick.

7. Mix well and on the flame.

8. Keep stirring with a spoon, else they will form lumps as shown in the second pic below. Keep cooking in a low flame.

9. It will start getting thick. If you want to add sweetener (like jaggery syrup or palm sugar candy) add when it becomes slightly thick. You can add ghee also if you prefer. 

10. Once it becomes thick and starts to leave the sides of the pan, it is done. Switch off the flame.

Allow to cool for a few minutes. And feed warm. 

As the porridge sits, it thickens. So adjust water and cooling time according to your baby's preferences :)

Cheers,
Chitz

Thursday, 1 December 2016

Kerala Style Vendakka Gravy | Vendakka Mappas | Vendakka Thengapaal Curry

Okra in Coconut Milk - the best gravy for Kerala Appam


I like to experiment with new veg gravies for my lunch. I make them, eat them and then ask Deeps to taste them when he is back home for the day. If he likes them, then the dish features in our regular menu. If he doesn't like it and it's only me who has fallen for the recipe, then it is made for my lunch at times. This is one such dish which I found while googling, from a dear blogger buddy Julie at 'Erivum Puliyum'. And the best part is I finished the whole gravy at lunch itself not leaving anything for Deeps to taste even ;) 

I love coconut milk in my gravies. They have a mild taste yet feels so rich and tasty and they are very light on the tummy as well. It is much easier to prepare also, if you are using coconut milk powder. The curry will be ready in a jiffy. But if you are extracting milk from freshly grated coconut, then it is a slightly different story. It may take an extra 15 minutes. But I always vouch for homemade dishes from scratch. There is an un-doubting taste and freshness and authenticity in those dishes that can never be replaced with short cuts. 

And although I had this gravy with rice, with every mouth that I took, I had that inner voice telling me at the back of my head that this is going to taste just awesome with Appam, as this curry tastes like a cousin of our regular Vegetable Stew. I have that in mind, sometime soon I am going to try that combo :) If you are looking for some easy fast recipes for lunch at home or for your lunch dabba to office, do try this out. I am sure you will not regret :)


Recipe Source: Adapted from here


I Took: 

Preparation Time: 15 minutes

Cooking Time: 30 minutes


Serves : 2-3 persons


I Used:


Vendakka/Ladies Finger - 10 nos
Coconut Oil - 2 tbsp
Cinnamon - An inch piece
Cloves - 2 nos
Green Chilly - 2 nos - slited
Ginger - 1 tsp - chopped
Onion - 1 no - medium sized - sliced
Turmeric powder - ½ tsp
Red Chilly powder - 1 tsp
Curry leaves - A sprig
Coconut Milk - Thick - 1 cup
Coconut Milk - Thin - 1.5 cups
Lemon juice - 1 tbsp

To Temper:

Coconut Oil - 3 tbsp
Mustard seeds - ¼ tsp
Shallots - 4-5 nos - sliced
Curry Leaves - A sprig


The Way:


1. Rinse and clean the ladies finger in water. Chop off the edges and cut them into 2 inch length pieces or bite sized pieces as per your preference.

2. Heat 1 tbsp oil in a pan and add the cut ladies finger pieces and saute them for about 3-4 minutes till the stickiness of the ladies finger goes away.Once done transfer to another plate/bowl and keep them aside.

3. If preparing coconut milk from fresh coconut, grind coconut with water (as required) and extract the thick and thin coconut milk and keep aside. If using instant coconut milk powder, add the powder in warm water (as mentioned in the packet), prepare the thin and thick milk and keep aside.


4. Heat oil in a pan/kadai. Add the whole spices - cinnamon and cloves. Keep the flame in low or medium. After about a minute add the chopped ginger and green chillies. Saute for about half a minute.


5. Add the sliced onions and saute till it turns translucent. No need to make it brown.

6. Now add curry leaves, salt, turmeric powder and red chilly powder and saute well for about 2-3 minutes till the raw smell goes off.

7. Now add the sauteed ladies finger and give a nice stir.


8. Add the thin coconut milk and give a stir. Cover and cook till the ladies finger is cooked. This may take abut 6-7 minutes.

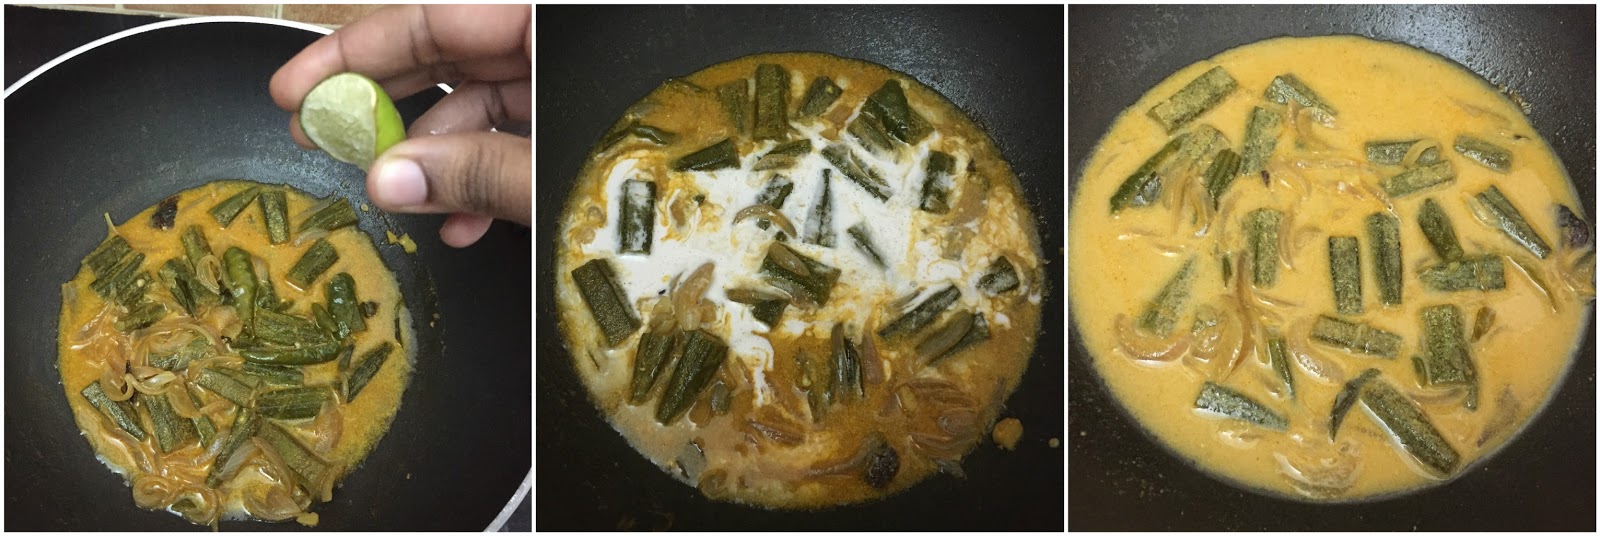
9. Now add the lemon juice (is optional) and adjust salt if needed.

10. Once the ladies finger is cooked, add in the thick coconut milk. Give a quick and nice stir. Switch off flame.


11. In another pan (tadka pan) heat oil. Splutter mustard seeds. Add in the chopped shallots and curry leaves. Saute till the shallots turn light brown in colour. Take care not to burn them. Add the tempering to the gravy and give a nice stir.


Serve hot with Appam / Idiyappam / Steamed Rice & Fish Fry :)

Cheers,
Chitz