Monday, 21 November 2016

Chembu Kumbalanga Moru Curry | Kerala Style Chembu Kumbalanga Moru Kootan | Kerala Style Chembu Kumbalanga Pulissery

Taro & Ash Gourd in a coconut based yogurt gravy


In my last post, I talked so much about keeping up on your resolutions and chasing dreams and pursuing passions and what not (Though I didn't talk that much, that was what I had in mind while I was writing that post) And the foremost on them was to be a regular here and I had all things necessary for that too.. Like draft posts, step-by-step pics of recipes, edited photos... But, but, but.. My laptop went into a hibernation mode and would not connect to the internet.. All my other devices would but not my laptop :( Something or the other to deter you, right?? Sigh !! So you are asking me how it is working now? I don't know, seriously I don't :) As I mentioned before, it went on hibernation on it's own and when it felt the time was right, it again was up and running :D Maybe it's way of detox week ;)

And so what am I back with? It is a very regular kootan that is made at Deeps' place. Kootan is nothing but a gravy based dish that is had along with rice. Some call it curry, some gravy, some kuzhambu, some pulusu, some charu and so on. You must have got me now, right? So all gravy based recipes are called as Kootan at Deeps' place. And generally they have a kootan, kuthari choru (rice), upperi (dry sabzi or stirfry), meen varuthathu (fish fry), pappadam and kondattam molagu (deep fried sun-dried green chillies) for lunch. This is mostly a normal everyday menu there :) 

And this yogurt based moru kootan is made mostly twice a week and is a family favorite too.. We usually play with different combo of veggies here. Here today I have made with Chembu (Colocassia) & Kumbalanga (Ash Gourd). You can also use Vellarikka (Cucumber), Kaya (Raw Plantain), Chena (Elephant Yam), Manga (Mango) etc to make this. This can be made with a single veggie alone or a combo of two as well. Usually we do not use chembu alone as it is of sticky nature and can make the gravy very dense or thick. Hence usually when using chembu pair it up with kumbalanga or vellarikka. So do try out this easy recipe (Only the prep part takes lil time, I assure ;)) which will taste awesome with rice and a chicken varatiyathu (or any non veg dry side dish) and let me know how you liked it !


Other Sadhya recipes:


Recipe Source: Amma


I Took: 

Preparation Time: 30 minutes

Cooking Time: 15 minutes


Serves : 3-4 persons


I Used:


Chembu/Taro/Colocassia/Arbi - 4-5 nos
Kumbalanga/Ash Gourd/White Gourd/Winter Melon - 200 gm piece (1 cup after cutting to pieces)
Red Chilly powder - 1 tbsp
Turmeric powder - 1 tsp
Salt - As Needed
Curd - 1.5 cups

To Grind:
Coconut - ½ cup
Green Chilly - 2-3 nos
Cumin seeds - ½ tsp

To Temper:
Coconut Oil - 2 tbsp
Mustard - ½ tsp
Fenugreek/Uluva - ½ tsp
Red Chilly - 2 nos
Curry leaves - 1-2 sprigs

The Way:


1. Soak the chembu/colocassia in water for 10-15 minutes. After that peel the skin off using a scraper/knife. Cut them into small bite sized pieces.

2. Clean the kumbalanga/ash gourd by peeling/cutting off the skin and then discarding the middle portion (with seeds) as well. Then cut them also into bite sized pieces. 


3. Grind together the items under 'To Grind' by adding a little (about 2 -3 tbsp) water and keep aside.


4. Then whisk the curd nicely using a whisk so that it becomes loose and no lumps are present. Alternately, you can take the curd in a mixer and give a quick pulse also.


5. Now in a pressure cooker, add the chembu/colocassia pieces along with salt, turmeric powder, red chilly powder and water (around 1 - 1.5 cups) and cook them for 2 whistles in medium flame or till they are half - cooked.


6. Once they are cooked, add the ash gourd/kumbalanga pieces and cook till done. This may take about another 2-3 whistles in medium flame.


7. Now heat oil in a kadai. Splutter the mustard seeds and fenugreek. Then add red chilly and curry leaves and saute for a minute.


8. Add the ground coconut paste and stir well for about 3-4 minutes till the raw smell goes off and moisture starts leaving the pan.


9. Add the boiled chembu-kumbalanga pieces along with the water and give a nice stir.


10. Now switch off the stove. Immediately add the whisked/beaten curd and give a nice stir. Take care that the curd does not curdle. You may have to remove it from stove after stirring for this. Serve with rice, upperi or a non-veg dry side dish of your choice :)


Cheers,

Chitz

Thursday, 3 November 2016

Udaitha Muttai Gravy | Udacha Mutta Curry | Egg Drop Gravy | South Indian Style Poached Egg Gravy


Does the name of this dish intrigue you? Or is this your family favorite, a quick fix recipe at your place? Many might not know or would not have heard of this recipe. At least, Deeps does not know. It was a surprise for him that eggs can be cooked this way. Actually it was a surprise for me too, that Deeps did not know this way of preparing eggs as he is an avid egg eater :D So all egg lovers and eggetarians' out there, here is an easy quick recipe with eggs for you. Instead of adding boiled eggs to the gravy, we break and drop the eggs as such into the gravy and allow them to cook in the gravy and thereby slowly infusing the heat, salt and tart from the gravy into the eggs :) Sounds nice??

My mom used to make this dish regularly at our home before. Actually this was one of the dishes that she learnt to cook during her initial days after marriage. She learnt this recipe from one of my dad's buddy as this was one of my dad's favorite way of having eggs back then :) So you can call this a bachelor special recipe as well as it is easy to make and tastes great and is a non-veg dish as well. So let's see step by step how this is made..


Other Egg Recipes:
Egg Rice | Muttai Sadam


Recipe Source: Ma


I Took: 

Preparation Time: 20 minutes

Cooking Time: 10 minutes


Serves : 2 persons


I Used:


Oil - 2-3 tbsp
Egg - 2 nos
Mustard - ½ tsp
Onion - 1 medium sized - chopped
Tomato - 2 medium sized - chopped
Green Chilly - 1 no - slited
Tamarind - A small goosberry sized
Turmeric powder - ½ tsp
Red Chilly powder - 2 tsp
Coriander powder - 1 tsp
Garam Masala - ½ tsp
Salt - As needed
Curry leaves - To garnish
Coriander leaves - To garnish


The Way:


1. Soak tamarind in ¼ cup of water (preferably warm) for 10-15 minutes. Then extract the pulp and keep aside.

2. Heat oil. Splutter mustard seeds.


3, Add onion, green chilly and salt. Saute well. The onion should turn slightly brown in colour.

4. Now add all the masala powders - turmeric powder, red chilly powder, coriander powder and garam masala. Saute well for 2-3 minutes till the masala blends nicely with the onion and the raw smell goes off.

5. Now add the tomatoes and saute. 


6. The tomatoes should become soft and mushy. Saute occasionally till then. Take care that they do not stick to the bottom of the pan or get burnt.

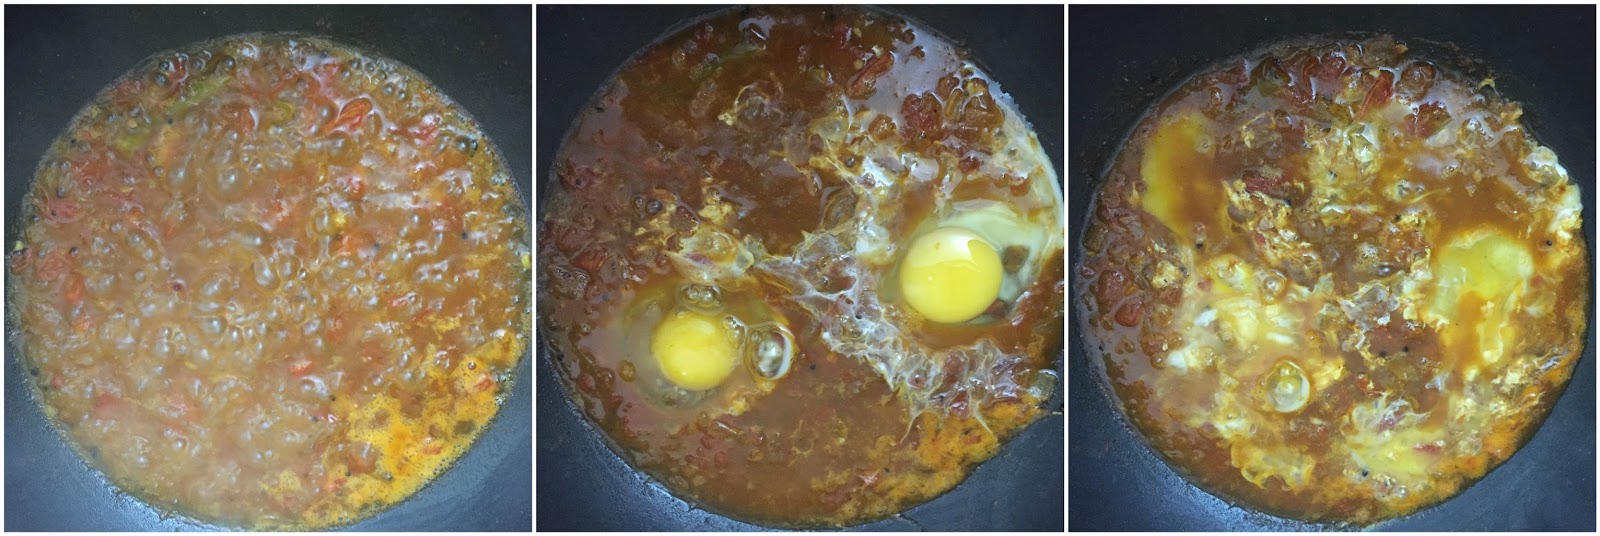
7. Now when the tomatoes have mashed down well, add the extracted tamarind juice.

8. Also add sufficient quantity of water. You can add water suitable for your gravy needs. I added 1.5 cups of water.


9. Allow the water to come to a boil. Check the salt at this point and add if required.

10. Now break the eggs and drop them gently into the gravy.

11. If you like, you can gently break the yolk as shown in the pic below so that they cook well and also faster.


12. Allow the eggs to cook well. You can close the pan and also cook. This may take about 3-4 minutes. 

13. Once the eggs are cooked, garnish with curry leaves and coriander leaves and serve hot with phulkas/rice.


Notes:

  • Instead of chopped tomatoes, you can add tomato puree as well. Just grind two tomatoes in mixie and add them instead of the chopped ones
  • You can add ginger-garlic paste if you like, Without them also, the gravy tastes awesome :)
  • Add little tamarind only as specified in the ingredients list. Else both the tomatoes and tamarind can contribute and make the gravy extra sour
  • You can use tamarind paste also instead of extracting juice from fresh tamarind. Use ½ tsp then

Cheers,
Chitz

Tuesday, 1 November 2016

Cauliflower Poriyal | South Indian style Gobi ki sabzi | Gobi ki Sabji

Cauliflower cooked in onions, tomatoes and Indian spices


Hi folks, so November is here and even before you realise it is going to be the next new year soon ;) So today I woke up to a message from a dear friend in one of my Whatsapp group, that you still have two more months to achieve those resolutions that you promised yourselves ten months back :) So keep pushing yourselves or for those lazy bums like me, start doing them soon :) :) I do not want to preach here ;) but just sharing what I have experienced personally or learned over the years is that 'Keep trying, be sincere in what you do, coz the results are just around the corner and you will surely be rewarded, sometimes in forms that you do not even anticipate or expect'.

So enough of my midnight musings, let's see what I have for you today. It's an easy cauliflower sabzi that tastes good with sambar rice, curd rice, rasam sadam and even your phulkas.. This is another veggie that Deeps is not fond of, but if I make this sabzi he eats atleast 2 spoons. Something is better than nothing right ;) The right blend of that red chilly powder and ginger-garlic paste along with that tartness from the tomatoes makes the otherwise boring cauli to a delectable dish. Try this and I'm sure it will not disappoint you :)


Recipe Source: Ma


I Took: 

Preparation Time: 20 minutes

Cooking Time: 20 minutes


Serves : 2-3 persons


I Used:


Cauliflower - 200 gm - a small sized 
Turmeric powder - ½ tsp
Salt - As needed

Mustard seeds - ½ tsp
Onion - 1 medium sized - chopped
Tomato - 1 medium sized - chopped
Ginger-Garlic paste - 2 nos
Turmeric powder - ¼ tsp
Red Chilly powder - 2 tsp
Coriander powder - 2 tsp
Salt - As needed
Curry leaves - To garnish
Coriander leaves - To garnish


The Way:


1. Clean the cauliflower by removing the stalks and leaves. Separate the florets and cut them if required to bite sized pieces. If there are black discolorations on top of the florets scrape them off with the tip of the knife. Rinse the cleaned florets once or twice in water.

2. Heat water with salt and turmeric powder. When it starts to boil, add the cleaned florets to it and allow it to boil for 3-4 minutes. 

3. Then drain the florets and keep them aside.  


4. Heat oil in a kadai/pan. Splutter mustard. Then add onions and salt and saute well. They should start to turn slight brown in colour

5. Then add the ginger-garlic paste and saute for 3-4 minutes till the raw smell goes off.


6. Now add in the powders - red chilly powder, coriander powder & turmeric powder. Saute well for 2-3 minutes. It should blend nicely and evenly with the onions.

7. Add in the chopped tomatoes and saute well. The tomatoes should turn mushy.


8. Once they become mushy add in the par-boiled cauliflower and mix well.


9. Sprinkle about 2 tbsp water and cover and cook them till the cauliflower is done

10. Garnish with curry leaves and serve with phulkas/steamed rice


Notes:


  • If you wish, instead of par-boiling you can cook the cauliflower initially itself. Totally your convenience :)
  • For garnish, you can use coriander leaves as well

Cheers,
Chitz

Thursday, 20 October 2016

Easy Veg Pulao | Easy Pressure Cooker Vegetable Pulav


Hello folks, how are you all? Pooja celebrations are done and now you all must be gearing up for Diwali, right? In between this Pooja and Deepavali, we celebrated our DD's first birthday :) :) It was a small cake cutting function followed by dinner with our friends from around. I didn't prepare anything special for him except semiya payasam as he was down with fever and I didn't get the time nor had the mind to :(  I wanted to make muffins, that was in my mind, but maybe sometime later. However, anything fancy I make, he will not be able to relish or enjoy, as he is too small to understand that, right? So I have decided to make them according to his preference for his second birthday. Hopefully, he might be making a list then :) 

So coming to today's recipe, it's a simple veg pulao and can be made in a jiffy, especially if you are craving for some biriyani and do not have the time :) But this is very much subtle compared to biriyani as we do not use red chilly powder or any garam masala powders. The hotness for this one pot meal comes entirely from the ginger and garlic used. You can pair it up with raita and pappad, would taste just right and can be termed as the perfect comfort meal. I had them with oven fried cauli-flower, vinegared onions & pappad. 

Other rice recipes:

Ambur Mutton Biriyani
Capsicum Rice
Coconut Milk Rice | Thengai Paal Sadam
Nei Choru | Ghee Rice
Vegetable Biriyani


Recipe Source: Ma


I Took: 

Preparation Time: 10 minutes

Cooking Time: 30 minutes


Serves : 2 persons


I Used:

Oil+Ghee - 3+2 tbsp
Cinnamon - An inch piece
Cloves - 2 nos
Bay leaf - 1 no
Onion - 3 nos - medium sized -sliced
Carrot - 1 no - medium sized - chopped
Potato - 1 no - medium sized - chopped
Green Peas - ½ cup
Coriander leaves - ¼ cup - chopped
Mint leaves - ¼ cup - chopped
Basmati Rice - 1 cup
Water - 2.5 cups
Salt - As needed


To Grind:

Garlic - 8-9 pods (big sized)
Ginger - 2-3 inch piece
Fennel / Perunjeerakam/ Sombu - ½ tsp
Green Chilly - 2-4 nos


The Way:


1. Grind the ingredients under 'To Grind' by adding a little water to a smooth paste. Preferably grind the green chillies to the end

2. De-skin the vegetables and onion and rinse them well. Then slice & chop them as required. If using frozen peas, keep them immersed in water for 10 minutes & rinse them and keep aside

3. Soak the basmati rice in water for about 10-15 minutes

4. In a pressure cooker, heat oil/ghee. Add the whole spices (cinnamon, cloves & bay leaf)

5. Add the sliced onions and salt. Saute well till they become translucent. It took around 4-5 minutes for me 

6. Add the chopped veggies (carrot & potato) and green peas. Give a nice stir

7. Now add the ground paste and saute well till the raw smell goes. This may take about 3-4 minutes

8. Add the chopped coriander and mint leaves. Give a nice stir

9. To this add the soaked basmati rice and give a stir so that all the grains are coated well with the oil & masala


10. Now add water and stir softly. Check for salt and add if required

11. Pressure cook till the rice is cooked. I kept for 1 whistle in high and 2 in simmer and it was done


Notes:

  • You can add any veggies of your choice, can include beans, mushrooms, capsicums etc
  • Do not compromise on the onions. If your onions are smaller in size, use more number. They give the pulav the flavour and taste
  • While serving you can garnish with caramelised onions & fried cashews as well. They add a rich flavor and aroma to the pulao
  • You can add half ghee-half oil or full ghee or full oil. Totally depends on you diet plan :)
  • Rice: Water ratio is 1:2 here. I added extra 0.5 cup for the veggies. If you want you can make that 0.25 cup as well. The rice:water ratio works different for different variety of rice. So adjust the quantity of water according to the rice you use

Cheers,
Chitz