Thursday, 1 August 2013

Pazhutha Manga Pachadi | Pazha Manga Pachadi | Mampazha Pachadi

Ripe Mango served with coconut-mustard-curd sauce & jaggery in Kerala Style


I would have never made this dish if not for my negligence ! I bought a raw mango - all for making some pickle & it was stashed away at the bottom of the rack of my refrigerator. Lazy me, I forgot all about it. One day, it peeped up & asked ' Aren't u gonna make use of me? I won't sit like this, neat & clean for long. Remember, I am a costly commodity at this part of the world' Did reality strike me hard?? Ohh yea, it did. So now me like a good girl, took it out & made the first slice. It was not all green & firm, but a bit soft & squashy on one end. Now Deeps saw me staring at it & made the quick decision 'Don't make pickle out of this. It won't taste good'. 'Is it spoiled?' came my quick question back. 'I don't think so. It has turned ripe inside. Just the outside color is still green', he said. 

I was at a loss. I was all happy that I would make some pickle, now it was like 'No soup for you, gal' ! I thought ok, I would make some Pazhutha Manga Kootan. I did some googling & was all set. But still at the bottom of my heart, I was still pondering, 'Is there some way to make a pickle out of this'. Then after a while when I was talking to Amma (Deeps' mom) I asked her about it. She said,'You can make pachadi out of it. It will taste great & Deeps also loves it'. Ok, that sounded like fun. A new dish for me as well as I have not had Mampazha Pachadi before. So I was thrilled to try it out. Quickly I jotted down the recipe in my notepad and lo, here it is. And as expected, Deeps loved it. He did not touch the main dish that day & had his entire share of rice with the pachadi. I too loved it with it's mix of tangy & sweet taste. And you know what, I loved it better the next day ;) So you now know what to do when you fall prey to this sort of negligence. So let's take a look at how I made it :)


Recipe Source: Mil

I Took: 30 minutes

Makes: 2 cups


I Used:

Pazhutha Manga/Ripe Mango - 1 no - big sixed - around 400 gms
Grated Coconut - ¼ cup
Grated Jaggery - 2 tbsp
Curd - 5 tbsp
Green Chilly - 2 no
Red Chilly powder - 1 ½ tsp 
Turmeric powder - ½ tsp
Mustard - 2 tsp
Red Chilly - 2 no
Curry leaves - 2 sprigs
Oil  - 1 tbsp
Salt - As Needed


The Way:


  1. De-skin the mango and cut it into small sized cubes. If using small sized mango, you can de-skin & use the whole mango (with the seed)
  2. Grind together grated coconut, mustard & green chilly. When they are ground well add curd & give another pulse or two so that the curd is mixed well
  3. In a saucepan mix together the ripe mango, red chilly powder, turmeric powder & salt along with ½ cup water & cook them over medium flame
  4. When the mango is cooked well, add the ground coconut mixture & grated jaggery & stir well. Make sure the flame is very low & it does not boil. This may take about a minute or so. Once mixed well, remove from flame 
  5. Heat oil in another pan. Splutter the mustard seeds. Add red chilly & curry leaves & saute. Take care that they are not burnt. Add this tempering to the pachadi (mango mixture) & give a stir & serve
Cheers,
Chitz

Tuesday, 30 July 2013

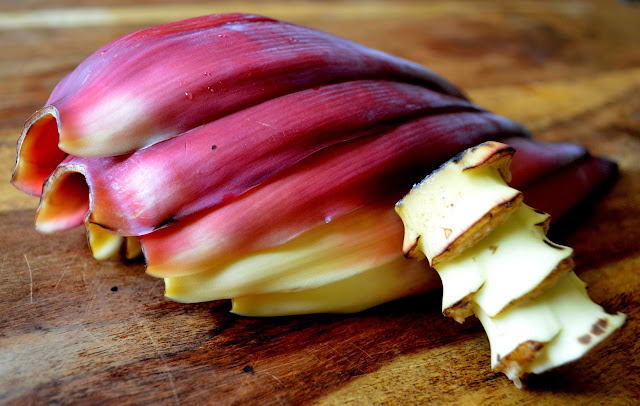
Vazhaipoo Poriyal | Vazhachundu Thoran | Banana Blossom Stir Fry - without Coconut

Banana Blossom stir fried with shallots & peanuts


There are certain veggies that we hate in childhood but turn close to heart when we grow up right? And when u relish on it now, you can always hear your amma saying 'How difficult was it to make her eat this one when she was young?' Isn't it?? Vazhapoo was one such veggie.. But to say the truth, I was a very picky eater when I was young, rather I had an aversion to food as such. Though you would never believe that if you see me munching & gobbling varieties of cuisines now ! 

Called by a wide variety of names as Vazhakoombu/Koombu/Kudappan/Chundu/Vazhapoo/Plantain or Banana Flower, this veggie is a very healthy & is a rich source of Vitamin E & antioxidants (now does that impress you?) And this dish you can say is yet another handiwork of my mom to make it even more healthier by avoiding coconut & substituting it with crushed peanuts. I would say that it retains the original flavor of the Vazhapoo which is usually shadowed by the addition of coconut & also the peanuts adds an extra crunch to the dish ! Even Deeps who is not a fan of this veggie would have a helping when the stir fry is prepared this way :)

The below picture goes to the Color me Purple (And Blue & Violet!) event of the "The Color Me Photography Challenge Series" - the brainchild of Priya !


Recipe Source: Ma
Serves: 3-4 persons


I Took:
Preparation Time: 1 hour
Cooking Time: 25 minutes


I Used:

Banana Blossom/Vazhapoo - 1 flower - about 2 cups after cleaning & chopping
Peanuts - 3 tbsp
Shallots - 4-6 no
Red Chilly powder - 2 tsp
Mustard - ½ tsp
Oil - 1 tbsp
Salt - As Needed

The Way:

  1. Clean vazhapoo & chop them finely. Then rinse them in water. Use a big strainer or colander to rinse them as it is more easier that way
  2. In a pan mix the cleaned vazhapoo, red chilly powder & salt. Add enough water & cook until the vazhapoo is done
  3. Coarsely grind the peanuts. You may just pulse it for 3-4 times
  4. In another pan, heat oil. Splutter mustard
  5. Then add shallots & saute till they turn golden in color. Now add the peanuts & saute well for a minute or so
  6. Finally add the cooked vazhapoo & give a thorough mix 
Serve with rice & a gravy of your choice :)

Cheers,
Chitz

Monday, 29 July 2013

Creamy Basil Pesto Pasta Recipe


At times, we need to indulge in very simple & tasty food right, which saves our cooking time & at the same time makes our heart & tummy full ! This pasta always does that to me. A busy eve when you do not have time to cook an elaborate dinner or a lazy afternoon & craving for some quick lunch? Try this then !! Having shared the Basil Pesto recipe with you, I thought I should share this simple pasta recipe too. Check here for tips on how to cook pasta. Enjoy :)

I Took: 20 minutes

Serves: 1 person


I Used:

Pasta (I used Penne) - 1 cup
Basil Pesto - ¼ cup
Parmesan Cheese - ¼ cup
Olive Oil - 2 tsp
Salt - As Needed
Pepper - As Needed


The Way:

  1. Heat olive oil in a pan over medium heat
  2. Add the basil pesto & stir it
  3. Once the pesto is warm add the parmesan cheese & mix. You can add the pasta boiled water if required to thin out the sauce
  4. Add the pasta & mix well so that the sauce is incorporated. Add salt & pepper to taste
Cheers,
Chitz

Friday, 26 July 2013

Kerala Parippu Vada | Channa Dal Fritters | Lentil Fritters

Fritters made from Channa Dal & Onions


Come to the God's own country & it is difficult to leave the place without spotting this snack. This is one of the yummiest finger food that you can find in the 'chaya kadas' (Tea stall) in Kerala. Pair it up with a cuppa chai & that makes your eve on a rainy monsoon day :) And did you know that this combo of Parippu Vada & Kattan Chaya (Black Tea) was once the watchword or identity of the Communist comrades ! I guess it is the simplicity of the dish & the abundance that made it so. Again, strictly my views :D And one can never forget the train journeys in South India, especially Kerala & Tamil Nadu without hearing the 'Uzhunnu Vada/Parippu Vada' shoutings ;) 

My mom seldom makes this one at home as it is Uzhunnu Vada that is popular at our abode, but my Mil is an expert in this. Give her 15 minutes (plus the soaking of the dal in the afternoon), she pulls up this yummy snack with hot steaming tea for us in the evening. And we are always ready to gobble this up in lesser time than she took to prepare it ;) So why don't we now see how to prepare this easy & popular snack?


Recipe Source: Mil

Makes: 25-30 medium sized fritters


I Took: 

Soaking Time: 2 hours
Preparation Time: 15 minutes


I Used:

Channa Dal/Kadala Parippu - 2 cups
Onions - 3 nos - medium sized 
Green Chilly - 5 nos 
Ginger - A 2 inch piece
Curry leaves - 3-4 sprigs
Oil - To Deep fry
Salt - As Needed


The Way:

  1. Rinse the channa dal in water 3-4 times. Soak it in water for 2-2.5 hours
  2. Chop the onion, green chilly, ginger & curry leaves finely
  3. After 2-2.5 hours, drain the water off the channa dal thoroughly. Use a colander if required & then pat dry the dal using a kitchen towel. Do not over soak the dal as it may increase the moisture content & may cause the vadas/fritters to break
  4. Now grind the soaked & dried dal coarsely in a mixie without water. Do NOT grind to a fine paste. Just pulse it 3 or 4 times. Add NO water at all as it may again increase the moisture content
  5. Add the chopped onion, green chilly, ginger, curry leaves & salt to the coarsely ground dal and mix well
  6. Heat oil in a kadai. When the oil is hot enough to fry the vadas, reduce the flame to medium high
  7. Make small gooseberry sized balls with the dal mix. Then flatten the balls using your palm. Hold the ball in one palm and press the other palm over the ball so that they get flattened 
  8. Take care not to break the balls. You may moisten your palm before flattening each ball. It is advisable to flatten the balls before adding to the oil, else they will break. Now deep fry the vadas until golden brown or till done
Drain off the excess oil & serve hot.

Cheers,
Chitz

Thursday, 25 July 2013

Eggless Strawberry Banana Muffins | Strawberry Banana Yogurt Cupcakes


I love strawberries, but they have to be sweet. Now that's an ambitious request right? Very seldom I come across fully sweet strawberries. Most of the times it will be semi-sweet or sour. Then I resort to milkshakes or smoothies or yummy bakes, as they would need a small amount of sugar & would taste out of the world :) Last week we had a guest for lunch & they bought us a lot of fresh berries - blue, black, red & straw ;) And also we had a small outing to a nearby lake during the weekend. Then I thought I would bake some of these muffins & make it a tea outing that day ! I should admit that I thoroughly enjoyed baking these cuties, as they filled my whole house with a yummilicious smell. Do try them out as they are very simple & less time consuming and also you are guaranteed of a fabulous outcome !


Recipe Source: Joy of Baking 

I Took: 25 minutes (Prep) + 25 minutes (Baking)

Makes: 12 regular sized muffins


I Used:

Strawberry - ½ cup - cut into bite sized pieces
Banana - 1 big sized - mashed
All purpose Flour - 1 cup + 2 tbsp
Butter - ¼ cup
Yogurt - ¼ cup
Vanilla Essence - 1 tsp
Granulated Sugar - ¼ cup + 2 tbsp
Baking Powder - ¾ tsp
Baking Soda - ¼ tsp
Ground Cinnamon - ¼ tsp or an inch stick mashed with banana
Salt - ½ tsp


The Way:

  1. Mash the bananas. If you do not have ground cinnamon then add the cinnamon stick to the banana & mash it
  2. Melt the butter (in an oven or saucepan) & allow it to cool to room temperature
  3. Pre-heat the oven to 175 degree Celsius in conventional mode 
  4. In a bowl whisk together yogurt, vanilla essence & mashed banana. Add the melted butter & stir to combine
  5. In another large bowl combine the flour, sugar, baking powder, baking soda, ground cinnamon (if available) & salt. You can sift it for 3 times for even mixing of the dry ingredients
  6. Then gently fold in the strawberries into the flour mixture making sure that they are coated well with the flour. This helps the berries to prevent from sinking during baking
  7. Now add the wet ingredients to the dry ingredients & stir gently so that they are combined. Do not over mix, else the muffins might become hard
  8. Line a muffin pan with paper liners or butter the muffin cups in the pan 
  9. Place 2 spoons of the batter in each cup using a spoon 
  10. Bake it for about 20-25 minutes or until a toothpick inserted through it comes out clean. Do not mistake the fruit within the muffin to be wet batter. Mine was done in 25 minutes
Cheers,
Chitz

Sunday, 21 July 2013

Fresh Basil Pesto Sauce Recipe


Some days I do not like to cook elaborate meals. Then I stick on to easy, ready to make dishes. This basil pesto sauce is one among them. I mostly use it for pasta but you can very well use them in a variety of ways. Spread it on a bruschetta or as an appetizer dip or use it as a spread or chutney for your sandwich. You can also mix it up with some mayonnaise to use up as a salad dressing or use as a spread or dip for your grilled chicken !! The uses are many & it's an effortless recipe :) Great right? 

I have some freshly growing basil sprigs on my window sill & I had been waiting for them to grow up to a considerable height so that I can use them. And now my emotions are that of a happy little kid :D This pesto sauce can be refrigerated for a week. Store them in air tight containers then. Alternately, it can also be freezed for upto six months.


Recipe Source: Adapted from here

I Took: 10 minutes

Makes: ¼ cup


I Used:

Fresh Basil leaves - ¼ cup
Walnuts/Pine Nuts - 4 tsp (I used Walnuts)
Garlic - 1 clove
Grated Parmesan Cheese - 2 tbsp
Olive Oil - 2 tbsp
Salt - As Needed

The Way:

  1. Add walnuts/pine nuts & garlic in a blender/mixer. Pulse it till crushed
  2. Add the fresh basil leaves to it & blend again
  3. Add olive oil and give it a quick pulse. Finally add the grated Parmesan cheese & salt and blend or pulse to your desired consistency
  4. I like it smooth rather than crunchy, so I blend it to a smooth paste. You can add water if necessary for the consistency 
Use as desired :)

Cheers, 
Chitz

Friday, 19 July 2013

Khatta Meeta Karela | Sweet & Sour Bitter Gourd

Bitter Gourd stir fry with Indian spices & Jaggery


Summer is at it's good mood here & I should admit that I am having a great time. Usually it seems that,  summer here means no snow & frequent rains with sun peaking out once in a while. But this time it's more of the radiant bright yellow hue with less of rains & I sincerely hope it remains the same :) And the pathways & gardens & fences are lined with bright & chirpy flowers in brilliant & bold shades. Even the river that flows through the center of this town looks lush green with the shadow of the big pines & apple & cherry trees on it's banks !! And the days are long as 20 hours, that  you never see the night for nearly 4 months a year,  unless you are a very late sleeper.. Feels heavenly right?? Wait before you decide that this is more better than your hometown :D All these goodness is compensated during the next 8 months of the year, when it snows heavily & you see the sun only for 4 hours a day !! And you can talk about the temperatures in (minus two digit) range :( But, some people do enjoy that weather right, so all together it comes as a package :) So here are some pics for you my friends !!


I have been doing a lot of cooking these days, but the photo shoot does not happen that often & hence it doesn't make it to this space. I had been having a lot of guests & get togethers & some experimental cooking.. Come summer time & it is jolly time for we ladies out here. Frequent get togethers & that implies food, food & a lot of food.. But summer is just an excuse to meet more frequently than in winter :D So coming to today's recipe, it's a bitter gourd stir fry that gels well with rotis & parathas and even with steamed rice & Morukari (Gravy with curd) as I had. Bitter gourd is Deeps' favorite veggie & so it features often in our menu (& hence this space ;)) & I not being a great fan of it, like to experiment with it to suit my taste buds. This recipe is from my mom's old cooking diary which too has a story with it ;) Maybe some other time, I guess I have talked enough for now..  Definitely try this recipe if you are not a great fan of bitter gourd as it has the perfect blend of sweetness & sourness to it which would take you a step closer to liking the healthy veggie !! Some other recipes with bitter gourd that are there in the blog are PitlaPavakka Puli Kuzhambu, Pavakya Pulin Curry & Bitter Gourd Fry.. 

Recipe from Ma's ole diary 

Serves: 3-4 persons

I Took: 35 minutes


I Used:

Bitter Gourd/Karela - 500 gm
Onions - 2 nos - big - chopped
Ginger-Garlic Paste - 1 ½ tbsp
Red Chilly powder - ⅓ tsp
Coriander powder - ⅓ tsp
Amchur (Dry mango) powder - ½ tsp
Turmeric powder - ⅓ tsp
Jaggery - 4 tsp
White Vinegar/Lemon juice - 1 tbsp
Oil - 2 tbsp
Salt - As Needed


The Way:

  1. Wash & scrape the bitter gourd. Remove the seeds and cut them into ½ inch thick pieces
  2. Boil them in salt water. I kept on microwave high for 12 minutes. Drain the water & keep aside
  3. Heat oil in a pan. Fry onion slices. When they turn translucent add the ginger-garlic paste & saute well
  4. Once the raw smell goes off add turmeric powder, red chilly powder, coriander powder, amchur powder, salt & 4-5 tsp of water & mix well
  5. Add the boiled bitter gourd pieces and mix well. Cover & keep on low flame for 5-6 minvutes
  6. Remove the cover & add jaggery to it. Cover again & cook for 2 minutes 
  7. Remove from flame & add the white vinegar OR lemon juice & mix well
Serve hot with parathas or roti or puri

Cheers,
Chitz