Wednesday, 9 May 2018

Easy Broccoli Stir fry | Easy Broccoli Poriyal | Easy Broccoli Upperi


Love quick fixes and love broccoli? Then this is the recipe for you. Actually you cannot call this a recipe as such, it is more like a salad kinda dish with a basic salt-pepper dressing. And this is how my mom makes broccoli at home. She says Indian spices do not go well with broccoli and so she never uses ginger-garlic paste or garam masala while making them. And I too agree and follow her while making broccoli. You can serve this as a side dish with dry or as a sabzi for your chapathi as well. So let's see this simple recipe today :)


Recipe Source: Ma


Preparation Time : 10 minutes

Cooking Time : 30 minutes


Serves : 2-3 persons 


I Used:


Broccoli - 100 gms
Onion - 1 medium sized - chopped
Tomato - ½ of a medium sized one - chopped
Pepper Powder - 2 tsp (As Needed)
Salt
Turmeric powder
-
-
As Needed
¼ tsp


The Way:


1. Clean and cut broccoli to small bite sized florets

2. Parboil the broccoli. This step is optional. If you want to parboil, in a saucepan heat water. When it starts to boil, add the broccoli florets along with salt and turmeric powder and reduce the flame to medium. Leave it for about 5 minutes. Then switch off the flame and drain the water

3. In another pan, heat oil. Add the chopped onions and saute

4. When they turn translucent, add the chopped tomatoes and saute


5. When the tomatoes are almost cooked, add in the pepper powder and salt. give a quick stir

6. Now add the par boiled broccoli and stir well. Leave it for 2-3 minutes. Then switch off the flame and serve. If you have not parboiled the broccoli florets, then add the broccoli and sprinkle some water. Close the lid and cook till done. Stir and sprinkle water (if needed) in between to see that it does not get burnt 


Cheers,
Chitz

Sunday, 6 May 2018

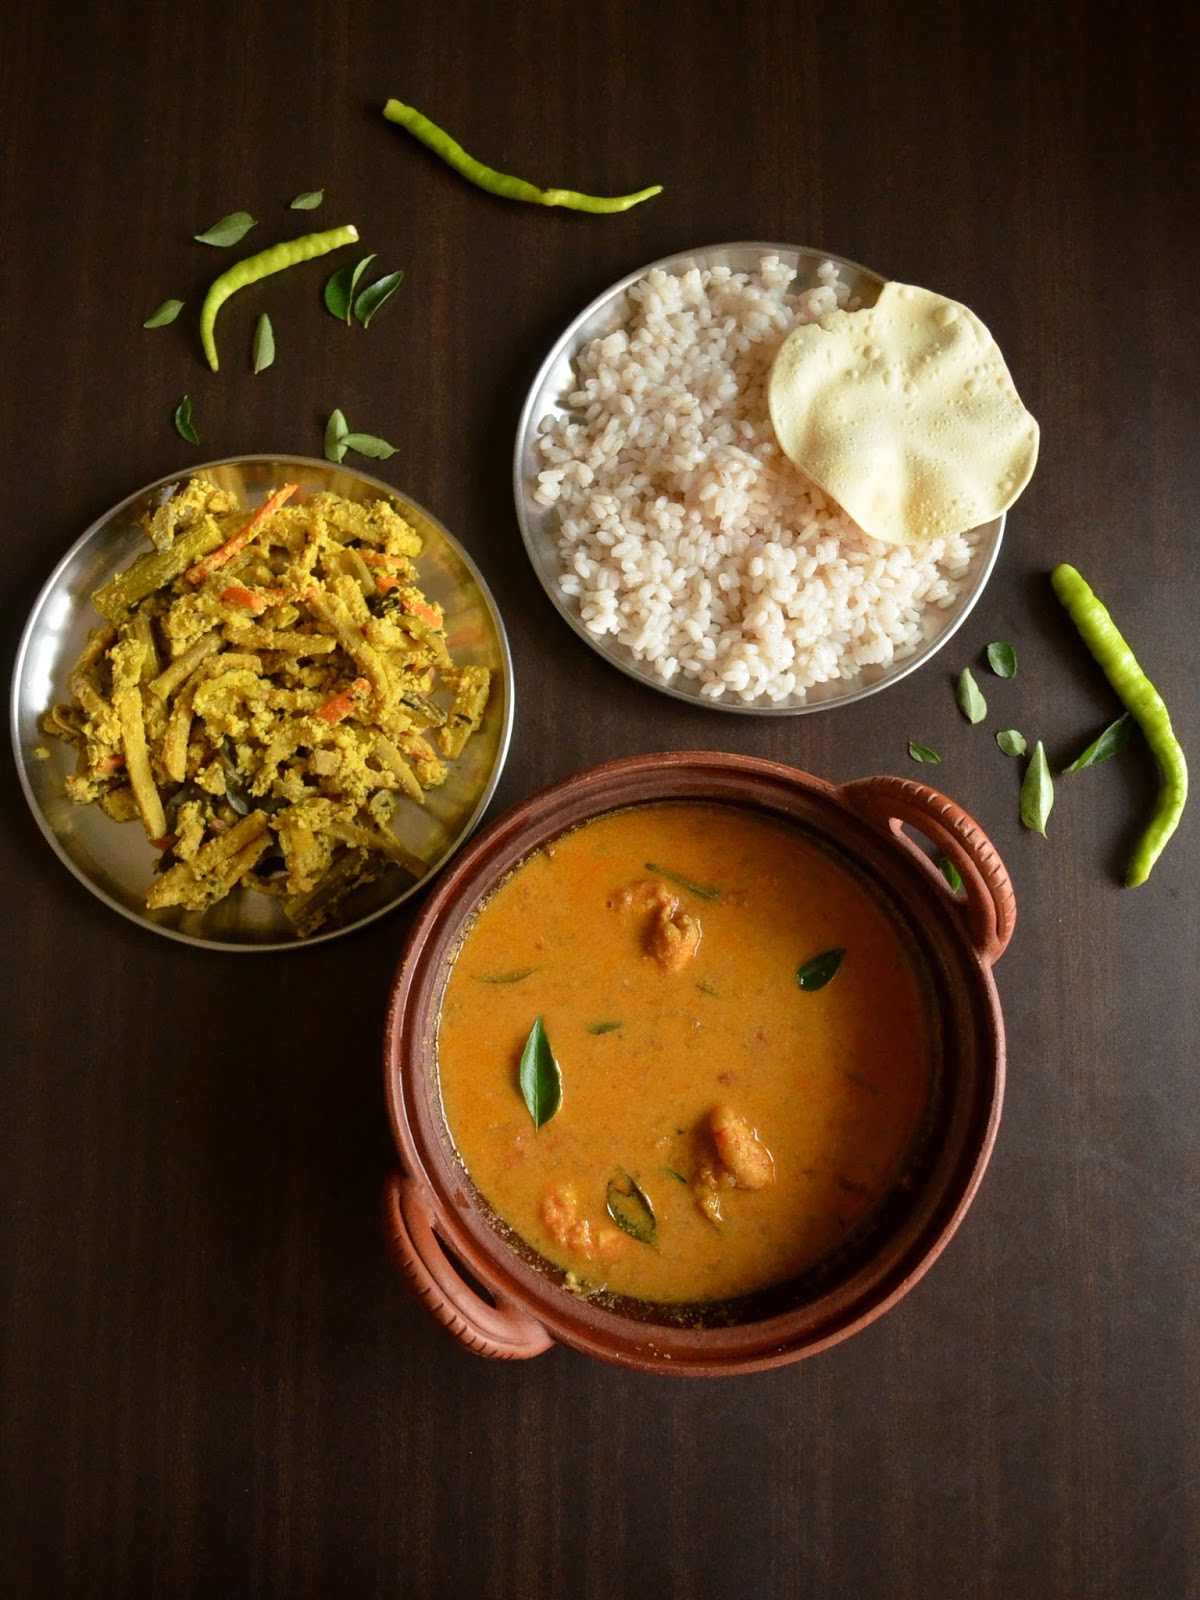
Chemmeen Curry | Konju curry | Malabar Style Chemmeen Kootan | Kerala Style Prawns Curry | Shrimp Coconut Curry


Many of you had loved this shrimp gravy when I had posted in Instagram and so I am here without much delay (maybe a little) with it's recipe. It is a classic preparation by my in laws especially Deepak's aunt.. It is very simple to make especially if you have some grated coconut and cleaned shrimps in hand. And it uses just red chilly powder for masala and the taste is brought about with the balance of tamarind and red chilly powder and of course the coconut. 

The measurements given here are just guidelines (this is exactly what I use) but they differ from family to family. So taste, adjust, taste, adjust. That's how you roll in the kitchen right :) And do not go stingy on the coconut. If you do, it does compromise the taste. Been there, done that. So do mark my words :) And when you try out this recipe, do let me know how you liked it. Now off to the recipe..


Recipe Source: Mil


Preparation Time : 10 minutes

Cooking Time : 40 minutes


Serves : 3-4 persons 


I Used:


Chemmeen/Prawns - 12-15 (big ones) (almost 250 gm before de-shelling)
Shallots - 4-5 nos (sliced)
Garlic - 3-4 big ones (chopped)
Ginger - A 2 inch piece(chopped)
Green Chilly - 2 nos
Tomato - 1 medium sized one (chopped)
Red Chilly powder - 1 tsp
Turmeric powder - ½ tsp
Tamarind - A lemon sized 
Grated Coconut - ¾ cup
Salt - As needed
Coconut Oil - 3-4 tbsp
Curry leaves - 2 sprigs


The Way:


1. Clean the prawns (remove the shell and de-vein them) and rinse well in water

2. Soak tamarind in 1 cup of warm water for 20-30 minutes. Extract the pulp and keep aside

3. Grind the grated coconut to a smooth paste with water and keep aside 

4. In an earthen pot (manchatti) or a pan, heat 3 tbsp coconut oil. Add chopped ginger, garlic and slit green chillies and saute

5. When they start to turn brown in colour, add the sliced shallots and saute

6. When they turn start to turn golden, add chopped tomatoes and saute. The tomatoes should become mushy


7. When the tomatoes turn mushy and the masala seems to have reduced add in the dry powders - red chilly powder, turmeric powder and salt. I use the really hot variety of red hilly powder here and hence adding only 1 tsp. Suit yourself according to your powder and taste buds

8. Saute them for 2-3 minutes till the raw smell goes off. Then add the tamarind water to it

9. Allow it to come to a boil. Then reduce the flame and add the prawns. Now allow the prawns to cook which would take around 12-15 minutes


10. When the prawns are cooked add the coconut paste and give a stir. Check the consistency of gravy. If it is too thick add little more water. Also check salt and hotness. If they are less add more salt or red chilly powder accordingly

11. Let the gravy come to a boil. Then add 1 tbsp coconut oil and the curry leaves and gently swirl the pan and switch off the flame


Serve with matta rice and a side dish of your choice. I served with aviyal !

Cheers,
Chitz

Wednesday, 2 May 2018

Chena Upperi | Chena Mezhukkupuratti | Kerala Style Elephant Yam Stir Fry


Do you like recipes that are ready in a jiffy or do you love elaborate cooking process and the satisfaction that you get from it? I do love elaborate cooking but i'm quite lazy nowadays ! So ready in a jiffy seems to be doing great in my vocabulary for now :D Maybe the effects of running day long behind my toddler ;) Well, anyways there was a stage in my cooking days where I was scared of dishes that used minimal ingredients.. You know, you have to get the dish right with those limited number of spices or ingredients. And the actual taste lies in using those ingredients subtly ! Well, I wouldn't say I am completely past that phase but I'm way better from where I started :) 

And talking about ready in a jiffy and minimal ingredients, this recipe does justice to both those terms. We use pretty much the same process for many of the stir fries like this yam, raw banana, chinese potato, potato and likes.. It is a fast recipe and elephant yam (chena) can actually make you feel better on days when you do not eat non-veg right? So as I would like my non veg roasts, I serve this stir fry also with some moru curry and pappad :) So check out the recipe and thank me later for saving your time packing lunches on a busy morning :)


Recipe Source: Mil


Preparation Time : 10 minutes

Cooking Time : 30 minutes


Serves : 3-4 persons 


I Used:


Chena/Elephant Yam - 1 cup heaped (after cutting to cubes)
Salt - As Needed
Turmeric powder - ½ tsp
Coconut Oil - 2-3 tbsp
Mustard - ½ tsp
Curry Leaves - 2-3 sprigs


To Coarsely Grind:

Shallots - 10 nos
Garlic - 5 medium sized pods
Red Chilly - 2 nos


The Way:


1. Clean chena/elephant yam by removing the outer skin and rinsing it well in water. Then cut them into bite size cubes (1 or 1/2 inch according to your preference)

2. Pressure cook them long with salt, turmeric powder and a little water (less than 1/4 cup) for 1 or 2 whistles till cooked. Do not keep for more than 2 whistles else it will become mushy. Good variety of yam gets cooked in 1 whistle

3. While the yam is cooking, take grated coconut, shallots, red chilly and garlic in a mixer jar and give a coarse blend. 3-4 pulses is sufficient. Do not grind to a smooth paste


4. Now take coconut oil in a kadai/pan. Splutter mustard. Then add curry leaves

5. Then add the coarsely ground coconut - shallot paste. Saute for 3-4 minutes till it's cooked and the raw smell of the garlic and shallots goes off


6. Now add the cooked chena/yam and give a gentle stir. Allow it to simmer for another 3-4 minutes till it's mixed well. Then remove from fire and serve


Serve with red rice, moru curry and pappad!


Cheers,
Chitz

Monday, 30 April 2018

Cheera Thalippu | Cheera Thalichathu | Spinach Gravy (without dal)

Amaranthus cooked in starch water


I know amaranthus or spinach is healthy and by now you must be knowing that my family is a popeye family except me. I eat amaranthus only because it is healthy and not because I like it :D And today's recipe is from my mil. Deeps loves when the spinach is made like this. It is very similar to the Cheera Thoran but only difference is this is made like a gravy for rice and for the gravy instead of using dal, starch water is used. Not heard of before? Even I didn't before getting married ;) It is very easy to make and can be made in a jiffy. If your folks are tired of eating spinach with dal combo, try this way!


Recipe Source : Mil


Preparation Time : 10 minutes

Cooking Time : 30 minutes


Serves : 3-4 persons 


I Used:


Spinach/Amaranthus/Cheera
Coconut Oil
-
-
3 cups - chopped
2-3 tbsp
Shallots - 6-8 nos
Red Chilly - 2 nos
Green Chilly - 2 nos
Salt - As Needed
Rice cooked water/Starch water - As Needed (I used 2.5 cups)


The Way:


1. Slice the shallots and keep aside. And rinse the spinach in water 3-4 times to remove the mud and other impurities and drain them. Then chop them finely and keep aside

2. In a pan heat coconut oil. Add the sliced shallots and also break the red chillies into two and slit the green chillies and add them as well 

3. Saute them well until they turn colour to slight brown


4. Now add the starch water or the rice cooked water to it. Allow it to come to a boil

5. Now add the chopped spinach to it and give a nice stir. Close the pan and allow the spinach to cook in low flame. It will take around 10-15 minutes for the spinach to cook. 

6. Check in between to see if the starch water is sufficient for the gravy. if you find it's less add accordingly. The amount of starch water is completely your choice and depends on how thick/thin you want our gravy to be. If you do not have or do not want to use starch water you can use water instead or else half and half of starch water and normal water


7. When the spinach is cooked switch off and serve with rice and a side dish of your choice !

Cheers,
Chitz

Wednesday, 25 April 2018

Oven Roasted Peanuts | Varutha Kadala | Roasted Peanuts


My family and my extended family, we all like to munch on salted roasted peanuts.. Even the kids and toddlers too follow the trend :) Everyone loves to munch some good salted "kadala" or "kappalandi" or  "nilakadala" or "verkadalai" whatever name you call it ! I remember in my childhood days my mom and dad used to try to re-create the kappalandikaran's way of roasting peanuts by adding sand in the kadai and then heating them to an optimum temperature and then trying to roast the peanuts in them.. If I ask them about that, they will still reminisce them with more failure stories than success ones ; The idea was to re-create the perfectly roasted peanuts that we get from the road side vendors, but it's quite a feat to achieve at home without damaging your utensils. And in those days it was cheaper to buy the roasted peanuts from them than try to recreate at home...

But nowadays it is so costly to buy from them, have you noticed? You just get three fistfuls for 10 bucks. And every time you want to munch on peanuts you can't go searching for the kappalandi chetan right :D So I learnt to roast these peanuts very gracefully in a microwave from my Mil.. It's very easy and fuss free and you do not leave behind a spotted dirty looking kadai.. Cool right? And now the different microwave brands work differently.. Some heat up fast while some are slower, so take baby steps first and know your microwave lest you are left with bad looking burnt peanuts !


Soaking Time : 60 minutes

Cooking Time : 10-15 minutes


I Used:


Peanuts-As Needed
Salt-As Needed


The Way:


1. Soak peanuts in salt water for 30-60 minutes. The water should be salty when you taste it. Hence taste and add salt accordingly. If salt is not sufficient, the roasted peanuts will not taste great

2. Once soaked. spread the peanuts on the microwave tray. Set your oven to microwave mode and power to max (in my case 900 W) and timer to 3 minutes

3. After 3 minutes, open the oven and quickly stir the peanuts with a spatula. This is to ensure that they get roasted evenly

4. Then again keep in 900 W for another 2 minutes. Again open and stir with a spatula. I continued like this for a total of 11 minutes and the peanuts were roasted. In my mil's microwave she keeps for 5 minutes twice or thrice till done. That oven doesn't heat too fast and hence she is able to keep for a longer time. So know your oven and test with smaller time during the first time. Then you will get the hang of it and can improvise 

5. And watch out for the burnt smell. If you get them, immediately switch off the oven and open the door and allow it to cool. And from next time keep for a lower time :)


Hope my tips are helpful and you could roast some good peanuts :) Let me know your comments and thoughts in the comments section !

Cheers,
Chitz

Friday, 20 April 2018

Mushroom Do pyaza | Easy Mushroom Dopyaza recipe


Are you a mushroom lover? I am and that too an ardent one. That's why you can see many mushroom recipes here :) Deeps is not a big fan and Dhruv is an occasional eater. But that doesn't stop me from buying and making them. i do prepare for myself once in a month or so ;) So today's recipe is an easy do pyaza preparation using mushrooms. do pyaza as you know is nothing but using onions twice in the recipe.. Like do (two) pyaz (onions).. This is a simple preparation and makes a wholesome meal with some phulkas.. An easy to go option for making lunch box recipes that look healthy as well as cute and filled :) So the mushroom fans, do try out and let me know :) My other recipes with mushrooms are Mushroom Dry FryRestaurant Style Mushroom Pepper FrySauteed Mushrooms & Kadai Mushroom


Preparation Time : 10 minutes

Cooking Time : 30 minutes


Serves : 3-4 persons 


I Used:


Mushroom - 200 gm
Oil - 3 tbsp
Onion - 1 medium sized - cubed
Onion - 1 ½ medium sized - chopped finely
Tomato - 1 medium sized - chopped finely
Ginger-Garlic paste - 1 tbsp
Green Chilly - 2 nos
Turmeric powder - ¼ tsp
Red Chilly powder - ½ tsp
Coriander powder - ½ tsp
Cumin powder - ½ tsp
Garam masala - ½ tsp
Coriander leaves - To Garnish
Salt - As Needed


The Way:


1. Clean the mushrooms by removing the skin (refer here) and slice them up. Chop 1 big sized onion (I used 1½ medium sized onion) and cut into cubes another medium sized onion. Chop finely 1 medium sized tomato and keep aside

2. Heat 1 tbsp oil in a pan. Add the cubed onions and saute them till they turn slightly golden. Do not brown them. Once done, remove and keep them aside


3. Now add the remaining 2 tbsp oil. When it turns hot, add the chopped onions and slit green chillies along with some salt and saute 

4. When they turn translucent add the ginger-garlic paste and saute for 4-5 minutes till the raw smell goes off and the onions slowly start to change colour

5. Now add all the dry masala powders - red chilly, coriander, turmeric, cumin and garam masala. Give a nice stir. Saute for another 3-4 minutes and allow the raw smell of the masalas to go off. Take care not to burn them and keep sauteeing occasionally


6. Then add the chopped tomatoes and saute. The tomatoes should turn soft and mushy

7. Finally add the sliced mushrooms and give a gentle stir. Now cover the pan and cook the mushrooms till done. Do not add water. Mushrooms release water when they are covered and cooked. So that will be sufficient for them to get cooked 


8. Now when the mushrooms are cooked, there can be some water left in the pan. If then keep the lid open and allow the water to evaporate and the gravy to become dry

9. When done, add the sauteed cubed onions and coriander leaves and give a nice stir. Switch off flame and serve with some hot phulkas !


Cheers,
Chitz

Thursday, 19 April 2018

Easy Tomato Pickle | Tomato Thokku | Thakkali Thokku Recipe | Thakkali Urukkai


Tomatoes are getting cheaper now right? So why don't we pickle some? And if it can serve you as a relish or side for your idly, dosa, chapathi, curd rice, sambar rice or rasam rice. then isn't the recipe a winner? Yes, I am not joking. This is such a pickle, a versatile one ;) I enjoy it the most with curd rice and dosa.. It is also an ideal one to make and give for your loved ones travelling abroad! So let me stop the talking now and let the recipe and pics do the work for you :)


Preparation Time : 5 minutes

Cooking Time : 40 minutes


Recipe source : Ma


Makes : A 120 gm bottle 


I Used:


Tomatoes - 4-5 medium ones (½ kg)
Tamarind  - A small gooseberry sized
Chilly powder - 2-3 tbsp
Oil - 3 tbsp
Mustard 1 tsp
Asafoetida - 1 tsp
Curry leaves - 2-3 sprigs
Salt - As Needed
Turmeric powder - ½ tsp
Ginger-Garlic paste - 2 tbsp
Fenugreek-Mustard powder - 2 tsp (Use 2 tsp each of mustard & fenugreek seeds)


The Way:


1. In a pan dry roast the mustard seeds (2 tsp) and fenugreek seeds (2 tsp) for 4-5 minutes on low flame. Take care not to burn them. It starts giving a nice aroma and also the mustard will start spluttering. Then off the flame. Allow it to cool and powder them in a clean and dry mixer jar. You can grind this powder in bulk and use it for all of your pickles


2. Grind together the tomatoes, tamarind and red chilly powder together to a smooth paste

3. In a wide pan, heat oil. Splutter mustard. Then turn the flame to low and add asafoetida. Make sure that they do not get burnt. Then add the curry leaves


4. Then slowly pour in the ground tomato paste. Take care while pouring, since the pan is hot they can splutter out on you

5. Then add in the required amount of salt, turmeric powder and ginger-garlic paste. Now turn in the heat to medium


6. Let the pulp cook in medium flame until the water gets evaporated and it slowly starts turning into a mass. This will take about 15-20 minutes. Keep stirring in between to avoid them getting burnt

7. When it gets to solidify check for salt and hotness. Add salt and red chilly powder if required as per your needs

8. Once it gets thick add the fenugreek-mustard powder and give a nice stir. Leave for about a minute or two and then switch off the flame


9. Store in a clean and dry glass jar or container. If making in large quantities then preserve them in fridge

Can serve with idly, dosa, chapathi, curd rice, rasam rice and sambar rice !


Notes:


  • The amount of red chilly powder given here is what I used. It will vary depending on the sourness of the tomatoes. So adjust as per your needs
  • Adding tamarind is purely optional. If your tomatoes are too sour, then omit them
  • Ginger-garlic paste is also optional. If you do not need them, then go ahead and skip them
  • Instead of grinding the tomatoes, you can also chop them into fine pieces and add them. In that case the skin of the tomatoes tend to come off separately and it is slightly difficult to get a smooth texture or the pickle
  • Make sure that the water content from the tomato pulp completely dries off else your shelf life might get reduced
  • Use a clean and dry spoon every time you use the pickle to ensure a longer shelf life

Cheers,
Chitz