Monday, 8 February 2016

Vanilla cupcake | Easy Vanilla cupcake (Eggless & Butterless)


I do not want to start the post with yet another apology for being away ;) as it is just the beginning of another fabulous year & also I am in a happy happy mood to share with you all the arrival of our bundle of joy - Dhruv. He is nearing his 4th month now & so you would all be understanding my busy schedule & lack of time to concentrate on other affairs :D But many a times I had been wanting to visit this another baby of mine as well, but you see, Dhruv takes precedence :D :D


I was planning to post this cupcake recipe on his 100th day as a celebration but was not able to. This cupcake stays close to my heart for another special reason as I craved for it the most during my pregnancy time. Weird or cute, you guys should say, but this muffin stays top on my list still ! It is super easy to make with quite a few calories loaded as it has no egg & no butter. And it is fluffy soft and moist and just melts in your mouth and you can relish it absolutely fine without any topping or frosting or icing. So I am sure you would want to try this out today eve itself with your coffee & do let me know how it turned out :) 


I Took : 

Preparation Time : 15 minutes

Baking Time : 40 minutes


Makes : 20-25 muffins


I Used:

All purpose flour/Maida - 1 ½ cups - 3 tbsp
Corn flour - 3 tbsp
Sugar - ¾ cup
Baking powder - 1 tsp
Baking Soda - ½ tsp
Oil - ½ cup
Curd - 1 cup
Vanilla Essence - 1 tsp


The Way:

  1. Pre-heat the oven to 180 degree C
  2. Keep the muffin tray ready with the muffin liners or if you want to bake it as a cake, grease a 6 or 7 inch pan with butter & dust it with a tsp of flour
  3. Sieve well the all purpose flour & corn flour in a bowl and ensure that they are evenly blended & mixed
  4. In another bowl, mix well sugar & curd. Now add baking powder & baking soda into the mixture & mix well and allow it to rest for 2-3 minutes
  5. Now to this frothy mixture add oil & vanilla essence & mix well
  6. And then add the sieved flour, one tbsp at a time, and whisk well
  7. Once all the flour is mixed, pour in 1-2 tbsps of the batter into the muffin liners (or the baking pan)
  8. Bake them for around 35-40 minutes or until a toothpick inserted comes out clean
  9. Allow them to cool for about 10 minutes & serve with ice-cream or chocolate syrup or any dressing of your choice

Cheers,
Chitz

Wednesday, 25 February 2015

Avocado Kiwi Smoothie


I know I go on long unannounced breaks, but that has become completely unavoidable these days.. So what am I back with? It is another refreshing and healthy smoothie for all fruit lovers out there. Trust me, this combo tastes great and I just couldn't resist making them over and again..  And for those who do not like to eat fruits raw, what better way to take in those nutrients, than with this sugar free smoothie?


I Took : 10 minutes

Serves : 2 tall glasses


I Used:


Avocado-½ of a large one
Kiwi-2 nos
Milk-¼ cup
Almond powder-2 tbsp
Honey-2 tbsp
Mint leaves-A sprig
Ice cubes-3-4 cubes

The Way:

  1. Place milk, almond powder, honey, mint leaves and ice cubes in blender & blend smoothly.
  2. Now add the scraped avocado and cubed kiwi and blend again till smooth & creamy.
  3. Serve chill for the refreshed feel !

Cheers,
Chitz

Sunday, 30 November 2014

Mutton Chops | Mutton Chukka

Mutton cooked in spices & dry roasted


Who doesn't love a dry roasted mutton dish with less oil & practically no frying? Yes, the recipe for the day is an easy, hassle free & diet friendly mutton sukka or mutton chaps. Actually, you do not need a main course for this dish, you can savour it just like that as a snack. Also you can pair it up with sambar sadam/rasam sadam/puliserry and it would taste heaven ! 

My mom used to make a variation of this dish with chicken but it was at my friend 'D's place during a dinner party that I saw this made with mutton as a dry roast and immediately, me & Deeps fell for it. From the pics, don't think of it as burnt, as my dad commented, it is the colour of the dried onions & masala ;) So what you waiting for, try it out & get accolades from your family & friends & do let me know too :)


Recipe Source : From my friend 'D'

Preparation Time : 10 minutes

Cooking Time : 45-60 minutes


I Used:


Mutton - ½ kg
Onion - 2 medium sized - chopped
Tomato - 2 small sized - chopped
Ginger-Garlic paste - 1 tbsp
Red Chilly Powder - 2 tsp
Coriander Powder - 1 ½ tsp
Turmeric Powder - ½ tsp
Garam Masala - 1 tsp
Salt - As needed
Curry leaves - 2 sprig
Water - ¼ cup
Coriander leaves - To Garnish


To Temper:


Oil-3 tbsp
Fennel seeds-½ tsp
Cinnamon-½ inch stick
Cloves-2-3 nos
Bay leaf-1 leaf
Curry leaves-2 sprigs


The Way:

  1. Cut the mutton into medium bite sized pieces. Rinse the pieces thoroughly in water
  2. In a pressure cooker, add the mutton pieces, chopped onion, chopped tomato, ginger-garlic paste, red chilly powder, coriander powder, turmeric powder, garam masala, salt, curry leaves and water and mix well
  3. Pressure cook for 2-3 whistles or until the mutton is cooked
  4. In a pan, heat oil. Temper the fennel seeds. Add bay leaf, cinnamon & cloves. Saute for about 30 seconds
  5. Then add the cooked mutton & curry leaves. Cook on low flame until the water evaporates and it becomes completely dry
  6. Garnish with chopped coriander leaves
Serve with Jeera Rice/Peas Pulav/Coconut Milk Rice/Mutton Biriyani or Roti/Porrottas

Cheers,
Chitz

Thursday, 2 October 2014

How to make Ada for Palada Pradhaman in banana leaf at home | Homemade Ada Recipe


So, is this a comeback? I'm not sure. For so many days, I am planning to post something in this darling space of mine, but somehow it was not happening. So today, I decided to put aside some of my usual holiday day chores and pen down something. First in my list of drafts was this all time favorite 'Ada for Adapradhaman'. It is indeed a sense of joy and pride when you go homemade on the usual 'pick from the supermarket' stuff. So when I enjoyed making the ada right from scratch at home, I made a mental note that I should share it to all those lovely readers out there.

Palada pradhaman is a must kheer/payasam for Onam Sadhya and for most weddings as well. Also this is a personal family favourite, so I should say that it is with a delay that this recipe is being featured here ;)  And this should really come in handy to all those non-residents who are not able to find 'Ada' during Onam time or when you crave for some yummy palada pradhaman ! Hope you enjoy making them at home, so do let me know how it turned out :)


Other Sadhya recipes:


Recipe Source : Deeps

Preparation Time : 10 minutes

Cooking Time : 40-45 minutes

Makes : 1 cup


I Used:


Rice Flour - 1 cup
Water - ¼ cup (As required)
Salt - 1 tsp
Oil - 2 tbsp
Banana Leaf - As required


The Way:

  • Mix together the rice flour, salt & oil with enough water to make a soft dough. The dough should be moist but not too watery
  • Clean and wipe the banana leaves and cut them to suit the size of your pan. Apply oil to the top of the leaves
  • Make a small ball out of the dough and spread it on the banana leaf as thin as possible. You may use a sandwich knife to spread them thin and even. Using the zig-zag end of the knife make close criss cross lines in the dough 
  • In a wide and thick bottomed pan, bring water to a rolling boil
  • Drop the dough spread banana leaf into the boiling water

  • Allow it to cook for 3-4 minutes till it becomes transparent
  • Remove the cooked ada from the boiling water and add it to a bowl of warm water

  • Rinse the ada for 3-5 times until the stickiness is removed
  • Cut the ada into small pieces when cool and use it to make the yummy kheer !

Cheers,
Chitz

Saturday, 4 January 2014

Ambur Mutton Biryani | Ambur Biryani | Easy Mutton Biriyani


So without much delay, let me wish all you wonderful friends & readers 'A Happy & Prosperous New Year'. How did the new year go for you all? Hope it was a colorful and bright one :) I have yet another reason to celebrate this new year. My blog turned one this year. To be exact, day before yesterday. The blog did bring out a year of fun, learning & a new excitement for me. I do not want to bore you guys with long speeches of my enthusiasm. 

So what am I bringing you today? It is not a sweet or dessert. By now, you must be knowing that I celebrate the anniversaries & occasions with chicken & mutton rather than sweets & cakes :) This is yet another amazing biriyani recipe that has been a constant hit in our kitchen. Actually I am only the photographer for this recipe. Everytime, to be frank every Sunday, it has been Deeps who makes this at our home :) We always are on the lookout for different varieties of biriyani & the famous South Indian Ambur biriyani was on our list for a long time. Once we tried it it become quite a regular at our place. Even our guests are a huge fan of it :) So try it out, you guys will definitely fall for it !!

Ambur Biryani is one of the famous food recipes of South India which emerged during the Nawab of Arcot's regime. This was served for the army of Carnatic as it was difficult to prepare Rotis or Parathas to cater to the need of lakhs of jawans. Today, it is served in all Muslim weddings along with Chicken Kebabs & sweet dishes. Courtesy: Wikipedia


Recipe Source : Adapted from Here

Marination Time : 1 hour

Preparation Time : 10 minutes

Cooking Time : 40-45 minutes


I Used:

Basmati Rice - 2 ½ cups
Water - 4 ½ cups (2 ½ * 1 ¾ cups)
Mutton - ½ kg
Onion - 3-4 nos - medium - sliced
Tomato - 2 small nos - chopped
Ginger-Garlic Paste - 1 tbsp
Mint leaves - ½ cup - chopped
Corainder leaves - ½ cup - chopped
Red Chilly powder - 1 tbsp
Coriander powder - 1 tbsp
Turmeric powder - ½ tsp
Oil - ¼ cup
Ghee - ¼ cup
Salt - As Needed


To Marinate:

Red Chilly powder - 1 tbsp
Coriander powder - 1 tbsp
Turmeric powder - ½ tsp 
Garam Masala - 1 tbsp
Yogurt - ½ cup
Ginger-Garlic paste - ½ tbsp
Lemon juice - 2 tsp 
Whole Spices:

Cinnamon  - 1 inch stick
Cloves - 2
Cardamom - 2
Bay leaves - 2
Star Anise - 2

To Grind:

Cashews - 10
Fennel Seeds - ½ tsp
Cumin Seeds - ¼ tsp
Green Chilly - 2
Garlic - 3

The Way:

Preparation:

  1. Marinate mutton with the ingredients listed under 'To Marinade' for about 45-60 minutes
  2. After an hour pressure cook the marinated mutton with sufficient water until done and keep aside
  3. Wash and soak the rice for about 10-15 minutes
  4. Add 2 tbsp of ghee in a pan & fry the soaked basmati rice for 2 minutes
  5. Grind the ingredients under 'To Grind' into smooth paste and keep it aside

Cooking:

  1. Heat ghee and oil in a wide bottomed pan. Add the whole spices to it and fry them in a low heat until a nice aroma comes out
  2. Now add the sliced onions and fry till it becomes translucent. Add ½ tbsp of ginger & garlic paste and saute for 2-3 minutes until the raw smell goes off
  3. Then add red chili powder, coriander powder and add turmeric powder. Fry well and add the chopped tomatoes along with salt and fry them for 3-4 minutes
  4. Finally add the mint leaves & coriander leaves and mix it all together. Add the pressure cooked mutton and mix well 
  5. Now add the ground paste and saute it for another 5 minutes in low flame
  6. Then add the fried basmati rice to the gravy and water and mix well. Sprinkle some coriander leaves.
  7. Taste the mix for salt and hotness. Add if required to suit your taste buds
  8. Cover the pan and cook in medium fire for 15 minutes
  9. After 15 minutes check if the rice is done and water has evaporated completely. Else  reduce the flame further and cook for another 5-10 minutes
  10. Once the rice is done, off the flame and leave the pan in the heat of the stove till you serve
Serve with onion-cucumber raita, mint-coconut chutney & mutton gravy of your choice.

Notes:

  • Rice : Water ratio of 1:1 ¾ works perfectly well for me. I use India Gate basmati rice for making this biriyani
Cheers,
Chitz

Tuesday, 17 December 2013

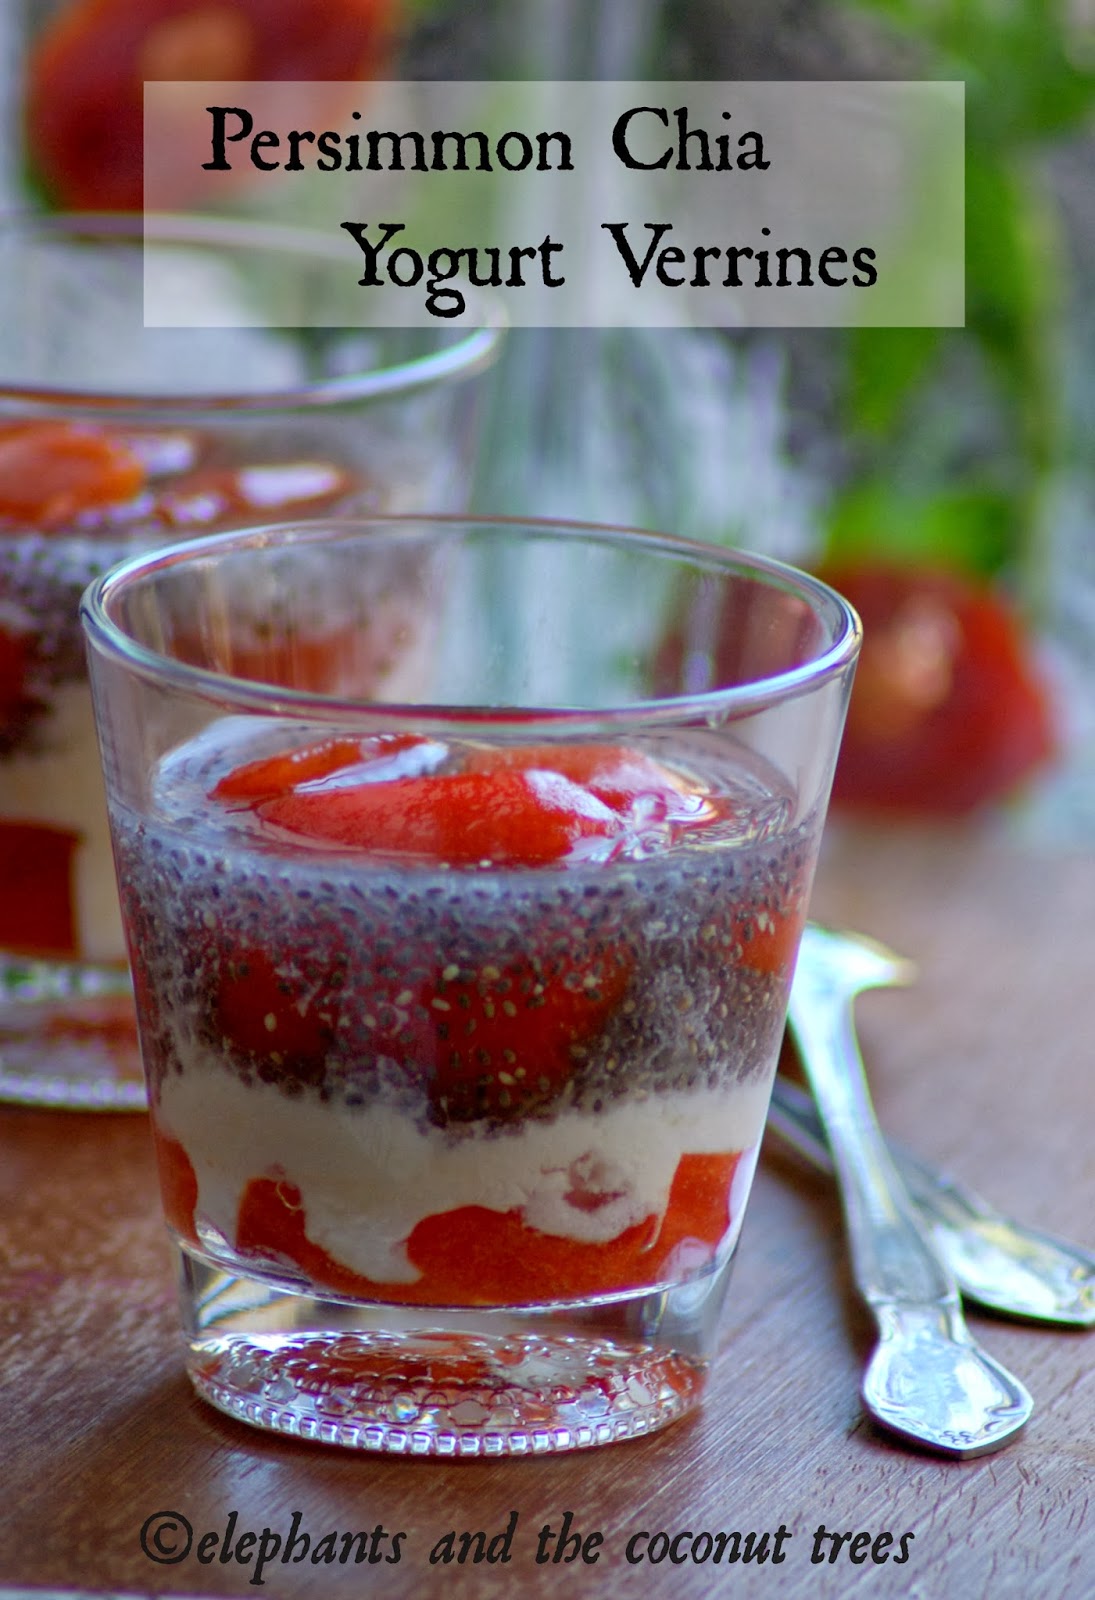
Persimmon Chia Yogurt Verrines - From my Guest

Now, is that a co-incidence or the heights of my lethargy, I'm not sure. But the next post after my guest post is a guest post for me from a very special blogger friend of mine ;) :D Guess who is doing the first guest post for me?? Yeah, she is the creative food photographer, food stylist & the wonderful Meena from elephants and the coconut trees. I am a great fan of her lovely pics. She tells the story of the dish through her appealing & mouth watering pics, which make me crave for them right away. Her Unakka Chemmen Podi is a award winning recipe which has brought me great accolades at my home :) 

So Meena is one of my great blogger buddy who constantly encourages me with my posts & recipes :) When I asked her to do a guest post for me, she immediately accepted & presented with 3 wonderful recipes & pics to choose from. I actually wanted tell her to do all 3 for me :D but then my sis intervened & selected this dish :) To tell the truth, I am a great fan of persimmon a.k.a sharon fruit & it was with great delight that I seconded my sis's decision :) 

So now, over to Meena dear !!


Thank you so much Chitz for inviting me to your space.It is such an honor to do this guest post for you. I will never forget that you were one among the first to join my blog and encourage me all along.

Hello lovely readers,

I am Meena, who blogs at elephants and the coconut trees.I am from Kerala,India currently living in California, United States with my husband and tween. I am a complete foodie and enjoy all kinds of cuisines. 

I started cooking after marriage and it was never easy for me. Those days there was no Google to help either. I must say I have done so many experiments and the poor man of mine just gulped it down.Then came the daughter.. a very sweet girl but she could reject food like a Master Chef judge :) That being said times have improved. Non vegetarian,super spicy food and baked goodies just vanish in no time:) I started blogging to acquaint daughty with Kerala food and to keep track of everything else that happened in my kitchen.


Persimmon is a fruit looks like tomato but gives a faint taste and smell of mango.Unripe ones can be really astringent and bitter.So pick ones that give in to a press. Persimmon freeze very well and ones thawed it is really pulpy and tastes really sweet that I do not use any extra sweetener when I eat, not even honey. 

The quality of the verrines lie on the yogurt you use.I used whipping cream and made yogurt at home.It really gives a creamy texture and certainly enhances the taste. Persimmon Chia Yogurt Verrine is an ideal fall dessert to make in large batch.It can also be had as a breakfast on the go if you were to fill it in jar with tight lid .


Ingredients :

Fuyu Persimmon - 2 ( 1 per person)
Homemade yogurt from heavy whipping cream - 4 -5 tbsp( Really thick not sour)
Chia seed - 1 1/2 tbsp
Honey - 2 tsp

Method :

  • Wash ,wipe and freeze ripe persimmon for 24 hours.
  • Soak chia seeds in 1/2 glass water and let it stand for 1 hour to expand or overnight in fridge.
  • When u are ready to assemble in the glass simply take out the frozen persimmon put it in warm water for a few minutes then cut off leave part and peel  the skin gently with potato peeler (u might have to hold the fruit with a paper towel or cloth as the fruit would be still cold).Cut into bite size pieces

To assemble 

  • Arrange few pieces of fruit at the bottom of the glass then slowly put 2 tbsp of yogurt per glass then hold a spoon upside down on top of  the yogurt  and gently pour 2-3 tsp of chia seeds onto the back of the spoon.So the layers would not mix up .On top add add the remaining cut fruits.Serve chilled or at room temperature.
  • Before serving drizzle some honey.


Thank you so much Chitz for giving me an opportunity to be your guest.Wish you all the best and hope you join Deepak soon.

And that was the very sweet lady from the land of 'coconuts & elephants' :) treating me & my dear readers will a fall dessert. Thank you so much Meena for doing this guest post for me.. I do miss Persimmons & you made me reminiscence of my indulgence of it :)

Cheers,
Chitz

Saturday, 23 November 2013

Kerala Mixture - My first Guest Post :)


The first time experiences will always remain memorable & close to our heart, isn't it? I experienced that excitement when Rafee, the sweet tooth & sweet heart asked me to do a guest post for her wonderful space. I really like this segment at her space & used to look forward to the posts, which used to feature every Saturday before, but now due to her slightly busy schedule became biweekly. I got acquainted to a lot of fellow bloggers through this lovely event of hers :) So most of the times, the first times do makes us a little nervous, right? It was the same with me too. What to cook, how to present? Will Rafee's wide range of reader fans like it, especially after she left the choice of the dish to me :D After much debate (inside my head) and cooking two to three dishes I finally settled for the 'Kerala mixture'. 

Rafee is an amazing person whom I befriended through the blogging world. I have to say person rather than blogger, coz blogging is just one aspect of her life that she handles amazingly in addition to the other roles of a daughter, wife, mother, home maker & a professional ! In spite of her busy schedule she does blog very frequently & never fails to express her two words of opinion & encouragement to what her fellows have cooked & presented ! And the highlight is she replies to every comment at her space. Now that's the heights of dedication & interaction for me. The intro for most of her posts would be her experiences or small quotes which would really make you understand that she is a warm human being who strives to be a better person with each passing day ! It's a pleasure to know you & be a fellow blogger, Rafee :) I am really glad that I could do this guest post for you & thank you for giving me this oppurtunity :)

Do hop on to her space for the detailed recipe & pics :)


Cheers,
Chitz