Showing posts with label Cheese. Show all posts

Monday, 29 July 2013

Creamy Basil Pesto Pasta Recipe


At times, we need to indulge in very simple & tasty food right, which saves our cooking time & at the same time makes our heart & tummy full ! This pasta always does that to me. A busy eve when you do not have time to cook an elaborate dinner or a lazy afternoon & craving for some quick lunch? Try this then !! Having shared the Basil Pesto recipe with you, I thought I should share this simple pasta recipe too. Check here for tips on how to cook pasta. Enjoy :)

I Took: 20 minutes

Serves: 1 person


I Used:

Pasta (I used Penne) - 1 cup
Basil Pesto - ¼ cup
Parmesan Cheese - ¼ cup
Olive Oil - 2 tsp
Salt - As Needed
Pepper - As Needed


The Way:

  1. Heat olive oil in a pan over medium heat
  2. Add the basil pesto & stir it
  3. Once the pesto is warm add the parmesan cheese & mix. You can add the pasta boiled water if required to thin out the sauce
  4. Add the pasta & mix well so that the sauce is incorporated. Add salt & pepper to taste
Cheers,
Chitz

Sunday, 21 July 2013

Fresh Basil Pesto Sauce Recipe


Some days I do not like to cook elaborate meals. Then I stick on to easy, ready to make dishes. This basil pesto sauce is one among them. I mostly use it for pasta but you can very well use them in a variety of ways. Spread it on a bruschetta or as an appetizer dip or use it as a spread or chutney for your sandwich. You can also mix it up with some mayonnaise to use up as a salad dressing or use as a spread or dip for your grilled chicken !! The uses are many & it's an effortless recipe :) Great right? 

I have some freshly growing basil sprigs on my window sill & I had been waiting for them to grow up to a considerable height so that I can use them. And now my emotions are that of a happy little kid :D This pesto sauce can be refrigerated for a week. Store them in air tight containers then. Alternately, it can also be freezed for upto six months.


Recipe Source: Adapted from here

I Took: 10 minutes

Makes: ¼ cup


I Used:

Fresh Basil leaves - ¼ cup
Walnuts/Pine Nuts - 4 tsp (I used Walnuts)
Garlic - 1 clove
Grated Parmesan Cheese - 2 tbsp
Olive Oil - 2 tbsp
Salt - As Needed

The Way:

  1. Add walnuts/pine nuts & garlic in a blender/mixer. Pulse it till crushed
  2. Add the fresh basil leaves to it & blend again
  3. Add olive oil and give it a quick pulse. Finally add the grated Parmesan cheese & salt and blend or pulse to your desired consistency
  4. I like it smooth rather than crunchy, so I blend it to a smooth paste. You can add water if necessary for the consistency 
Use as desired :)

Cheers, 
Chitz

Monday, 17 June 2013

The French Laundry's Gougère - Baking Partner Challenge #11 | Cheese Puffs


It's time for yet another Baking Partner Challenge. This time it was to learn to prepare Pâte à choux - the light French pastry dough, which is used to make sweet and savory delicacies. The challenge was to make Chocolate Eclairs or French Gougère or both using Pâte à choux. I was in deep confusion on which one to choose to bake this time & the problem was I have not had both before, so it was kinda difficult to decide.. If time had permitted, I would have done both. After much thought & research I zeroed in on the savory Gougère a.k.a the Cheese Puff.


So foremost, a small note which I had gathered on the pastry dough & the savory appetizer, before I take off on the recipe. Gougères are made all over France though they are said to have originated from Burgandy. They are small & light on the outside and soft, eggy & cheesy on the middle or inside. These puffs are best served warm & usually as an accompaniment to Wine. Some like to fill them up with some stuffing or sandwich them with ham. I personally enjoyed having them with Nutella (Nugatti) ;) And you must be wondering what's with the name 'The French Laundry's Gougère', it's nothing else but Thomas Keller's Michelin 3-star restaurant 'The French Laundry' in California. There these famous little Gougère appetizers are served with wine.

And talking about pâte à choux, here the dough is cooked first before baked. That's instead of using a raising agent it uses the heat from cooking the dough to puff the pastry. Also cooking the dough dries it out a bit & makes it easier to absorb the eggs. And while baking it uses two different temperature that allows it to first puff and then dry into crispy little delights. So that's a lot of information for now I guess, so quick into the recipe  ..


Recipe Source: Adapted from Bouchon Bakery Book


Makes: 30 bites


I Took: 

Preparation Time: 20 minutesBaking Time: 30 minutes


I Used:

Water - ½ cup + 1 ½ tbsp
Butter - Unsalted - 4.5 tbsp
Kosher Salt - ½ tsp
Freshly ground pepper - ¼ tsp
All purpose flour - ½ cup + 2 ½ tbsp
Eggs - 150 gm / 2 large nos
Gruyere Cheese (Aged & shredded - scant 1 cup


The Way:

  1. Preheat the oven at 220 degrees for 10 minutes
  2. In a saucepan, combine water, butter, salt & pepper and place over medium heat and stir until the butter is melted
  3. Increase heat to medium high once the butter has melted. Then bring to simmer and remove from fire
  4. Using a wooden spatula stir in the flour for about 2 minutes until it has a paste like consistency
  5. Now place this saucepan again over medium-high heat and stir rapidly for 1 minute, until the dough pulls away from the sides of the pan and the bottom of the pan is clean. Remove from fire
  6. The dough should be glossy and smooth but not dry
  7. Now beat in the eggs, ONE AT A TIME, beating until each addition is completely absorbed by the dough. Use only large eggs not extra-large or jumbo or small as this may cause the puff to be too liquidy or be under-baked
  8. Mix until the dough pulls away from the sides of the bowl pulled with the spatula but immediately grabs back on again. When the dough is lifted, it should form a bird's peak- it should hold it's shape and turn down on itself but not break off
  9. Now add the cheese and mix to incorporate
  10. In a baking tray place the baking sheet and take a tablespoon of the dough & drop on into the baking sheet with a distance of at least 1 ½ inches in between each drop. Use wet fingers to smooth the surface of each drop
  11. Bake for 10 minutes and then turn down the temperature to 190 degrees and bake for an additional 20-25 minutes or until they are completely golden brown. Make sure they bake until they’re completely browned up the sides so that they don’t sink when cooling
Cheers,
Chitz

Tuesday, 5 March 2013

Shrimp Quesadilla


'Tat ta da' day - When you mix this and dash in dat and sprinkle those, you get a yummly recipe. Yes, it was that kind of day today. Wanted to eat something other than the usual 'rice and curry and stir fry' combo lunch. I was in a great mood for something spicy and cheesy and non-veggie. And there I was browsing and browsing and browsing... But none seemed satisfactory for my spice buds. That's when I thought, come on... lemme mix and dash and sprinkle ;) 

A quesadilla is like the wrap equivalent in a Mexican cuisine. It's a flour/corn tortilla filled with a savory mixture of cheese, vegetables, meet & other ingredients. An ideal lunch box idea for people on a diet (of course minus the cheese & shrimp, you can substitute with a veggie of your choice maybe bell peppers or mushroom), coz it's both yummy and fills you up for a meal ;) 


I Used:

For the Spicy Green Dip:

Sesame seeds : 1 tbsp
Coriander      : 5 sprigs
Mint              : 3 sprigs
Green chilly   : 2 nos
Ginger           : a quarter inch piece


For the Shrimp:

Shrimp                    : 50 gm
Garlic                      : 1 pod
Lime juice               : 1 tsp
Red chilly powder    : 1 tsp
Pepper powder        : 1 tsp
Cumin powder         : 1/2 tsp
Salt                         : As needed


For Serving:

Wheat Tortilla       : 1 (U can use any tortilla)
Olive Oil               : 3 tsp
Onion                   : 1 (chopped - medium sized)
Parmesan Cheese   : As needed 


The Way:

  1. Grind together ingredients under 'For the Spicy Green Dip' 
  2. Place the shrimp in a bowl. Marinate it with the ingredients under 'For the Shrimp' and allow it to stand for 30 minutes
  3. Then cook the marinated shrimp with a little of water, until done 
  4. Heat a pan on medium high. Add olive oil
  5. As it heats up, add onion and saute till translucent. Add the cooked shrimps to it and toss around till dry
  6. Warm the tortilla in a tava 
  7. Now to assemble the quesadilla, place the tortilla. Sprinkle with the grated cheese. Distribute the spicy green dip on top of the cheese. Add the shrimp mixture to it. 
  8. Now place this in the tava until it is nicely toasted and the cheese begins to melt
  9. Roll it over and serve with tomato sauce or the spicy green dip
Cheers,
Chitz

Monday, 25 February 2013

Baked Chicken Pasta

Pasta cooked with chicken, capsicum and baked with cheese


It was a lazy morning.. You must be wondering, usually stories begin with 'It was a lazy afternoon', yes, but for me it began in the morning itself ;) So I was on a movie marathon spree. It was in the middle of the 3rd movie I guess that hunger struck me. And since I had all cuddled up nicely on the sofa with lethargy at its heights, I was on high Italian cravings. Pasta and chicken and cheese melting within. Lo, I was ready for action.. Cooking time :D What nice way to boost your lethargy than with baked pasta, rite ?? I had previously done a lot of research on pasta cooking and after two or three unsuccessful attempts, I succeeded in getting it right. So I thought I should share with you all :) Don't look scared with the list down there. Just a few tips, so that you get it right at your first attempt :)


How to cook pasta 

  • Boil water. Add in salt for the extra flavor
    • Most of the brands/institutes specify the ratio of water-pasta-salt as 1000 gm-100 gm-1 tsp. However, the idea is to have enough water to cover the pasta a little over, so that it is convenient enough to stir them.  
    • Cover the pan and allow water to come to a boil. Once it starts boiling you can uncover 
  • Add the pasta now
  • Stir and check every now and then till al dente 
    • Different brands and shapes of pasta have different cooking times. And usually this will be listed in the pasta cover/box. 
    • Hence do not mix leftovers of one with another. This can turn into a mess
    • The time listed will be quite accurate. Hence stick to it
    • Al dente means to be cooked to firm but not hard. This means 'to the tooth' in Italian. It is thoroughly cooked but still offers resistance while chewing. In effect not too hard and not too soft
    • Stirring the pasta is very important, especially in the beginning when you add the pasta, because they tend to clutter together as the first layer begins to soften and release starch
    • Later on have some occassional stirs to ensure that they stay separate
  • Strain using a colander or strainer

Recipe for Baked Chicken Pasta


I took: 1 hour

Serves: 1 person


I Used:

Pasta (I used Penne)  -  1 cup 
Pasta Sauce         -  5 tbsp
Chicken              - 100 gm - Boneless & chopped
Onion                 - 1 no - medium sized - Diced
Capsicum            - 1 no - medium sized - Diced
Garlic                 - 3 cloves
Basil                   - ½ tsp
Rosemary            - ½ tsp
Cinnamon            - An inch piece
Olive oil              - 3 tsp
Mozarella cheese  - As garnish to cover the pasta
Pepper powder    - As needed
Salt                     - As needed


The Way:

  1. For this recipe, cook the pasta just before al dente. A minute less than the time specified in the pack
  2. In a pan, heat olive oil
  3. Add garlic and cinnamon and saute
  4. Add the chicken pieces, basil and rosemary and saute till the chicken is half done
  5. Then add the onion and capsicum and saute 
  6. Add the pasta sauce and stir 
  7. Add pepper powder and salt and stir well 
  8. Preheat oven to 180 degrees C
  9. Lay the pasta in a ovenproof dish and sprinkle over mozarella cheese
  10. Bake for about 20 minutes. Let stand for 5 minutes before serving
Cheers,
Chitz

Monday, 7 January 2013

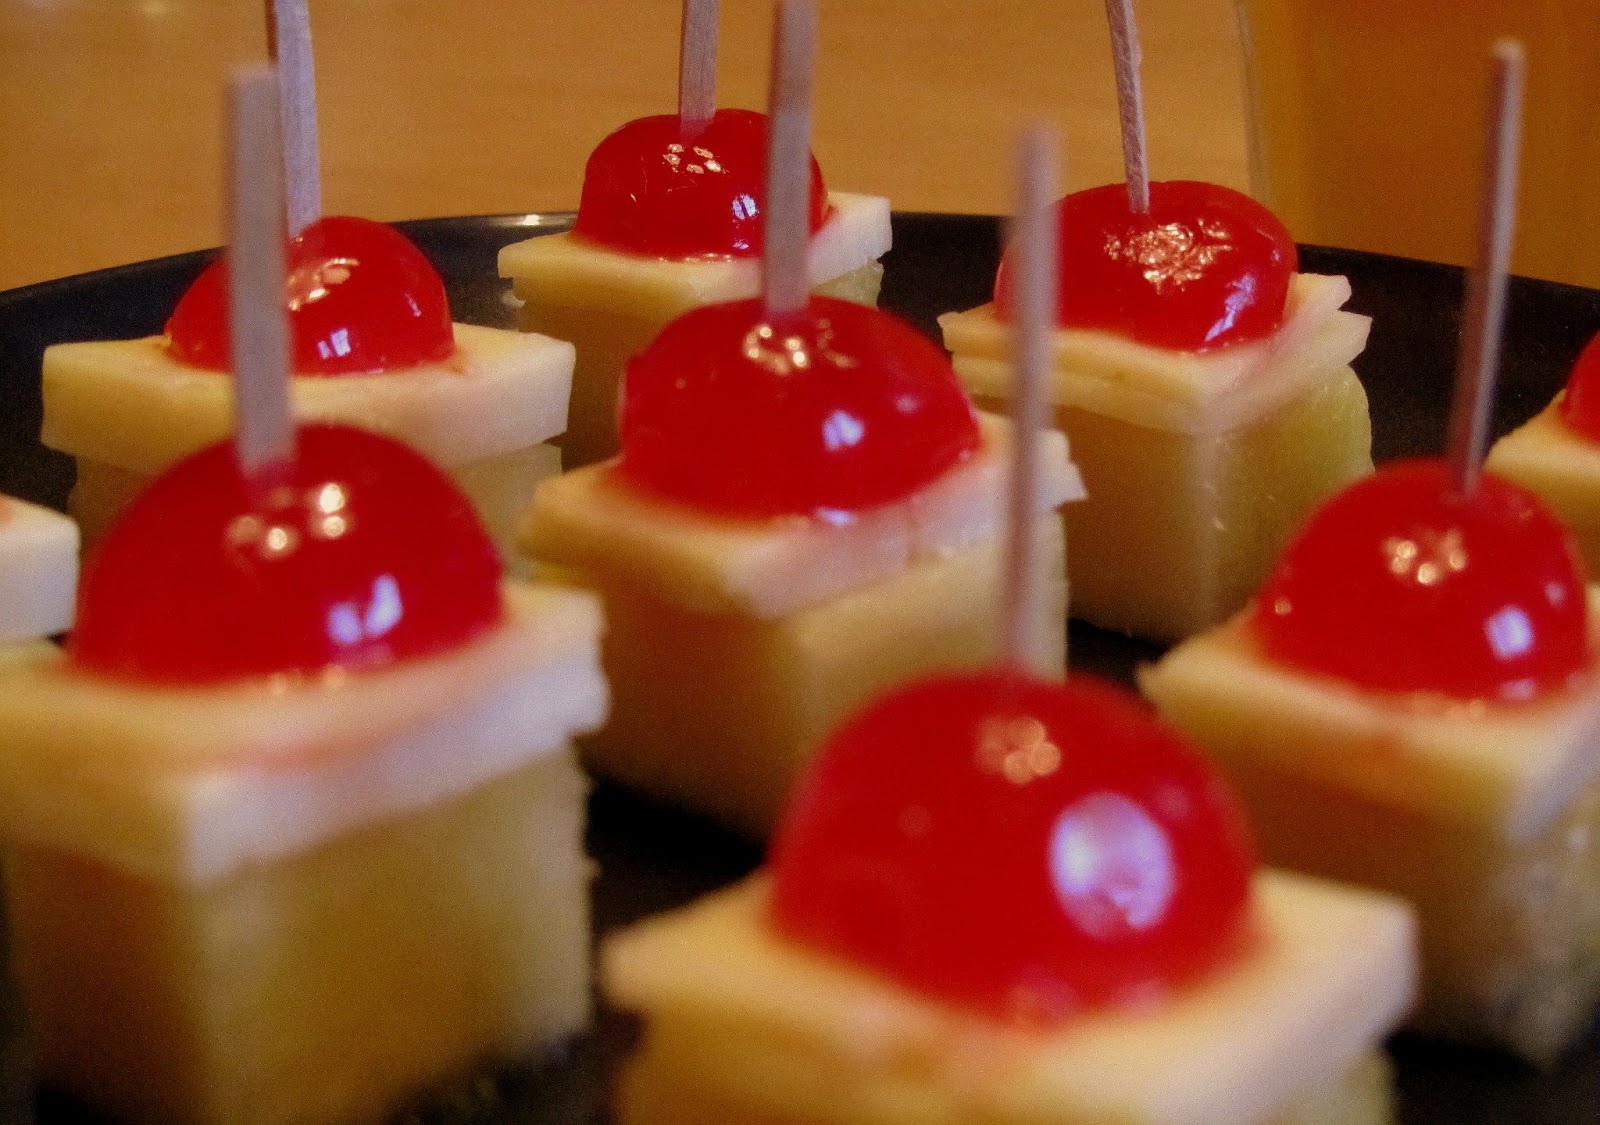
Pineapple Cheese Sticks


'Early to bed and early to rise makes a man healthy, wealthy and wise'. But what if you are not an early bird? Now obviously I am not one. And that comes with serious consequences for my food timings :-( Yeah, I don't like to skip a meal.. But at times weekends make me do that. And that's one lazy eve, I was struck with the idea of making these pineapple cheese sticks.

I remember having them as starters in an eat-in (forgot the name, maybe I should ask my mom, she will know!!) in Trivandrum, when I was a child.. I loved to wriggle them in my mouth for the perfect blend of the sourness of the pineapple, the salt of the cheese and the sweetness of the cherry.. Oooh.. That was quite a feast those days :-) 

So here is the recipe of the starter that did make me hungry after a while and lo, I was set off cooking the dinner :)


I Took: 10 minutes


I Used:

Pineapple (Canned or Normal)
Cheese
Glazed Cherry
Tooth Picks

The Way :

Cut pineapple into small cubes. I used the middle portion of the pineapple as they are more stiff and less sour. Cut the cheese also in the same shape as that of the pineapple. Cut the cherries into half. Onto each toothpick, insert the pineapple, followed by the cheese and then the cherry.

The sticks are now ready to be served :-)

Cheers,
Chitz