Wednesday 31 January 2018

Instant Jowar Dosa | Cholam Dosai | Jowar Dosa Recipe | Sorghum Dosa Recipe


I am a breakfast lover.. Are you? I wasn't one until a few years ago. But slowly as I started experimenting many food and started understanding and liking food, I understood the importance of having a full tummy breakfast and the variety of option that we can have and make for a good brekkie ! There used be a whole year and a half in my life where I constantly had toasted bread with honey and nutella for breakfast ! I myself am surprised now at how I managed to have that same breakfast without getting bored :D 

Now with my little one at my heels, I am in constant search for healthy, wholesome and quick to make breakfasts which is good and tastes great for both me and my little one's taste buds :) This is one such option. I bought the Jowar flour from Big Basket when they had put up an organic products sale. It is very easy to make them and very healthy too and my little one loves it (for now ;)). He has it as such without any sides but I like to spice them up with a gravy and this time I paired it up with some leftover Kohlapuri chicken from the previous day's dinner ;) So if you are like me and would like to try new healthy breakfast options, here is the recipe for you :)


Recipe Source: Here


Preparation Time : 5 minutes

Cooking Time : 10-15 minutes


Makes : 5-6 dosas


I Used:


Jowar Flour/Cholam Maavu - 1 cup
Rice Flour
Cumin Seeds
-
-
½ cup
¼ tsp
Onion - 1 medium sized chopped
Green Chilly - 1-2 nos
Curry leaves - 2 sprigs
Salt - As Needed
Oil - As Needed
Water - As Needed


The Way:


1. In a bowl add Jowar flour, rice flour, cumin seeds, chopped onions, chopped green chillies, torn curry leaves and salt and mix well

2. Add water and make a thin batter. The batter should be watery like that for rava dosa or neer dosa

3. Heat a dosa griddle or pan. Smear a tsp oil and pour the batter. Add little oil along the sides and on top of the dosa. Allow it to cook

4. Then flip over the dosa and allow it to cook. Once cooked, transfer to a plate and serve hot 


Notes:

  • The batter should be runny and watery
  • You can also add some chopped coriander leaves and cashews as well in the batter if you like

Cheers,
Chitz

Tuesday 23 January 2018

Uppilitta Nellikka| Uppu Nellikka | Nellikka Uppilittathu | Gooseberries in Brine | Brined Gooseberry


Visit to Deepak's hometown Calicut is never complete without a visit to the kozhikode beach and the visit to Kozhikode beach is never complete without having the uppilitta maanga and uppilitta nelikka. Now some may argue that it's not hygienic to have them from the street side vendors but... I myself think about it every time I buy from them, but the sight of it just makes you crave them so much that you will be able to forgo the hygienic thought for a minute ;) It's not just gooseberries and raw mangoes that are brined there. Almost any possible veggie and fruit is brined in those big jars.. Gauva, Pineapple, Cucumber and so on.. Maybe next time I will take a pic and upload here ;)

So what do you do when you do not have the luxury of having them as often as you would like them to? You re-create them at home ! This is very easy to make. Just make sure that you take care of some things like using a glass container to store them and never to use your hands and instead take the brined gooseberries out from the container using spoon or fork. You can also use up the brine once the gooseberries are over. Take about half glass of the brine, add some lemon juice and another half a glass of soda. Mix well and tada, as Deeps says, it's divine :) Can quench you in an instant after that long run or heavy workout.. 

And you know what? I had kept this in the fridge and forgot to click the pics. Was thinking that I will click them after a few days once they swell up. After a few days Deeps and Dhruv ate one and warned me 'Take the pics fast and don't blame us if they get over'. Two days later, i found the bottle half empty. It was almost in the evening and light was low. I was thinking should i click now? Will I get decent pics? Then I thought it's better to get at least pics with half the bottle of gooseberries than to get none at all. So went ahead and clicked them ;) So what you waiting for? Go brine those gooseberries that are in season now :)


Makes: A 500 gm bottle with 8 gooseberries 


I Took: 

Preparation Time: 10 minutes

I Used:


Gooseberry - 7-8 nos
Green Chilly - 2 nos
Salt - As needed
Water - 1 ½ cup

The Way:


1. Rinse the gooseberries well and allow them to dry. you can pat them dry using a kitchen towel

2. Then using a fork make small prick marks all over the gooseberry. This is for the salt to sink in well in the gooseberry

3. Rub salt all over the gooseberry


4. Heat water in a saucepan. Allow it to come to boil and then cool it to room temperature

5. Now take the prepped gooseberries in a glass bottle or container. Add slit green chillies and salt. Then pour the water into it. The water level should be above the gooseberries. Check for salt. The water should be salty (slightly more than normal salty taste). If not sufficient add accordingly

6. Rest it for a day or two and then you can refrigerate it. Leave it for at least a week before having it


Notes:

  • Some use vinegar or lime juice also. But we do not prefer it to be too sour, so we skip it. If you want to add, remove 1/4 part water and add vinegar instead or juice of 1 lime
  • I allowed the gooseberries to rest for a day in room temperature and then refrigerated it for a month and then used it
  • Avoid using plastic containers to preserve this. I did once and also did not refrigerate them and they developed mold and had to discard them
  • You can also use up the brine once the gooseberries are over. Take about half glass of the brine, add some lemon juice and another half a glass of soda. Mix well and serve

Cheers,
Chitz

Wednesday 17 January 2018

Ulli Sammanthi | Ulli Chammanthi | Easy Onion Chutney


 Are you a chutney person or a sambar lover when it comes to having idly and dosa? I'm definitely a sambar gal.. I have to have lots of sambar and the idly or dosa has to be nicely dunked in and soaked and made moist for me to devour.. ahh, the thought itself makes me crave for some sambar idly now :D But Deeps and my little one are more of chutney lovers. Even if sambar is there, they would need some chutney for their soul ;) So coming to today's recipe, it is a simple humble Onion chutney with the bare minimal ingredients that you can ever imagine to make a dish :D 

This chutney is a regular at my mil's place whenever idly or dosa is made. And that would be in addition to a red or white coconut chutney and sambar. I make this with big onions but if you have a stock of shallots you can make it with them too or you can make half and half of onions and shallots. And if you are conscious about using oil, then no need to saute onions. Instead directly grind them with red chilly and add coconut oil. That also tastes yum. This chutney is really a time saver recipe and can be made very fast. And if this chutney is there I really don't mind even if sambar is missing from the menu :)

The other chutney recipes that might interest you are 


Recipe Source: Mil

Serves: 2 persons


I Took: 

Preparation Time: 5 minutes

Cooking Time: 10 minutes


I Used:

Onion/Savala - 2 nos (medium sized - chopped)
Red Chilly Powder  - 1.5 tsp
Salt - As Needed
Coconut Oil - 2 tbsp

The Way:


1. Clean the onions and chop them. In a kadai/pan heat 1 tbsp coconut oil. Toss in the onions and add required salt and saute them

2. The onions should turn colour and become slight golden. Take care not to burn them. Now add the red chilly powder and saute for another 2-3 minutes till the raw smell goes off. Now switch off the flame


3. Allow it to cool. Once cool, grind them to a smooth (or rough depending on your preference) paste, preferably without water. If the quantity of onions is too less it will be difficult to grind, in that case add very little water 

4. Transfer the chutney to a serving bowl. Add 1 tbsp coconut oil and mix


Serve with hot idlis and dosas !

Cheers,
Chitz

Tuesday 16 January 2018

Raw Papaya Thoran | Kerala Style Kaplanga Thoran | Karumoosa Thoran | Naadan Kappakya Thoran


Today's recipe is a slightly different one friends.. Did you know that you can cook raw papaya as a veggie and make amazing dishes out of them? That's one beauty of growing up on the west coast of India in Kerala. You learn to make use of the leaves, stalks or the raw fruits and make varieties of dishes out of it. Most of the Keralites, at least the previous generation grow many fruits and veggies at home itself at their backyard and whip up tasty dishes out of those organic produce. 

I have seen my mil make a very yummy gravy from the raw mango, jack fruit seeds and cucumber, all home grown ;) Usually during the morning ritual of cleaning (sweeping off the dry leaves and such) the front and back yards, whenever she comes across a fallen raw papaya or raw mango, she brings them inside to sneak them into the lunch and dinner menu for the day.. Cool right ;) So I thought I will share with you how to make a thoran (poriyal/stir fry with coconut) using this raw papaya. I also have another gravy type recipe using raw papaya. Will post that sometime later. For now, let's see how to make this easy and ready in a jiffy thoran..


I Took: 


Preparation Time: 10 minutes

Cooking Time: 20 minutes


Serves : 3-4 persons


I Used:

Raw Papaya
Coconut Oil
Mustard
-
-
-
250 gm/1.5 cups (chopped) 
1 tbsp
¼ tsp
Turmeric powder-¼ tsp
Salt
Curry Leaves
-
-
As needed
A sprig


To Pulse:
Coconut-¼ cup
Shallots/Small Onion-4 nos
Green Chilly
Cumin seeds
Garlic
-
-
-
1 no
3 nos small sized
¼ tsp


The Way:


1. Scrape away the skin of the raw papaya and cut it into half. Remove all the seeds from and then rinse them well. And chop them very finely. If you have a food processor, go ahead and use it


2. In a pan, heat the coconut oil. Splutter mustard seeds and curry leaves. When it starts to splutter, add the chopped raw papaya along with ¼ tsp turmeric powder and salt. No need to add water. Allow them to cook covered in a medium low flame until done. Check in between to ensure that it doesn't get burnt or stuck at the bottom of the pan and give a quick stir. It should take about 10-15 minutes to cook


3. Now while the papaya gets cooked, coarsely pulse together the ingredients under 'To Pulse' in mixie without adding water. Do not grind to a smooth paste. Just 3-4 pulse until all the ingredients get crushed and mixed well would be sufficient.


4. Now add the ground coconut paste to the cooked raw papaya and and give a nice stir till the coconut tempering is coated evenly all over. Switch off the flame in a minute or two and serve


Serve along with brown rice, Sambar or pulissery and pappad and a non veg dry dish !

Notes:

  • Coconut is the key ingredient for thoran. So do not compromise on it :)
Cheers,
Chitz

Monday 15 January 2018

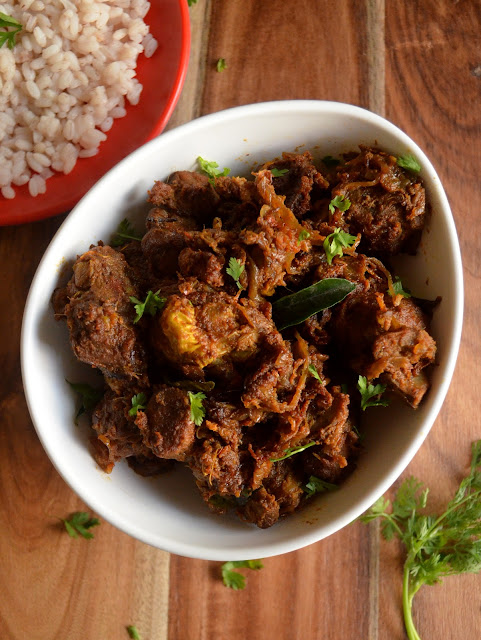
Kerala Mutton Roast | Easy Kerala style Mutton Varatiyathu | Nadan Mutton Roast Dry


Hello folks.. How is the New year treating you? My year is so far good and going sort of ok! That means, I am atleast keeping up on half of my resolutions so far ;) My laptop was giving me a lot of trouble in the past 2-3 months and finally I have had it repaired and so the second task I wanted to do was to publish a post in this humble little space of mine. And the first one is to upload my little one's pics and take a backup of it somewhere safe ! I almost had a nightmare when my lappie crashed as I was scared that I would lose his videos. But thank God, I could recover them ! Some little crazy cute things that we hang on to in life na :)

So whoever knows me would know that I love chicken, both to cook and to eat and for me the first thing that comes to mind while deciding a menu for any celebration is to include a chicken dish. But today's recipe is not about chicken, it's mutton. This recipe is very easy one and can be done with the regular ingredients from your pantry and it is super tasty too. This is a hit in my family and Deeps goes ga-ga about this every time I make it and he always says it tastes as good as a restaurant style roast.. Now that's something that can make you both happy and proud right? So why you thinking further? Head on to the recipe and make some soon and let me know how you got appreciated for it :)


Preparation Time : 10 minutes

Cooking Time : 45-60 minutes


I Used:


To Marinate:
Mutton
Red Chilly Powder
-
-
½ kg
1 tsp
Lemon juice
Ginger Garlic paste
Salt
-
-
-
½ of a medium sized one
½ tbsp
As needed

For the Masala:

Onion
Shallots
Green Chilly
-
-
-
2 small sized - chopped
10 nos - sliced
1 no slited 
Tomato-1 medium sized - chopped
Ginger-Garlic paste-1 tbsp
Red Chilly Powder-1 ½ tsp
Coriander Powder-1 ½ tsp
Turmeric Powder-½ tsp
Garam Masala
Pepper Powder
Cumin Powder
-
-
-
1 tsp
½ tsp
¼ tsp
Salt-As needed
Curry leaves-2 sprig

To Temper:
Coconut Oil-3 tbsp
Fennel seeds-½ tsp
Cinnamon-½ inch stick
Cloves-2-3 nos
Bay leaf-1 leaf
Curry leaves-2 sprigs


The Way:

  1. Cut the mutton into medium bite sized pieces. Rinse the pieces thoroughly in water
  2. Marinate the mutton with red chilly powder, salt, ginger garlic paste and lemon. If you have time allow it to marinate in the freezer over night else marinate them for 30-60 minutes
  3. Then pressure cook them until done. I kept on high flame for 2 whistles and low for 2 whistles
  4. In a pan heat oil. Temper the fennel seeds. Add bay leaf, cinnamon and cloves. Saute for about 30 seconds
  5. Then add the sliced onions, shallots and slit green chilly along with little salt and saute
  1. When they become translucent and slightly turn to start brown add ginger- garlic paste. Saute for 3-4 minutes for the raw smell to go off 
  2. Now add red chilly powder, coriander powder, turmeric powder, cumin powder and pepper powder and saute for 2-3 minutes
  3. Then add the chopped tomatoes and saute well. It should turn pulpy and mash completely
  1. Then add the cooked mutton & curry leaves. Cook on low flame until the water evaporates and it becomes completely dry

Serve with Jeera Rice/Peas Pulav/Coconut Milk Rice/Mutton Biriyani or Roti/Porrottas


Notes:


  • Adjust the spice levels according to your taste buds. I have used chilly powder, pepper powder and green chillies here. So adjust the amount of  chilly powder while marinating and also while using the masala
  • Use good juicy tomatoes to balance that sour taste perfectly
  • And allow the mutton to roast till the masala becomes completely dry and completely coated to the mutton
  • Use coconut oil for that authentic taste. It does bring in a lot of difference

Cheers,
Chitz