Pages

Thursday, 22 February 2018

Strawberry Milkshake | Easy Strawberry Milkshake without ice cream


Last recipe was with strawberry and this one too is with strawberry.. Blame it on the season ;) Around a month ago, when my parents came visiting us in Pune, we went on a short trip to Mahabaleshwar and visited the Mapro gardens in Panchgani. There we got strawberries at a cheap rate of 150 rupees per kilo. Actually some were saying that if you visit in the morning the rates are still cheaper and you an get them for an easy 80-100 rupees per kilo.. We were expecting to go pluck the strawberries at the farms but the locals there told that since it was peak season we were not allowed to and that would be allowed during March-April time.. So what did we do? We ate a lot of strawberries and bought a lot more and came back :D Dhruv was ready to eat them all as such but he caught a cold two days later, so we didn't give him much.. And me being a strawberry lover in just shakes and cakes, went ahead and made milkshakes with them using chilled milk ;) 


You can have variants of this simple recipe.. You can sneak in some ice cream - anything of your choice, be it vanilla or strawberry. Don't like milk? Then replace with some Greek yogurt or have a mix of both the yogurt and milk. Add in a nice ripe banana or a couple of dates.. Maybe a handful of chia seeds.. Or a tablespoon of cocoa powder ;) Want to cut low on sugar? Then add honey instead or maybe cane sugar..The options are plenty. You can adjust to your cravings and dietary requirements! 


Makes: 1 tall glass


I Took: 


Preparation Time: 5 minutes


I Used:


Strawberry - 4-5 nos 
Cashew - 5 nos
Almond - 4 nos
Sugar - 2 tsp
Chilled Milk - 1 cup


The Way:

1. In a mixer/blender, crush the cashews and almonds together

2. Once they are coarsely/finely (as you need) crushed, add the strawberries and sugar and give a nice blend

3. Now add the milk and blend smoothly. Serve cold !


Notes:

I normally boil the milk and let them cool down and then refrigerate them and use in my milkshakes and smoothies

Cheers,
Chitz

Wednesday, 21 February 2018

Eggless Whole wheat Strawberry Muffins | Butterless Strawberry Muffins | Strawberry Cupcakes


My family exhibits varied emotions towards strawberry.. The hubby won't touch it, my son loooveeees it and I love it in forms of cakes and shakes and likes but not a great fan to eat it raw. My son loves the sight of it and is always happy to eat them as such. I should say as of now coz his interests change really quick ! Anyways, I had no difficulty in finishing off that box of strawberries thanks to Dhruv but I had been wanting to try this muffins recipe from Aparna's blog for quite some time and so this time I did it.. 


It is made of half all purpose flour and half whole wheat flour and so it is a bit dense. Deeps liked it and gave a thumbs up and that should actually translate to "great" coz he is not a cake lover.. And as for Dhruv he likes muffins so he too loved it.. It's so easy to put up, just mix the dry and wet ingredients separately and fold them together and bake.. Easy right? And if you too do not want to eat strawberries raw but want to try some cake out of it, here is the perfect recipe!!


Recipe Source: My Diverse Kitchen


Preparation Time : 10 minutes

Cooking Time : 30 minutes


Makes : 12 medium sized muffins 


I Used:


Strawberry - 1 cup (chopped) (around 200 gm)
All purpose flour/Maida - 1 cup
Whole wheat flour - ¾ cup
Granulated sugar - ½ cup
Baking powder - 1 ½ tsp
Salt - ½ tsp
Milk - ½ cup
Oil - ¼ cup
Thick yogurt - 2 tbsp
Vanilla essence - 1 tsp


The Way:


1. Take all the dry ingredients - all purpose lour, whole wheat flour, baking powder and salt in a bowl and mix well

2. Add the chopped strawberries to the flour and mix gently. Ensure that the strawberries are coated well with the flour


3. In another bowl take the wet ingredients - milk, oil and vanilla essence and mix well

4. Add the wet mixture to the strawberry-flour mixture and gently mix together in a folding motion about 4 to 5 times

5. Do not over stir. The batter will be lumpy and floury. I had to add 2 to 3 tsp of milk extra to eat up all the flour. But that is fine. With whole wheat flour it will be like that

6. Fill the muffin tray with liners and fill the batter in the liners. This batter will not rise much and hence you can almost fill the liners with batter


7. Bake them at 190 degree C for about 25-30 minutes till done and the top turns golden brown. Then cool for 10 minutes and unmould and serve

Cheers,
Chitz

Tuesday, 20 February 2018

Vazhapindi Upperi | Unnipindi Mezhukkupuratti | Banana Stem Stir Fry | Plantain Stem Stir Fry | Vazhaithandu Poriyal (without coconut)


Is vazhapindi a veggie that you like? I like it the most in sambar.. Ehh, u didn't know that you can add them in sambar? You sure can.. Cut them into round disks and add them in sambar just like you add radish.. Once it is cooked and soaked well in the sambar it justs tastes yum :) I know you will thank me for it once you have made and tasted it ;) I have already posted a kootu recipe from vazhathandu here, so today it's an easy upperi or stir fry from Kerala that can be made ready in a jiffy. It tastes really well with rice and a tangy gravy.. So let's see how it can be done. 


Recipe Source: Mil


Preparation Time : 10 minutes

Cooking Time : 50 minutes


Serves : 4 persons 


I Used:


Banana Stem/Vazathandu/Unnipindi - 1 ½ cup (after chopping)
Coconut Oil - 2 tbsp
Mustard - ½ tsp
Red Rice/Kuthari - 3 tbsp
Re Chilly - 2 nos
Curry Leaves - 2 sprigs
Turmeric powder - ¼ tsp
Salt - As Needed


The Way:


1. Clean the plantain stem/vazhaithandu by removing the outer rings till you reach the hard core central pith. Then slice them into 1/4 inch thick round disks. There will be fibre surrounding the disks, remove and discard them. now chop the round disks into small cubes an keep them immersed in water or preferably buttermilk (so as to retain the colour of the stem) 

2. Now take the chopped stem along with salt, turmeric powder and a 1/4 cup of water in a pressure cooker and cook them for 3-4 whistles in medium flame. If it is a good variety stem it will get cooked well else will take longer. See if it becomes soft and is cooked after 3-4 whistles, if not cook again till done. Alternately you can cook them in a pan also. If then refer step 5

3. Once the stem is cooked, heat the coconut oil in a pan. Splutter mustard


4. Add the red rice and broken red chillies. Saute on low flame for 3-4 minutes till the rice starts popping. Add the curry leaves

5. Finally add the cooked stem along with water if any. Give a nice stir and allow the water to dry. If you are not pressure cooking the stem, add them now with enough water (1/4 -1/2 cup) and allow it to cook covered over medium flame for 15-20 minutes. Cook till it is done and becomes soft and transparent. Also it should become dry


Switch off the flame and serve with red rice (or white) and a tangy gravy like puli kuzhambu or fish gravy!

Cheers,
Chitz

Monday, 19 February 2018

Kerala Style Kanava Roast | Nadan Koonthal Roast | Kerala Style Spicy Squid Roast | Koonthal Ularthiyathu | Calamari Roast


How many of you are fans of this squid or calamari? Most of the hard core non-vegetarians especially from Kerala would love them, especially this Kerala special roast preparation made from it. I'm sorry as some of the vegetarians would find this dish especially the slimy looking fish a bit eerie! There is also a fry preparation made of this which tastes equally yummy :) Even thinking and writing about it evokes so much of childhood memories for me.. Actually during my school days there was a chapter in the Malayalam subject called 'Kadalile Mashikuppi' (meaning the ink bottle in the sea) about this Kanava.. that is what I remember every time I see this fish in the market :) Anyone else remembers that chapter?? So coming to the recipe, this is an easy and yummy preparation which requires only the usual ingredients from the pantry.. And you can make a lip smacking dish that sure will bring you laurels :) 


Preparation Time : 10 minutes

Cooking Time : 50 minutes


Serves : 4 persons 


I Used:


For Marination:

Squid/Kanava/Calamari/Koonthal - ½ kg
Fish Fry masala (optional) - 2 tbsp
Red Chilly powder - 1 tsp
Turmeric powder - ¼ tsp
Pepper powder - ½ tsp
Salt - As Needed
Water - less than a ¼ cup


For Masala:


Coconut Oil
Cumin seeds/Jeerakam
-
-
2-3 tbsp
½ tsp
Shallots/Small Onions - 20 nos (sliced)
Tomato - ½ of a medium sized one (chopped)
Ginger-Garlic paste - 1 tbsp
Red chilly powder - ½ tsp
Coriander powder - ¾ tsp
Pepper powder - ½ tsp
Cumin powder - ¼ tsp
Garam Masala - ½ tsp
Salt - As Needed
Curry leaves - 2 sprigs


The Way:


1. Clean the squid and cut it into rings or strips as per your preference. I got the squid cleaned and cut from the fishmonger, so all I had to do was rinse it well. If you are not as lucky and want to get it cleaned, there are many videos in youtube, click here, which can help you

2. Marinate the squid with salt, turmeric powder, red chilly powder and marinate for 1/2 an hour. I usually buy fish in the evening and so marinate them with the required spices and refrigerate them overnight for next day use. This also I did likewise and added 2 tbsp of shallots-garlic-pepper paste that I usually use for fish fry.

3. Take the marinated squid in a pan and add little water (less than 1/4 cup would be sufficient) and pepper powder. Cook over medium flame and then in low flame or about 15-20 minutes or till the squid is cooked. The squid becomes hard when cooked, so that's the cue. Do not overcook it as it becomes hard when overcooked. Once cooked keep the squid aside along with any water if remaining


4. In a pan, heat coconut oil. Splutter cumin seeds. Add the sliced shallots and slit green chilly and saute

5. Once the shallots become translucent (takes about 5-6 minutes) add the ginger garlic paste and saute till the raw smell goes (for about 3-4 minutes)


6. Then add all the spice powders - red chilly powder, coriander powder, cumin powder, pepper powder and garam masala along with little salt (salt is there in the cooked squid, so add accordingly) and saute well. Leave it for a minute or two in low flame

7. Then add the chopped tomatoes and saute. The tomatoes should turn mushy and blend well with the shallots and spices and the masala should get a deep colour (as per your preference). So saute/cook on low flame till that point

8. Now add the cooked squid and give a nice stir  till the masala is coated well evenly. Leave it for a minute or two for the masala to sink in


9. Now add the curry leaves and give a quick stir and switch off the flame


Serve with moru curry, pappad and a thoran of your choice !

Cheers,
Chitz

Wednesday, 7 February 2018

Instant Gooseberry Pickle | Instant Nellikai Pickle | Amla Pickle | Easy Nellikka Achar


Is Amla something that you would like to eat raw? I don't.. I like it when brined or made into a pickle or maybe a chutney or something.. I think it's coz of it's bitter taste and many would agree with me on that.. But it's a very healthy berry loaded with Vitamin C and antioxidants and many other minerals and vitamins. I don't have to elaborate that it's widely used in Ayurvedic medicines and treatments.. They are also low in calories and fat and cholesterol free. 

I have heard that it doesn't lose it's medicinal properties much even after cooked or pickled.. Not sure if it's true.. But believe me when I say that this recipe is one of the best and can make any gooseberry hate eat some ;) There is jaggery added to balance the bitterness and that gives a lift to this pickle :) We love this pickle and make it whenever I find some gooseberries :) So let's see how to make this lip-smacking pickle!


Preparation Time : 5 minutes

Cooking Time : 30 minutes


Recipe source : Ma


Makes : A 300 gm bottle 


I Used:


Gooseberry/Nellikka - 8 nos (1 cup after de-seeding)
Turmeric powder - ½ tsp
Salt - As Needed
Gingelly Oil - ¼ - ½ cup
Asafoetida - 2 tsp
Red Chilly Powder - 1 tbsp
Jaggery - ½ cup
Lemon jucie/Vinegar - Juice of ½ a big lemon/ 3 tbsp vinegar
Mustard  - 2 tsp
Fenugreek - 2 tsp
Mustard-Fenugreek powder - ½ tbsp


The Way:


1. In a pan dry roast the mustard seeds and fenugreek seeds for 4-5 minutes on low flame. Take care not to burn them. It starts giving a nice aroma and also the mustard will start spluttering. Then off the flame. Allow it to cool and powder them in a clean and dry mixer jar. You can grind this powder in bulk and use it for all of your pickles

2. Boil the gooseberries with salt and turmeric powder for 10-12 minutes or until cooked. Alternately you can pressure cook for 1 whistle

3. Once cooked, remove the seeds. The gooseberry will have natural cut marks on it. Gently use a knife to remove one wedge and then the remaining wedges can be removed gently using hands. Then remove the seeds and keep aside. If you want to make even smaller pieces, then go ahead and chop them


4. Now take a pan and heat the gingelly oil (nallennai). Now reduce the flame. Then add asaoetida, don't go stingy here :) Add it liberally


5. Then add red chilly powder and saute for a minute. Then add the boiled gooseberries

6. Now add the jaggery. I have used powdered organic jaggery. So added it directly. If using normal big roundels of jaggery, then scrape and take the required amount of jaggery in a pan. Add 2 tbsp water and heat it so that it dissolves completely. Allow it to cool and then filter off the impurities. Do not add more water as it can spoil the pickle. Now add the filtered jaggery syrup to the gooseberries


7. Give a nice mix and then bring it to a boil. Now switch off the flame and add the mustard-fenugreek powder and give a gentle nice stir

8. Then add lemon juice or vinegar. Not both, either one and mix gently

9. Store the pickle in a clean, dry, glass container. You should be able to see oil floating on the top of the container else chances of the pickle getting spoilt are very high. Leave in a clean place for a day or two for the flavours to soak in and then refrigerate it


Notes:

  • If you do not like gooseberry bites in your pickle or want to mask it all together, after cooking the berries, mash them into a smooth paste 
  • Add either lemon juice or vinegar. Don't add both. I would suggest to go for lemon juice
  • Store in a clean and dry glass container for longer shelf life
  • Refrigerate if possible after a day of making the pickle for longer life
  • Always use a clean dry spoon to take the pickle from the bottle
  • Allow a layer of oil on top of the container for longer life and it prevents from mold formation on top of the pickle

Cheers,
Chitz

Tuesday, 6 February 2018

Koorka Thoran | Kerala Style Kurka Thoran | Chinese Potato Stir Fry


Many of you might not know this veggie or tuber vegetable 'Koorka'. This is a well know veggie in Kerala and is a winter vegetable. You find it mostly during the months of November, December. The best translation that Google could find me was 'Chinese potatoes'.. Don't ask me why or how, I just don't know :D All I know is that it's a very tasty veggie and is a family favourite and slightly difficult to clean ;) But don't lose heart. It's worth the effort as it tastes really yum :) 

It looks very similar to Arbi (taro root) but not slimy like it.. Since it's small and has different small twists and turns like ginger and hence cleaning or scraping it's skin is a little tedious. You can make a thoran (stir fry with coconut) or a upperi/mezhukkupuratti (stir fry without coconut). Both tastes awesome but we are slightly partial to thoran.. I will post both recipes here.. And today I'm posting the thoran, and you guessed it right :D


Preparation Time : 25 minutes

Cooking Time : 25 minutes


Recipe source : Ma


Serves : 4 persons


I Used:


Koorka - 250 gm (around 2 cups after slicing)
Coconut Oil - 3 tbsp
Mustard  - 1 tsp
Curry leaves - 2 sprig
Grated Coconut - ¼ cup
Shallots/Small Onions - 10 nos
Red Chilly - 2 nos
Garlic - 5 nos 


The Way:


1. Soak the koorka/chinese potato in water for half an hour to one hour. Then scrape the skin off it using a knife. Alternately you can pressure cook the koorka for 1 whistle and then peel the skin off like you do for a potato. Or there is a third method that is predominantly followed in many Kerala families, you take the koorka in a jute or sack or a gunny bag and hit the bag gently on the floor repeatedly. After a while you can see that the koorka skin comes off easily

2. Once the skin is removed completely, rinse them again in water. Then chop them or slice them, as you prefer, to bite sized pieces


3. Take the sliced koorka in a kadai or pan. Add salt and turmeric powder along with 1/4 - 1/2 cup of water and cook them till done. It takes about 10-12 minutes. You can touch and see to see if it's cooked. You should get a similar feel like that of cooked potato. Once done, drain off the excess water and keep the koorka aside. If you had pressure cooked the koorka in the first step then omit this step

4. While the koorka is cooking, take grated coconut, shallots, red chilly and garlic in a mixer jar and give a coarse blend. 3-4 pulses is sufficient. Do not grind to a smooth paste


5. Now take coconut oil in a kadai/pan. Splutter mustard. Then add curry leaves

6. Then add the coarsely ground coconut - shallot paste. Saute for 3-4 minutes till it's cooked and the raw smell of the garlic and shallots goes off

7. Now add the cooked koorka and give a gentle stir. Allow it to simmer for another 3-4 minutes till it's mixed well. Then remove from fire and serve


Serve with red rice, moru curry and pappad!


Notes:

  • There are a few ways in which you can clean koorka like
    • Soak the koorka/chinese potato in water for half an hour to one hour. Then scrape the skin off it using a knife. 
    • Pressure cook the koorka for 1 whistle and then peel the skin off like you do for a potato
    • This method is predominantly followed in many Kerala families, you take the koorka in a jute or sack or a gunny bag and hit the bag gently on the floor repeatedly. After a while you can see that the koorka skin comes off easily
  • Always if possible, parboil the koorka, drain off the excess water and use it. Pressure cooking the koorka reduces it's taste. It tastes much better while cooked normally 
  • I have used lesser quantity of garlic here as my family prefers it that way. If you like the flavour more then you can add more
Cheers,
Chitz

Friday, 2 February 2018

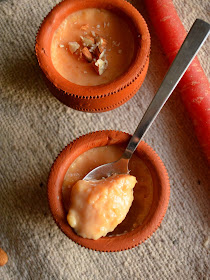
Carrot Custard | Carrot Custard Pudding | Carrot Custard Kheer


This recipe screams childhood memories in my head.. I was very much averse to sweets till my little one was born. There were very few sweets or sweet dishes that I liked. If I remember correctly all that I liked was my amma's gulab jamun and this carrot custard and my ammooma's (grand ma's) occasional pineapple kesari and athirasam.. That too once in a blue moon and not regularly. This carrot custard was my fav.. And actually there is a funny story to this custard.. 

Once during my exam days (I think during 7th grade) my mom made Carrot Pongal (will try to post this recipe too soon) and Carrot Custard for lunch. That day I had my exam in the afternoon. I had a hearty meal and went to the exam and passed with flying colours. In fact I was the school topper (all divisions of that grade put together) that time. Somehow it stuck in my mind that it was the good omen of this carrot custard (good faith you see ;)) and used to bug my mom to make it at least once during each exam. Now that i think about it, I feel so embarrassed and funny. But my mom used to oblige :D , she's a gem you know... So I make it once in a while now to reminisce those days and again in the good faith that I can sneak some milk into my little one's diet.. But no, he doesn't seem to enjoy this as I do.. But that doesn't stop me from making them you know.. So for all those sweet lovers out there and for those who want to try a different kinda dessert, here comes the recipe.


Preparation Time : 5 minutes

Cooking Time : 20 minutes


Recipe source : Ma's Ole Cookbook


Serves : 6-8 servings


I Used:


Boiled Carrot paste - 100 gm (about 2 big long carrots)
Milk - 500 ml
Sugar - 4 tbsp
Custard powder - 3 tbsp
Cream - 1 tbsp


The Way:


1. Peel the skin of the carrot. Rinse it well and chop them into small pieces. Now pressure cook them for 2-3 whistles or till cooked


2. Allow them to cool. Then take the boiled carrots in a mixer jar and grind them to a smooth paste and keep aside

3. Mix the custard powder in a little milk (about a tbsp) and make a smooth paste

4. Boil the milk with sugar


5. Add the carrot paste and stir nicely. Allow it to cook well for about 5-6 minutes. Keep stirring in between so that it doesn't get burnt


6. Add the prepared custard to the carrot-milk mixture and boil for 2 minutes stirring continuously. Else lumps will be formed

7. Now add the cream and mix well. Switch off the flame

8. Remove from fire and allow it to cool. Then refrigerate it or an hour or more and then serve chilled and garnished with nuts of your choice


Notes:


  • Instead of pressure cooking the carrots, you can grate them and saute in ghee and then add boiled milk and sugar to it and then continue from step 5. In that case cook a little longer for the carrots to get cooked well. This will be more of a kheer kind than pudding
  • I made these with the Delhi carrots as I get them more than the normal carrots nowadays but I like it better with normal carrots
  • If the carrots are not very sweet, then add little more sugar to balance the taste
  • If the pith of the carrots are that green or light yellow in colour, it can ruin the tatse of this dessert. So either discard them or make this pudding with nice sweet carrots

Cheers,
Chitz